


NORTH SAILS BLOG
Todo
Events
Guides
News
People
Podcast
Sustainability
Tech & Innovation
Travel & Adventure

guides
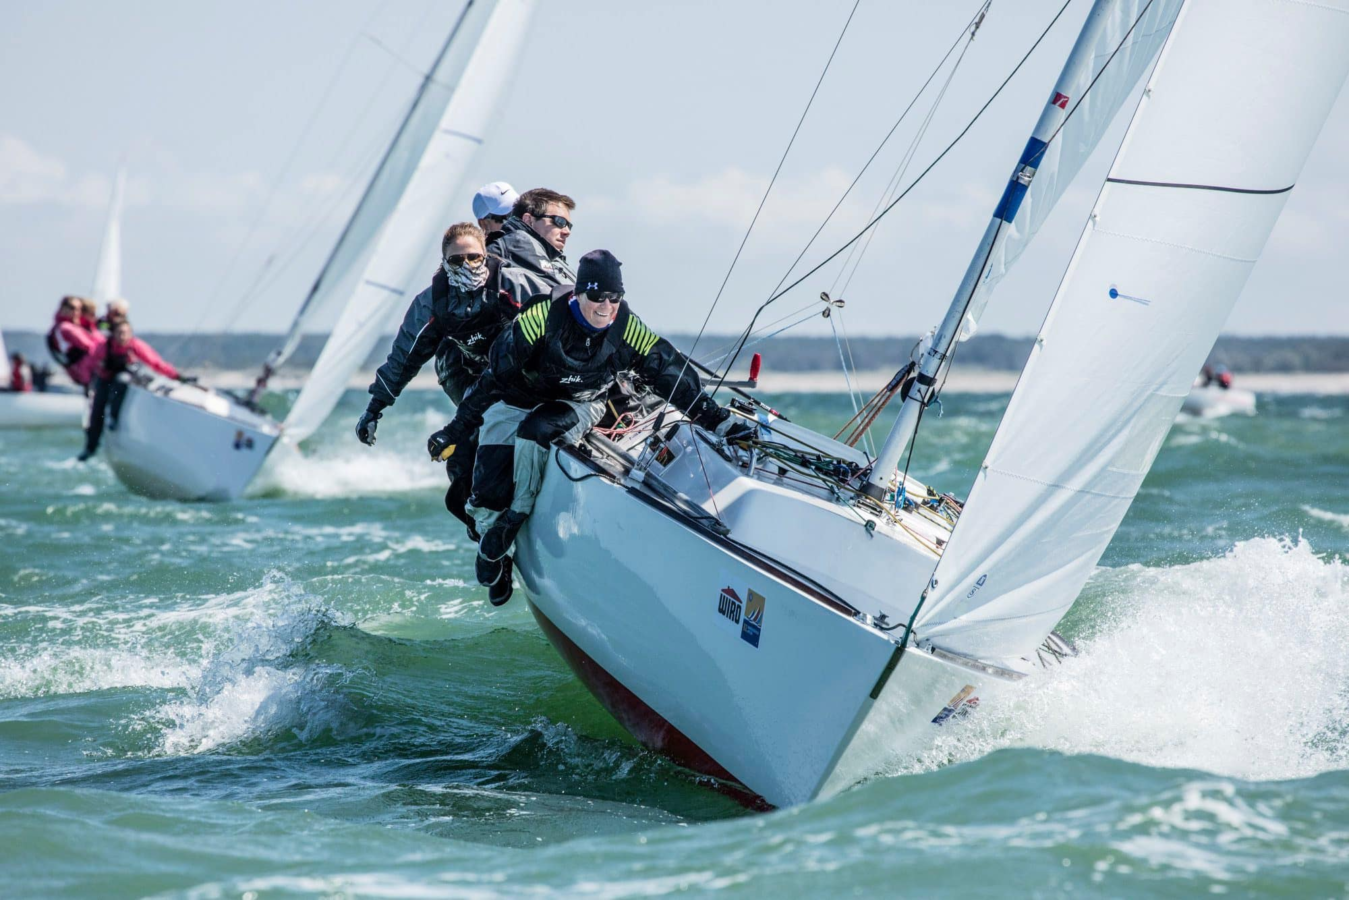
MELGES 24 WORLDS LOCAL KNOWLEDGE
MELGES 24 WORLDS LOCAL KNOWLEDGE
What To Expect In Villasimius
North Sails Expert Giulio Desiderato provides his intel on what competitors should expect at the upcoming Melges 24 World Championship.
It is hard to say exactly what we expect to see at the Worlds. The pre worlds event was my third event in Villasimius this year, and each time I’ve sailed here we’ve had different conditions – a strong Mistral, strong northeasterly with flat water, light sea breeze, big waves, and even one time with wind from the south. Each day at the pre worlds the wind was out of a different direction, so it will be very interesting and we should expect a variety of sailing conditions.
Because Villasimius is not a very common place to hold regattas, there isn’t really any local knowledge as not a lot of people of sailed here very often. This means it will be an open playing field when it comes time for the championship. It could be anyone’s game, which will be exciting.
I’ve sailed here in the tactician role and as main trimmer, and now most recently I’ve coached. What I’ve observed over those experiences on the boat and from the sidelines is that if the wind comes from the North, it will be really important to keep an eye on it and try to figure out which side the newest pressure will fill in.
During this time of year in Sardinia, the wind can be anything. The sea breeze is still common, but because of where Villasimius lies geographically, it is close to a cape and exposed to storms and wind lines that can be frontal and come up quickly.
Tips For Clients:
Manage your risks and get a good start. It will be important to manage your risks with the large fleet. Avoid big mistakes during the starts, and focus on finding a good place to get a clear lane off the line. Ideally, if you can start and sail for three minutes straight before having to make any moves, this will be key.
Keep an eye on pressure. Try to figure out where it’s coming from most often. They may drop the windward mark in an area where the pressure is filling in, which may put you on one particular side of the race track.
Tuning. Don’t be afraid to adjust your rig. If you try different settings, you can find what works best with the conditions at the time- which are going to be changing a lot at this location. It could be beneficial to set up for a certain condition knowing you’ll see it at the top-end of the course.
Sailing with 3Di? With 3Di, you won’t have to play with your tuning settings as much as teams using paneled sails will. We always use the same numbers. Our jib track setting also remains the same. The benefit is that there is not much play required. It is very user friendly.
Recommended Sail Inventory
For the championship, I recommend the following inventory: Mi1 mainsail, Ji-2 Jib, P-1 and P-3 Spinnaker.
Have questions about sails? Interested in upgrading your Melges 24 inventory to Championship-winning sail power? Contact your local expert today.
READ MORE
READ MORE

guides
J/24 WORLDS LOCAL KNOWLEDGE
J/24 WORLDS LOCAL KNOWLEDGE
Get To Know Biscayne Bay
To help you prepare for the 2019 J/24 Worlds, we asked the local Star and Snipe World Champion Augie Diaz to explain about his home waters of Biscayne Bay in Miami, FL.
Biscayne Bay is I think pretty straightforward. The weather is driven by cold fronts approaching, and we don’t get as much breeze as we used to because the city’s grown so big. But generally, any breeze from the northeast around through the southwest is great sailing. From this direction, the breeze is usually under fifteen knots, with relatively flat water (chop but no swell). Spring and fall are the best seasons, because we don’t get many fronts.
Dominant wind direction: easterlies
The old rule of thumb is still the case: if the wind’s to the left of the south end of Key Biscayne, you go left. Near the Key, from 120-160 degrees, there is a little more pressure closer to the end of the Key, and also a geographical shift off the land. How favored is somewhat current-dependent; from 70 degrees to 160 degrees with an outgoing current, then left is really good, what we call the “Old Man Expressway”. At the top of the beat on the J/24 Worlds course, the Old Man Expressway could be important.
On what I call the Cuba Course, where the Etchells sail, way down south of Matheson Hammock, there’s less left down there than there is closer to the point of Key Biscayne. So you have to keep in mind where you are on the Bay.
Current
Understanding the current is very important. People think the current comes in and out of the Bay from the east, but it actually runs in and out from Bear Cut. If you get close to what we call the Valves, which are the channels through the shallow areas that on the chart are labeled Biscayne Flats, there is a component of current going in and out of there. But you have to be very close to the Valves for that to be the net effect. Otherwise, the current basically ebbs from the southwest to the northeast, and goes the opposite way when it floods.
As for the timing relative to high and low tide, I’ve seen it as much as an hour off, so I just use tide change as a gauge and then keep checking the buoys, all the time. Sometimes seaweed will show lines of current, but I’ve never really seen a change in the color of the water.
Other wind directions
Once the wind gets to about 170-180, it’s pretty important to protect the right. That’s true all the way to 220 degrees. Anything right of 220-230, it’s going to march quickly to the northwest because that’s a frontal-driven direction, which doesn’t doesn’t have the ability to stick.
If the wind’s right of 230 degrees, I like coming in from the top left because you get some really nice puffs off the left shore. It depends where you are on the Bay; on the J/24 course, close to the west shoreline, you’ll definitely want to come in from the top left.
Northwesters are like you’re on a lake: very shifty, very up and down. But in late October, it’s actually less frontal, so that’s less likely.
Secret to success
Focus on what the current’s doing, and in the easterly understand how important it is to go left.
Thanks Augie!
READ MORE
READ MORE
guides
HOW TO BUILD YOUR MOTH SKILLS
HOW TO BUILD YOUR MOTH SKILLS
Dan Neri Explains How To Get Started Sailing this Foiler
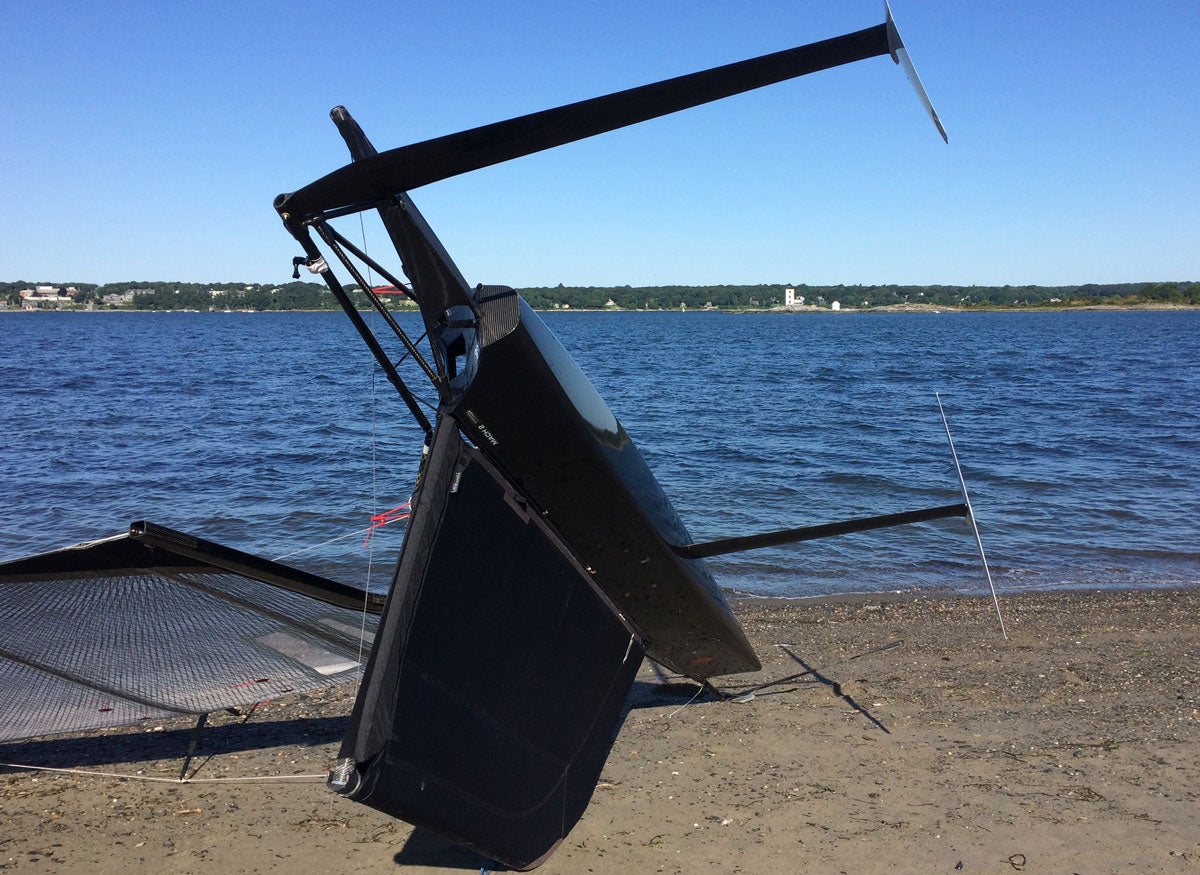
Compared to most dinghies, building the basic skill set for the Moth takes a long time. After about 40 hours of sailing the Moth, I can foil with confidence in all directions in the limited window of 8-14 knots of wind. I feel like I am close to executing a foiling jibe but have not connected two of them yet, and every tack is still an adventure with a surprise ending.
The experienced Moth sailors tell me that I am on a typical timeline. I was told that my decades of Laser sailing would help, but I don’t recognize a lot of cross over to the Laser. A skiff sailor will get there more quickly. Younger sailors probably learn faster than older sailors, but older sailors can afford to replace the broken parts! It all evens out.
Here are some lessons I have learned in my first nine months of Moth ownership that might help a fellow beginner.
First Assembly: Study the boat manufacturer’s assembly guide. Then get an experienced Moth sailor to help you. Plan on two full days. Take your time and you will break less parts.
Rigging: Watch the Nathan Outteridge tutorials. Then get a Moth sailor to help you the first time.
(And make sure to read How to Rig a Moth in 20 Steps)
Launching: Watch the Nathan Outteridge tutorials. Rig up in your yard and practice carrying the boat around in an area with no obstacles. You will find a balance point with the boom and mainsheet on your shoulder and the mast tip and wing bar both off the ground.
Flight setup: Get a Moth sailor to help you set the ride height control (see Flight Controls below). Pull the wand all the way up. Put the gearing in the middle. Then forget about the flight controls, and pretend it is a regular dinghy.
Balancing the Moth at low speed: Look for a day with 8-10 knots of steady breeze. Practice low riding while focusing on keeping the wings out of the water. Learn to tack at low speed. Hint: you can not scull with a Moth rudder. Try to not get stuck out on your Moth in less than six knots of wind. The Mach II is happier in reverse than in forward in very light wind.
Foiling: Watch the Nathan Outteridge tutorials. Look for a 10-12 knot day. Less than 10 knots makes taking off tricky. More than 12 knots feels like a hair-on-fire experience until you get some confidence.
Plan to sail for one hour with equal time spent swimming and foiling. Sail back and forth on a beam reach and enjoy the ride. Upwind and downwind can wait for another day; the first sensations of liftoff and controlled flight are the foundation that will keep you working up the steep and frustrating learning curve.
Turning downwind: This might be easier for sailors with skiff or catamaran backgrounds than it was for a lifetime Laser sailor, but the upwind-to-downwind transition is where I’ve had my most violent crashes. It is mostly a matter of starting with windward heel and then committing to the maneuver. The more breeze there is, the more aggressively you need to move through the transition zone. Waves make it more exciting. If you don’t go home with a few bruises, you probably did not progress. Get comfortable making the turn up and down in 10-12 knots before you try it in 14-16.
Foil Jibing: Watch the Nathan Outteridge tutorials. Then plan to crash a lot.
The maneuver has a few distinct steps; get moving at maximum speed with a slight windward heel, set your back foot on the hull and tuck your front foot, swing the tiller extension to the new wing bar, and lunge across and under the boom. Let the boat carve through the turn while getting your butt fully onto the new wing bar, then switch hands. While doing that make subtle steering adjustments, pushing the tiller slightly toward whichever wing bar is higher, to keep the boat under the rig. Simple.
Sail Trim: The Moth is extremely sensitive to sail trim, but for me, there was so much other stuff to deal with (balancing the boat in particular) that I took a set-it-and-forget-it approach at first. That was a mistake. Sail trim makes a huge difference in lighter wind by generating take-off speed (with a powered-up sail) and then by reducing drag and heeling moment once you are foiling (a flatter sail than you’d think). Again, the learning curve is steeper than other boats. To make sail trim adjustments, you have to learn to grab the right control lines (vang and cunningham) without looking down to find them, and then you have to pull two feet of line without upsetting the boat, while steering with the mainsheet in your tiller hand. Easier said than done.
Flight Controls
There are four controls that dictate lift-off and ride height.
1.) Ride height adjustment: It’s critical to set the ride height adjustment barrel in the correct position. The ride height mechanism connects the wand to the main foil flap. The ride height range is set while still on land but after the boat is fully rigged, on its side. Once the range is set correctly, you can dial in a little more or less lift with the control line while sailing.
The ride height adjustment controls the position of the main horizontal foil flap. If the linkage is set with the rod too long (barrel screw opened up), the flap will be pulled up (no lift) and the boat will not take off. The opposite adjustment (barrel screw closed down) creates too much lift (a big gap between flap and vertical foil indicates the flap is pushed down, making a lot of camber) which will cause the boat to lift off and keep rising until the horizontal foil catches air (and you crash).
The long black barrel is a telescoping screw that changes the length of the wand connecting rod. The barrel is turned by the control lines wrapped around it that lead out to the starboard and port wing bars. The aft end is connected to the curved arm (between my hands in this picture). The curved arm connects to a vertical rod that is in turn connected to the flap on the main horizontal foil. The “gearing” adjustment moves the ride height barrel up or down on the curved arm. A lower position results in more direct response between the wand and flap, while a high position dampens the action. Got it?
Experienced Moth sailors set the ride height by eye and it is a bit of a black art. If there are no expert Moth sailors available, adjust the barrel so that the flap and forward part of the foil form a fair curve when the wand is angled back about 45 degrees. Another gauge on the Mach 2 is to measure the gap between the flap and the vertical foil, which should be about 7mm with the wand all the way forward.
This shows the camber amount needed when you are up on the foils with just enough lift to keep you flying, with the wand hanging straight down and ticking the water.
Set up your ride height control line so that this neutral lift position is at the middle of the range of adjustment. If the breeze is very light, dial in more lift. If the breeze comes up, dial out some lift. As a newbie, it is easy to second-guess the ride height adjustment when in fact your technique is the problem, or to assume your technique is bad when in fact the ride height is way off. Get some help, so you can have confidence in this setting and focus on sailing.
2.) Gearing: Gearing comes into play once the boat is flying. Anthony Kotoun explains the function of the gearing control as “how much information do you want the wand to deliver to the flap.” If you find your boat is bouncing when passing over small surface waves, you have too much gearing (the flap is moving too much). If your boat is too floaty and slow to respond, the flap is not moving enough and you need to pull the gearing control down. Setting it in the middle is a pretty safe bet.
On my boat, the gearing control is the red line. If you follow it forward (towards the lower left of the photo) it connects to the black slider that is pushing down on the ride height adjusting barrel, along the curved arm. Most boats have the gearing led to both wing bars for adjustment on the fly. For now I leave it in the middle, so I have less lines to get tangled in!
The blue control line adjusts the shock cord that pulls the wand forward. In very light air, you want very little tension on the shock cord; as the breeze comes on, you want a little more. Worn shock cord makes the boat hard to control in windy conditions.
3.) Rudder angle: The rudder pin (the long pin that goes through both the upper and lower gudgeons) slides forward or aft in the rudder head, which changes the pitch, or angle of attack, of the foil at the bottom of the rudder. Changing the pin position and foil pitch controls the fore and aft flight trim. With the pin forward the rudder head moves aft, which in turn tips the foil up and creates more lift. More lift results in easier take off and more bow-down fore and aft trim. Moving the pin aft causes the rudder foil to sink and makes the boat fly with the bow higher than the stern. The pin position is adjusted by a big plastic screw inside the tiller, which is adjusted by twisting the tiller extension.
4.) Wand Length: The wand is telescoping with the length adjusted by a continuous-loop control line led to both wings. Shorten the wand for a lower fly height (better control but more drag and lower speed) and lengthen the wand to fly higher with greater righting moment and less drag (higher speed).
Left: shorter wand, lower fly height (better control, but more drag and lower speed). Right: long wand = higher ride height.
That probably seems like an awful lot to learn. It is, but it is also much easier to understand once you get your boat rigged up and laying on its side at the water’s edge. Pre-launch set up and check over is the only part of the Moth sailing game that you can learn while comfortably on land, without fear of crashing.
READ MORE
READ MORE
guides
HOW TO RIG A FOILING MOTH
HOW TO RIG A FOILING MOTH IN 20 STEPS
Dan Neri Gets Ready to Sail this Singlehanded Foiler
When I first set up my Moth, I broke a lot of stuff. Since then I’ve learned what to do (and what not to do) and in what order. First, bring everything to the beach. Set the foils off to the side, safely out of the way of the boat and any spectators.
Rig sail and spreaders
1. Slide the mast into the sail, keeping the mast above all the camber inducers. It is easy to get the mast past the lower cams. You’ll have to shove it past the top two one at a time.
2. I keep a string with a couple of spliced loops in my pocket to use as a temporary cunningham. I pull it just enough so the spreader bracket is positioned in its sleeve cutout. After stepping the mast this string is replaced by the regular cunningham.
3. Push the cams onto the mast and zip up the sleeve, starting at the top (when you derig, take them off starting at the bottom). To load the cams, put the mast on your knee, push down on the batten (against your knee) with one hand and push up on the cam with the other hand.
4. Before you lay down the sail and walk away, make sure the battens are pushed down so the sail doesn’t fly down the beach.
5. With the sail laying across the wing bars, untangle the stays, install the spreaders, and then attach the forestay and side shrouds to the mast.
Step the mast
Note: My boat has an adjustable headstay, so I can step the mast with the headstay adjustment at its loosest setting. If you have a fixed headstay, you’ll need to use a longer temporary headstay.
6. Position the boat so that it is pointing about 10 degrees away from head-to-wind. Hook up the shroud on the windward side and the long headstay. Pick up the mast between the two attached shrouds with the masthead into the wind, put the mast butt into the step, and push the mast up into place.
7. The wind will do most of the heavy lifting and the mast will fall to leeward, toward the loose side shroud. Hook up the leeward shroud, but leave the headstay long until after you attach the clew to the outhaul.
8. Attach the boom to the gooseneck and then hook up the cunningham and pull it tight. The tight cunningham will help to bend the mast and make it easier to hook up the outhaul.
9. Attaching outhaul to clew requires three hands; two hands to pull the sail and boom together against the boom vang, and a third to install the clevis pin. I have learned a little trick; I set the boom in the crook of my elbow and simultaneously pull down on the leech with that same hand, until the clew grommet lines up with the outhaul car. Then I install the pin with my other hand. Don’t forget to tension the headstay.
Install blades
10. If you’re rigging on a beach, remember to put a flat rock or a towel or anything other than sand under the tip of the bowsprit and the wand axle bolt. Then capsize the boat so you can install the blades.
11. Make sure the sail battens are popped down so the sail does not lift the boat. Tighten the mainsheet so the wind is pushing the sail towards the ground.
12. Assemble tiller/rudder and install on transom. Remember to put the tiller under the shock cord.
13. Take away the dolly and insert the main foil into the slot. Insert the daggerboard retaining pin. (You may need a hammer to tap it in if you are having trouble lining it up perfectly.)
Final adjustments
14. Hook up the ride height adjuster and gearing (on the floor just aft of the mast).
15. Pull the gearing to the middle of the range.
16. Attach the ride height uphaul/gearing cap.
17. Pull a little tension onto the wand shockcord.
18. Use a stiff ruler to check the foil flap gap with the ride height adjustment barrel control line in the middle of its range. For the Mach II, with the wand all the way forward, a 7mm gap is a good starting point.
19. Install a GoPro on the tiller so you can compare yourself (unfavorably) to the Nathan Outteridge tutorial videos.
20. Go find your hat if you are bald, and your cheapest sunglasses. Take off the foil covers. Ready to go sailing!
Read Moth Newbie: Dan Neri Learns to Foil
READ MORE
READ MORE
guides
THE BASICS OF SAILING THE IC37
THE BASICS OF SAILING THE IC37
2019 Rolex New York Yacht Club Invitational Cup
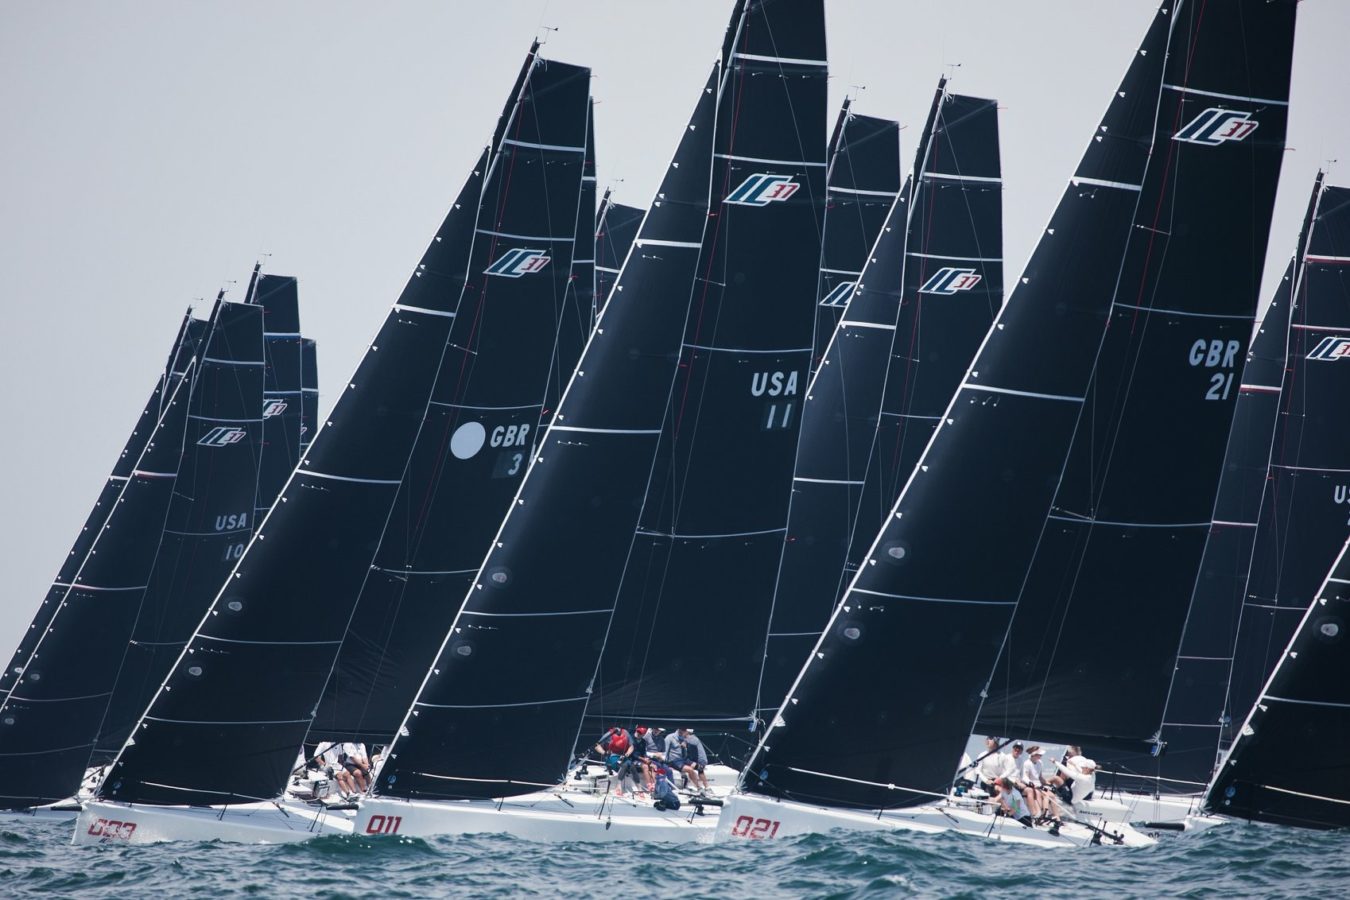
With more than 30 boats sold, the IC37 is officially the next big thing in one-design keelboat racing. This Mark Mills design is purpose-built for close racing in large fleets. Strict class rules that mandate mixed-gender, amateur crews and limit teams to one set of three one-design sails per year are intended to level the playing field and create a competitive environment where the team with the most talent and dedication and teamwork wins, rather than the one with the largest bank account. The first few years of a new class are always a time of tremendous learning and the IC37 class is no different. The winning techniques are evolving regatta by regatta. Here is a overview of the boat and the core maneuvers required to get around the racetrack.
READ MORE
READ MORE

guides
MELGES IC37: REEFING MADE EASY
MELGES IC37: REEFING MADE EASY
Step By Step With North Sails Ken Read
📸 Melges Performance Sailboats / Sarah Wilkinson for Beigel Sailing Media
With just three sails for all conditions, the ability to reef both the main and jib of the IC37 is crucial to sailing the boat in heavier air. The best way to properly de-power your boat is to reef your sails, and North Sails has done everything possible to make this an easy adjustment. Class rules state that in 18-20 knots, the Race Committee can display code flags which mean you need to reef your sails before the starting sequence.
From the time they hoist the “V” flag (which means reef your mainsail) or the “J” flag (which means reef your jib), you’ve got 10 minutes to reef before the start of the sequence. North Sails President Ken Read explains the process for reefing your sails on the IC37 in this latest how-to video. Learn how to do it and be comfortable setting it up so when the time comes, there is no question when you are out on the racecourse.
See also: North Sails Tuning Guide for the IC37
Learn more about the North Sails products for the IC37 by Melges.
READ MORE
READ MORE

guides
INTERNATIONAL MOTH SPEED GUIDE
Moth Dinghy expert Rob Greenhalgh introduces this extraordinary singlehanded foiling dinghy and describes the keys to sailing one fast.
Who sails the foiling Moth Dinghy?
The Moth class is for everyone—it’s so exciting, you don’t need to race it. Club sailors can get a huge buzz out of foiling, going fast around the bay, and learning to foil jibe and tack. They might enjoy it so much they never need to join a race. At the other end of the spectrum, there are sailors who have been in Moth Class for a decade or more and love the challenge of racing this exciting, complex craft.
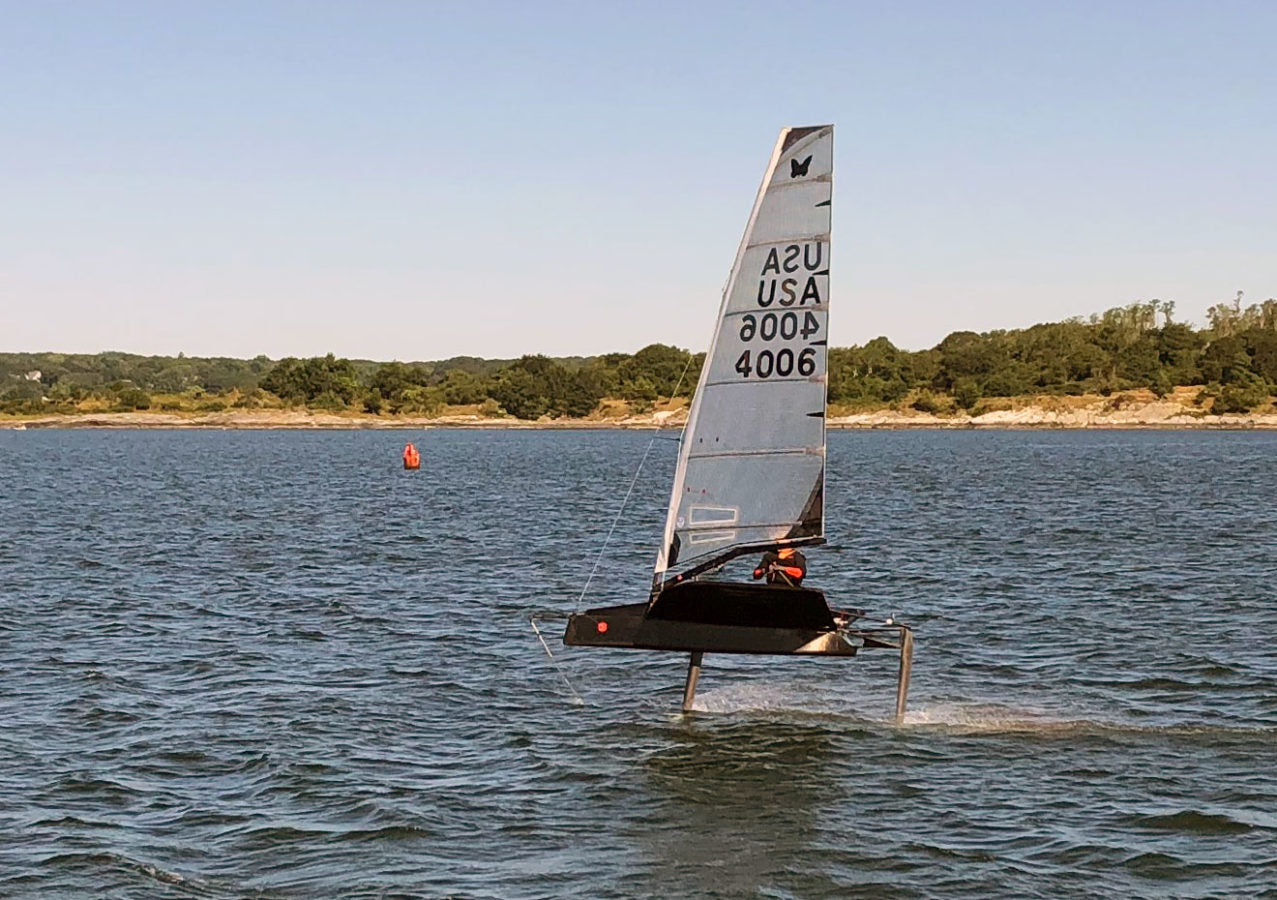
Viewed from stern or bow, the foiling moth is a high-speed machine, clearly unlike other sailboats.
What kind of sailors enjoy this challenge?
Moths are development boats, not a strict one-design class, and that’s daunting for some. The technical and evolutionary side of Moth sailing requires a good understanding of how everything works—how the foils interact with the rig setup and how to balance both aspects. Over the last five years, there have been massive speed advancements, which will continue. To be at the top of the game, you have to enjoy the technical side. But you can buy equipment off the shelf and, if you practice and sail well, soon be up to pace. Though more technically oriented sailors often gain an edge for a while, there are also lots of people who will make changes that don’t help them, so it evens out.
How physical is the sailing?
When you are first getting into it, Moth sailing seems physically hard, but once you’ve done it a while, it’s not too bad. On a windy day with a lot of capsizing, it gets pretty tiring. But it’s a light boat, and the loads are not high. Anyone can do it if you can move quickly at times. There are plenty of Moth sailors in their 60s.
New boats or used, which are better?
My advice for the first-time or second-time buyer is to look for a good second-hand boat that you know will fly. This saves you a lot of effort, because even experienced Moth sailors need a few months to work up a new boat. Sure, it’s always a worry that you might not be getting good enough kit with a used boat, but in my experience, any modern Moth can be made fast. If you want to buy new, a standard boat from either of the two main builders—Exocet by Maguire Boats, or Mach 2 by MacDougall McConaghy—will quick enough for top 5. You can also have a look at the new Bieker Moth by LSF Composites.
The Moth is a development class. What’s happening lately?
At the top end of the class, mast lengths are getting shorter to lower the rig’s center of effort and improve performance. A shorter luff length results in a longer boom length. Rigs have progressively become lower over the last five years, and mast lengths have reduced from 5270mm or 5300mm to the current standard of 5100mm.
The Vi-8 DS 3Di (on top) and Vi-8 LA 3DI feature the same sail area. The LA has more power in lighter winds to foil more quickly; the DS has less drag at high speeds.
What sails do you recommend?
North offers four different sails that meet the Moth sail-area limit of 8.25 square meters. (For more detail, read Four New 3Di Sails for Moth Sailors.) The choice of sails relates to your weight, expected wind speed, and another ongoing development in the class—deck-sweeping sails. Because of the class sail-area limitation, in 14 knots of wind we are always trying to shed horsepower and reduce aero-drag. The deck-sweeper sail is better at that, cleaning up areas of drag around the front of the mast, the boom, and the deck area.
North’s Vi-8 DS 3Di sail is a decksweeper-style sail that reduces aerodrag. If you weigh less than 75kg, you can use the deck-sweeper the whole time. If you’re heavier, like me, in breeze less than 10 knots you’ll need the all-purpose sail’s extra horsepower to get up and foil. The deck-sweeper sail has less horsepower because its center of effort is lower and its shape is not quite as good in those low areas around the mast, boom and deck.
8LA-3Di provides extra power to get on foil.
Which sails do you use?
I use the North Vi 8LA 3Di and Vi-8 DS 3Di, as both fit my mast length of 5100mm. They can be used on both the Mach2 and Exocet.
The decksweeper (Vi-8 DS 3Di) creates an endplate and lowers aero-drag. It is slightly faster once foiling.
How does foil choice affect sail choice?
Moths have two foils, a larger foil for lighter winds and a smaller foil for stronger, and that’s a choice you have to make on the beach. In my case, if I expect to be on my foils all day, I’ll choose the smaller foil and the deck-sweeper sail. If the winds are lighter or less reliable, I will often choose the big foil and the LA sail. And if I expect light air to start but a building breeze all day, I’ll likely choose the big foil with the deck-sweeper sail.
Tuning the Moth Dinghy
What are the keys to tuning a Moth?
Generally speaking, you should set up your boat to carry as much rake as possible. How much is that? You’ll know it’s too much if you can’t get under the boom in tacks and jibes. This is not something you do underway, and if the boom is making boat handling more difficult, make the rig more upright until that smooths out.
What other key adjustments do you make before launching a Moth?
Batten tension is one. For Batten 1 (the top batten) down to Batten 5, just take the creases out of the batten pockets—don’t over-tighten them. For Batten 6, remove the crease and then add two more turns by twisting the batten key two full revolutions in a clockwise direction. For Batten 7, take the creases out and add three turns. The outhaul is also non-adjustable underway. Rig the boat ashore with the outhaul loose. Pull on max vang and max cunningham, and then pull the outhaul tight. This will give you a good all round setting.
What other settings can you recommend?
Here some of the numbers from my boat, but don’t worry if your measurements are different. Comparing measurements boat to boat may not matter at all. The important thing is to start recording them and experimenting.
Front Prodder 340 (adjustable +/-50mm)
Side Arm 410mm
Deflection 220mm
Shroud Base 1500mm
Mast Length 5100mm (excluding plastic plugs top and bottom)
Back of mast to clew ring 2340mm
From mast length to shroud base, it's important to record all of your boat and rig measurements. You will change them over time.
How do you set up your foils, actuator wand, and gearing?
This could be the subject for an entire article, but here is an introduction. A Moth has main foils on the daggerboard and a wand in the bow that automatically adjusts the angle of the foils as you fly higher and lower. The rate at which your foils respond depends on how you set the gearing in the bow between your wand and the foils, and this is something you’ll adjust depending on your expectations for wind speed and wave conditions—the rougher it is, the more sensitive you want your gearing to be.
Sailing in rougher water requires faster gearing between your actuator and main foils. Foil gearing is a critical control for waves; make sure it can be adjusted for rough waters. To get through waves you need faster gearing. You’ll also change foil size depending on the wind forecast. I have two sets of main foils and use the smaller one on windier days. However, if the wind is light for the first race and predicted to build, I’ll go with the larger foil because the speed penalty of not being able to fly with other boats can trumps all other considerations.
Upwind Moth Sailing
What is most important when sailing upwind?
On any point of sail, the vang and cunningham are powerful controls, and need constant adjustment for different conditions. The goal is to generate power for low-riding and to get up on the foils, and then flatten the sail as the wind builds. One of the challenges of the Moth is it has a maximum 8.25 square meters of sail area, and upwind in most conditions, that’s more sail than you need. Downwind, you have the opposite problem; your speed reduces the apparent wind so much, you’re always starved for power.
What is low-riding mode and how do you sail fast in light winds?
In general you don’t race in winds when you can’t foil, but it may happen that the wind lightens up substantially during a race. Sailing in low-riding mode is an art in itself, something like balancing in a canoe because the hull is so narrow. I always recommend practicing sailing that way.
What does it take to fly a Moth?
To get on the foil, you’ll need a little windward heel to start. If you have marginal flying conditions, shift your weight just slightly farther aft to get more angle on the main foil. Your goal is to get to critical speed to get lift on the foil. Your rig can create vertical lift, so try to tip it over on top of you, but not too far. It’s a bit of a fine line.
Heel the Moth to windward to keep the boat more stable and reduce leeway.
Why do you tip the Moth to windward when flying?
We sail with the rig always tipped to windward because it keeps the boat more stable and reduces leeway on the main foil. Use very subtle steering and trimming of the main.
How do you trim the Moth sailing upwind?
Correct trim is the absolute key to good boatspeed. It’s very easy to over-sheet and stall the front of the mainsail. Always have the inside tell tales lifting. A common mistake is sailing under-powered and over-trimmed. As the wind increases, flatten the main by tightening vang and cunningham to accommodate the higher apparent wind speeds.
How do you adjust sail trim for gusty winds?
You need your rig set-up to be user friendly. That means having enough vang and cunningham to straighten the sail. If twisted, the center of effort can move up and down the sail. It takes a certain level of confidence to get to the point where you can let go of the mainsheet to tighten the kicker and cunningham.
Downwind Moth Sailing
What is the key to good Moth speed downwind?
Downwind we need a massive gear change as apparent wind speed reduces when you round the weather mark. Upwind, at speeds of 15 to 20 knots, you’ll be sailing in very high apparent wind speeds and fully depowering. Downwind, apparent wind speed is much lower. After bearing away, let the cunningham off completely, over-ease the vang and then ease the cunningham again. The over-eased vang really allows the cunningham to ease up the mast. I then bring some vang back on too avoid too much twist. People sometimes sail too twisted downwind, which makes the sail flat and less stable. I also pull on a tiny bit of cunningham to clean any creases, and as the wind builds, I bring on both controls slightly.
Sailing downwind, be sure to maintain a big entry angle in the lower part of the sail and avoid over-trimming.
What is your focus when trimming downwind?
I focus closely on my lower tell tales, keeping them flying 100 percent and making sure I ease enough to keep the sail ‘hooked up’ with airflow attached. I look for a nice big entry angle on the bottom part of the sail and clean up any horizontal creases by subtly tightening the cunningham. From there, it’s a matter of very subtle trim and steering. If in doubt, ease the sheet and be sure you have good flow going around the front of the sail. If you run into a light patch, just head up to keep the flow going on the main. If needed, power up the main even more. Get the gearing really slow on your foils to minimize drag. The boat will go faster and apparent wind will increase, moving the wind forward and letting you trim harder. Especially when it’s a bit lighter downwind, be sure to pre-empt a drop in apparent wind by easing main and bringing the bow up!
Moth Tacking, Jibing And Gear Changing
How do you foil jibe a Moth?
In all maneuvers, focus on where your body has to end up and getting your hand and foot positions correct. When jibing, think of the foils like they are an airplane; banking its wings is the only way it can turn. You need to tip the boat to leeward as you go into your jibe. As soon as the foils are banked, carve into the jibe with the rudder; the more heel you have, the harder you have to turn. Then move across the boat. Going into the jibe, I put my hand as far along the tiller extension as possible when I pass it across to the new side of the boat, and my body naturally follows. Lead your body with your arm and you’ll come out with the tiller behind your back where you want it and can do the hand transfer. Practice steering behind your back and quickly changing hands out of the jibe. Also, focus on trimming the main nicely out of the jibe so the sail ‘hooks up’ and you get power quickly. Jibing in light air can be hard but once you’ve got it, you can jibe just as easily in 10 knots or 20 knots. Sailing the boat downwind in all wind speeds is quite different. When it is windier, you tip the boat to windward more, move aft slightly, and don’t power up the sail as much. If you can’t foil jibe, it’s probably not windy enough to race. Keep in mind that it’s easier to jibe than tack. Sometimes when sailing upwind, we’ll jibe rather than tack to ensure we can stay on the foil.
When foil tacking or jibing, you need to flatten the boat. For jibing, bank into the turn to leeward. You’ll turn the boat more aggressively when your body is ready to move across to the new wing.
How do you foil tack a Moth?
When tacking you have to move quickly, bringing the boat relatively flat once head to wind. Start luffing slowly, taking the edge off your speed; make sure the boat is flat when head to wind. As my body moves across the middle to the new wing, I’ll increase the rate of turn, steering quite aggressively through the eye of wind, but my body has to be ready to cross the boat and receive the power on the new tack. You need to come out tipped to windward. Here’s how I break it down:
Ten seconds before tacking, consider slowing the boat slightly and sailing slightly higher.
Plan for a slow luff head to wind, followed by a faster turn rate once confident that crew weight can be positioned correctly.
Heel to windward before the tack but flatten the boat once head to wind. Move your weight inboard. It is important here to sheet the mainsheet on centerline so that it is not over the leeward wing when you pass underneath.
As you move across the middle of the boat, pass the tiller extension around the back and into a position halfway along the leeward wing.
When you are confident you can move to the new side, increase the rate of turn, landing on a wider than close-hauled course.
There are a lot of G-forces during this period, so expected to get ejected a few times!
Don’t try to piece the whole tack together immediately. Practice the first phase of luffing head to wind, getting your weight to center, and switching the tiller extension across.
Remember to ease mainsheet out of the tack and have your hands positioned so that the sheet can be eased quickly. The sheet is more important than the tiller on exit.
I set my mast rake to allow 70 to 75cm between the boom and the deck where I cross the boat. Tacking is important, so make sure you have room under the boom! For tacking practice, I recommend having the rig more upright.
Don’t adjust any control lines right before or after tacks, unless it is very light and foiling is marginal.
Name 5 key gear changes in a Moth
To foil early in light air, power up by having the vang and cunningham as loose as possible. However, it is easy to over-deepen the front of the sail, requiring further bear-away to get good flow on the sail. Don’t overdo it.
Downwind always requires a deeper sail shape than upwind, regardless of wind speed.
Once foiling, immediately pull on vang to stabilize the sail and cunningham to clean the creases. Even though the wind is light, we are quickly doing 14/15kts. The AWS is high so we need to change sail shape to achieve good speeds.
As the breeze builds, constantly increase vang and cunningham loads to achieve the desired sail shapes. Max vang should be achieved in 15 knots and max cunningham in 18 knots.
The Moth gets overpowered quickly, and from 18 knots upwards a softer tip or different sail is required. North’s LA and DS designs have a slight variation in the luff rounds to cover the range, with the DS being aimed at 14 knots true wind speed. For lighter sailors, a softer-tip allows the mast to bend earlier and depower the sail.
How do you start a race in a Moth?
Starts are a bit chaotic. Even for long-time racers, a Moth start will be a new experience. People get up on their foils with about 25 seconds to go and do a big turn-up at about 3 seconds, crossing the lining at 20 knots. A key thing when you’re on your foils is to have the ability to slow down while maintaining control. You need to practice that. Getting to the pin too soon is dodgy, especially with boats starting on port tack.
Why do so many Moths start on port tack?
Moths travel at 15 to 18 knots upwind, so tacking is a very costly part of an upwind leg. Reducing the number of tacks during a beat is very efficient, although this depends somewhat on how well you tack and how confident you are in making your tacks.
How many ways can you capsize a Moth?
You will capsize a Moth every possible way when learning. But I can sail for days now without capsizing, unless it is windy and choppy. The key to recovering quickly is to get on the daggerboard and do a dry capsize, climbing back over the wing. Sometimes that’s hard to do, especially when you pitchpole and find yourself 20 meters out in front of that boat.
What is the most common boat-handling mistake in a Moth?
Capsizing! Foil tacking, in particular, is very difficult. A common mistake is trying to foil tack when it’s breezy. Drag is so high that as you go through head to wind, everything slows down and it’s easy to capsize. You may be better off planning to do a touch-and-go tack.
READ MORE
READ MORE

guides
SPINNAKER SNUFFER INSTALLATION GUIDE
SPINNAKER SNUFFER INSTALLATION GUIDE
Making Your Downwinds More Easy and Enjoyable
© Amory Ross
North Sails cruising spinnakers and Gennakers™ equipped with Snuffer Plus™ spinnaker snuffers make downwind sailing faster and more enjoyable, while saving much of the aggravation normally associated with off-the-wind sailing. When used properly, a cruising spinnaker can add miles to your daily runs. Cruising spinnakers can be quite simple to deploy, even with a short-handed crew.
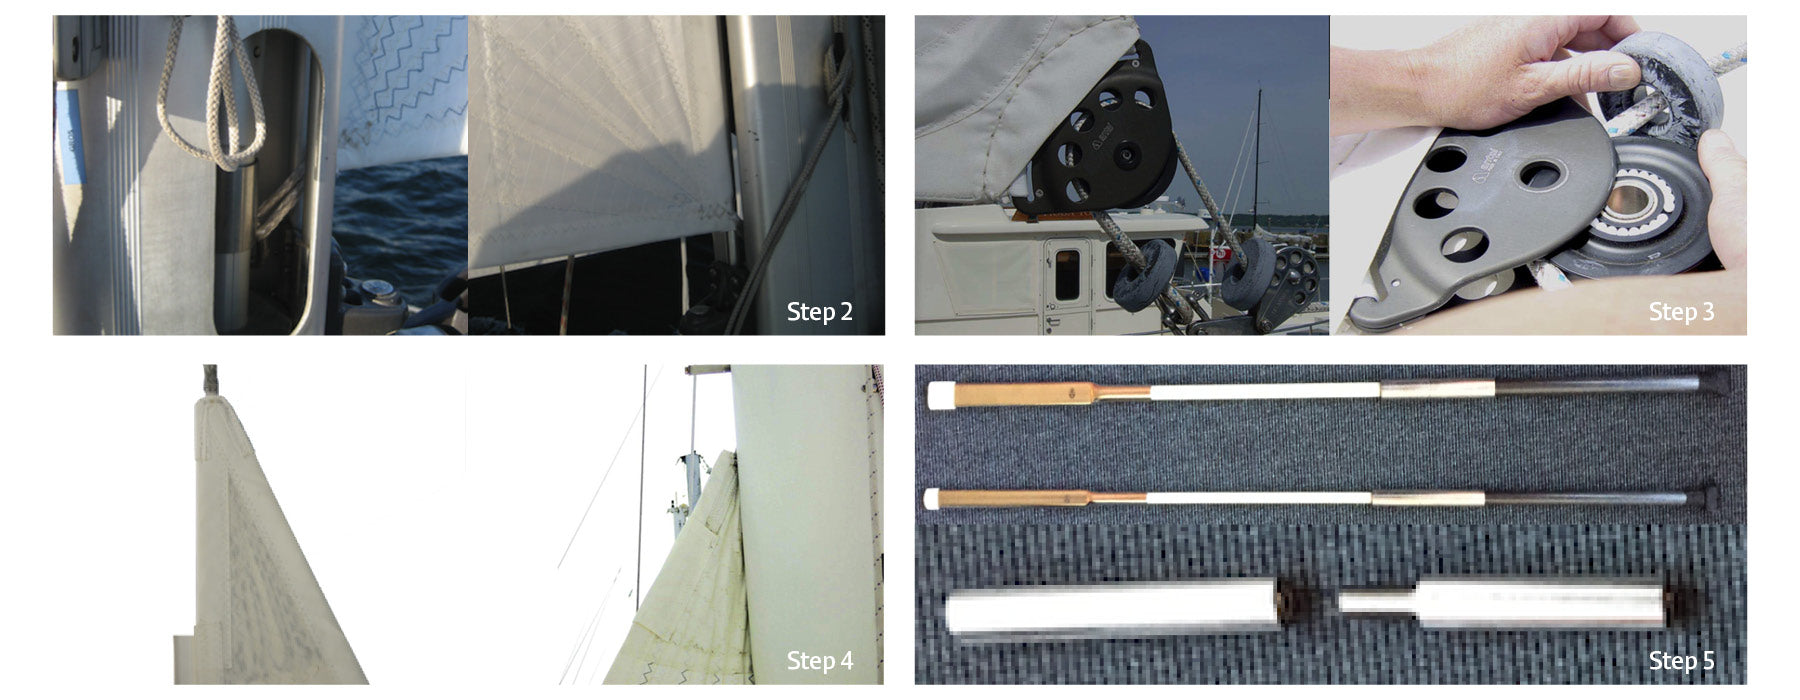
Step 1: Attach the clew and foot
On a dry, clean, open area), secure the head of the sail to a post and run the leech and luff making sure that it is free of any twists or tangles.
Step 2: Laying out the Snuffer Plus™
In the same way that the spinnaker was straightened, attach the “head”of the Snuffer Plus™ to a solid point and pull the sleeve out making sure it isn’t twisted. Use the colored stripe on the sleeve as a guide.
Step 3: Prepare the Snuffer Plus
Once the spinnaker and the snuffer have been laid out straight, use the internal retrieval line to pull the cone of the snuffer all the way to the head exposing the swivel
Step 4: Attaching the sail
Attach the head ring of the sail to the swivel inside the snuffer. Make sure that the screw or shackle is as tight as possible.
Step 5: “Snuff” the sail
Once the head of the sail is attached, pull the Snuffer sleeve down over the sail making sure neither the sail nor sleeve is twisted.
NOTE: On Gennakers™, the cone will not cover the entire sail and should end approximately one foot from the clew. Allowing the clew to go into the sleeve could risk damaging the cone when the sail is deployed underway. Battens can be taken apart by removing the tape and while holding the back section of the splice connector, flexing the front end up and down while exerting pressure in the opposite direction as the arrow.
Step 6: Loading the sail into the EZ Launch & Store™
Box Turtle
When the sail is ready to be placed In its turtle, lay the turtle out as shown, attaching the tack ring to the green Velcro tab and the clew ring to the red Velcro tab.
Insert the cone of the Snuffer into the bag first. Flake the sail into the bag leaving the head of the snuffer on the top. Use the Velcro tab at the center of the bag to secure the head and Velcro the bag shut. Finally, use the straps on the bag to cinch the bag shut.
READ MORE
READ MORE
guides
J/105 NORTH AMERICANS TOOL KIT
Get The Most From Your J/105
The 2019 J/105 British Virgin Islands North Americans in Marblehead is just around the corner. Is your team ready? Our J/105 Tool Kit will help. Created just for J/105 sailors, by our expert team.
#NSVictoryList
There is no better performance test of a one design sail than the results it produces. In 2018 alone, North Sails J/105 inventories helped teams win regattas all over the US.
Tips From The Champ
Champion Terry McLaughlin shares some tips that helped team Mandate win the 2018 North Americans.
Downwind Tips & Tricks
How to sail as deep as possible while still keeping your speed up. Before your next regatta, read this downwind manual from expert Will Keyworth.
Define Your Speed
Pulling all the pieces together can be challenging. Our J/105 Speed Guide will help you leverage our expertise to make the most of your sailing.
Fine Tune With North
Find your groove. Get your numbers. Be confident in all wind conditions. After countless hours of sailing, sail testing, and competing in the J/105, our championship winning sails will get you up to speed quickly.
Working With The Best
Our J/105 sails deliver the best results for our clients. Contact your local expert and join us at the front of the pack.
READ MORE
READ MORE
guides
J/24 US NATIONALS: LOCAL KNOWLEDGE
J/24 US NATIONALS LOCAL KNOWLEDGE
North Sails Expert Mike Ingham Explains What To Expect in Rochester
They call Rochester “Leftchester”. But of course it is not always that simple! We asked North Sails expert and Rochester local Mike Ingham what sailors should expect when they leave the docks at the 2019 J/24 US Nationals.
First, some basics:
The predominant winds are in the West quadrant (WSW to NW).
More often than not, systems come from the West quadrant, most often WSW
The thermal is NNE
The Genesee River flows North to the lake passing through Downtown Rochester before dropping considerably in altitude, passing RYC and emptying it’s silt into the lake
The racing area is typically straight North or NE from the river. It’s not quite in a bay, but the land does indent like a very open bay, so there is land from West through South to East. From West through North to East is largely exposed
The Lake is large and deep. It is around 350 miles long and 70 miles wide. The Niagara River flows into the lake on the SW corner and that water empties into the Atlantic by way of the St. Lawrence River in the NE corner
Here are some thoughts for each direction:
South Quadrant:
It’s shifty in all of the South directions.
The city of Rochester is ~8 miles up the Genesee and over 400 feet above the lake. That means the wind coming down that long hit is really unstable as it tries to mix in with the air below
Heads up puffy lake sailing.
Since the wind comes down that long hill, sometimes the puffs don’t hit the water so you don’t see them coming. Need to look and try and connect the puffs, but also need to be ready to react to whatever comes your way.
Top of the course is the most shifty because it is closer to land making the last move to the weather mark and the first move out of it pretty critical
All S directions (system driven)
Flat water
SOUTHEAST
Can happen, but is not common. Almost always associated with some rain and storm coming, but not always
Can get a lift off the right shore, but not consistently
Not a sustainable direction, it is unlikely to lock into the SE for more than half a day before something changes it
Will rarely turn into a thermal because it is associated with bad weather disrupting any land convection.
SOUTH
Relatively common system breeze
Often warm clear weather
Super shifty
Rarely any geographic pattern (like get to a shore) because relatively square to the land
SOUTHWEST
Relatively common system breeze
Can be nice clear warm weather, or can be humid with t-storms rumbling through especially in the afternoon
Can be very windy, but is relatively flat
Very shifty puffy – heads up!
West Quadrant
Common System driven
Often windy, clear
Relatively steady compared to the S winds, but still some shifts
Can have T-storms associated, especially late in the day
Out further in the lake, there can be big waves, but where we race there is a shore to the West, so that cuts down on big wave. Still choppy though.
Often very favored left because of a lift off shore and flatter water
North, Northwest System
N or NW System breeze about once a month lasting a few days (when it is windy)
Cold wind from the North
Often windy
BIG steep waves (up to 10 foot)
In the spring and summer, this is an oscillating breeze, so play the longer shifts, could be 5 min + oscillations
But in the fall, since the lake is warm and the air cold, mixing makes for big holes and puffs
Northeast System
Rare
Unstable often rainy and stormy
Does not last long
Play shifts, but don’t expect a solid pattern
Can be big waves if it does last a while because it has a very long fetch from the East end of the lake. But often does not last long enough to build up the really big waves
Northeast Thermal
Almost always a Thermal Sea breeze
Lite. It rarely gets into double digits
Like any other thermal, need a temperature differential. The lake peaks at around 65deg so it can happen even on a cool day.
The lake can “turn over”. Only the surface is warm and if the lower cool water mixes, it can get cool overnight to the mid 50’s
Flat water
Even though it is coming from the lake, it only goes out a few miles and does not have time/ distance to build up much chop
Once filled in, left seems to work more than not
Current
Surprisingly for a lake, you could see up to 1.5kts of current. Usually W to E parallel to the shore (but occasionally it inexplicably goes the other way –some kind of eddy).
You can’t predict it but can easily tell which way and how strong by watching which way the river silt exits the river on your way out.
It is caused by the bathtub effect, plus the flow of Niagara Falls (W to E). The lake is 300+ miles long and a low pressure system at one end or the other will suck the water that way, then when that pressure system goes away, the water “sloshes” back.
It is relatively even over the race course, there is rarely any local eddy or current relief anywhere because the lake gets deep quickly. You have to go right near shore and we don’t typically race there.
READ MORE
READ MORE

guides
DOWNWIND TACTICS
DOWNWIND TACTICS
In our previous installment we rounded the windward mark just behind our rival. In this segment North U Director Bill Gladstone explores downwind tactics against a single boat when you round close astern.
Consider this scenario: We’ve turned downwind within a couple of boat lengths of our rival – close enough that she is “under pressure.” No other boats are a concern. Pos 1 – Set the Scene. How can we pass them? Here’s How:
Pos 1 – Set the Scene- to Pos 2 – Soak
Speed First
You won’t pass anybody if you aren’t faster than they are (or at least as fast and more clever). You’ve got to focus on trim and speed first. When you’re fast then you can make tactical plays.
Basic Principles
Chase to the sides; attack when they come back. You can’t cover on both jibes. The basic play downwind is to get into attack position sailing toward the sides of the course and then attack when your rival jibes toward the middle.
Soak to Position
To get into position to attack try to match your rivals speed while ‘soaking’ a little lower. Be careful not to over-do your soak, especially in light air. If you are slow your rival may extend away beyond your wind shadow. Pos 2 – Soak
Pos 2 – Soak to Pos 3 – Attack!
Attack!
As your rival jibes, you jibe. Do not delay. There’s no, “Ready to jibe.” The team is ready! Just turn the boat – that’s the “Jibe Ho” signal (Turn with weight, not helm). This ‘simo’ jibe puts your wind shadow on your rival’s air. Their windex should be pointed at you, and yours at them…
Pos 3 – Attack
Our jibe suffocates them and they never get to full speed out of the jibe. We roll over them into the lead before they can recover. Well done!
Pos 4 – Ahead. Pos 5 – They Strike Back
They Fight Back
Alas, the leg is not over. On our next jibe our rival returns the favor, jibing on our air. Pos. 5 – Attacked. We can’t clear our air and he rolls over us. NOT Fair!
Pos. 6- Rolled!
Come Out Hot
Sometimes you can escape an attack by ‘coming out hot’ – that is, reaching up to push your apparent wind forward coming out of the jibe. Probably a good idea to warn you team before the jibe of your intentions. It won’t work if you steer ‘hot’ but don’t trim ‘hot.’
Don’t Attack
A little while later our rival jibes again. We’re in position, but we don’t jibe. Why not? Recall our basic principle of chasing to the sides and attacking toward the middle: An attack here would violate that rule and leave our rival an avenue of escape to the inside. .
Attack or Cross-Over?
Eventually we jibe Pos 8 and they jibe again. As the boats come converge we are in position to attack. In fact, we’re closer than before – a scant boat length behind now. One option is to jibe on their air. See below Pos 9S.
Option to jibe
A jibe would put our rival in our bad air and allow us to roll them. This can be strong play. One potential downside is that they may be able to block us from jibing and crossing.
Note that if we do jibe, we should jibe when still 2 – 3 lengths away. That’s close enough for our wind shadow to work yet far enough that they cannot fight back with a luff. A jibe within a length leaves us vulnerable to a hard luff where our rival can take us “to the moon” and then drive off to clear air.
Fig: To the Moon!
Cross Over
The alternative to jibing on their air is to Cross Over and Jibe. By Crossing Over and Jibing we gain control. Though we aren’t dishing out bad air we now control the path to the mark. We hold the starboard tack advantage and can jibe when we choose.
Pos 10 – Cross Over and Jibe to Pos 11 – Control
Clear Air
The Cross Over can be tricky in light air or high-performance boats as you must avoid the wind shadow of the windward boat.
Pos 10 – Clear Air
Next Play
There’s always a next play. If our rival jibes we can match their jibe to a position with clear air aft of their shadow and with an avenue of escape to the middle. If we don’t jibe they may try to Cross Over and pin us in a reversal of our current set up.
Conclusion
From here we just need to sail fast to the leeward gate. In our next segment we’ll look at Leeward Gate Tactics.
READ MORE
READ MORE
guides
LESSONS LEARNED FROM ROUNDING FIRST
LESSONS LEARNED FROM ROUNDING FIRST
Mike Marshall Explains Two Mental Traits That Will Help You Stay Ahead Of The Fleet
2019 J/22 Worlds 📸 Pepe Hartman
Three years after winning the 2016 J/22 Worlds, I signed on as a trimmer for the 2019 World Championship. I knew crewing would be a fresh challenge, and I was excited to help further raise the game on Raised J, owned by John Koppernaes, a team I’d sailed with in 2017.
This year’s Worlds were in Warnemunde, Germany, and our preparation strayed far from the original plan; all our practice days were blown out, so the practice race was basically our first outing—on an unproven, bottom-painted, charter boat.
What a surprise, then, to find ourselves rounding the first mark in… first.
That evening, I talked through our best approach to the regatta. “We’ve got great boat speed,” I said. “Now we just have to believe in ourselves, and know that we deserve to win.”
Sure enough, the next day we rounded the top mark in first once again—but were soon passed by the eventual regatta winners. Without being on the wrong side of a shift, what happened? Looking back in time a bit, Raised J had a tough event in the light and shifty conditions at the 2018 Worlds, and we all tend to set our future expectations by our most recent results. So this year, as soon as we rounded that first mark ahead of 30 other J/22s, the energy and excitement onboard climbed way too high. “Wow! We’re winning a race! At the World Championship!”
What we should’ve been telling ourselves instead was to keep calm, sail well, and stay in the lead—that we deserved to be there.
📸 Pepe Hartman
If turning a great start into a mediocre result sounds all too familiar, here are two traits to work on before your next big regatta.
Trait #1: Confidence
Confidence is the biggest mental asset a team can bring to the race course. Confidence in your starting ability gives you an edge over the boats around you. Confidence in your boat handling makes it possible to react more quickly to other boats’ mistakes. If you lack confidence, you may not even recognize another boat’s mistake and capitalize on it, because you’ll be too busy questioning your own abilities to recognize the errors of others—especially if it’s a top rival.
Confidence also leads to more rational decisions. If you are sure of your boat speed, you’ll be able to look past the bad shift you’re in or the bad waves you’ve just encountered. You’ll think to yourself, we’re fast, and everyone else also hits unfavorable shifts and waves. We just have to deal with these factors better than they do. Without this basic belief in your own abilities, a single wave can cause you to dramatically change the way you’re sailing the boat, making you even slower. Sure of your own skills, you’ll have fewer doubts and more definitive decision-making, which will actually make it easier to race well.
Trait #2: Learn From Mistakes
Another essential mental asset is identifying and admitting your mistakes. As cliché as it sounds, admitting that you’ve made a mistake is the first step toward moving past it. Analyze what you’ve done wrong, and have a plan to make sure you don’t make that same error again. Everyone makes mistakes, but your top competitors work hard to only make each mistake once.
Putting It All Together
Rounding first at the first mark in a World Championship proved we had equal skills and speed with the top contenders. The only thing we lacked was confidence in our own abilities. Instead of wondering how we got there, we should’ve focused on perfecting the rest of the race. Instead of getting excited, as if this great rounding was largely due to luck, we should’ve concentrated on minimizing mistakes—and learning from the ones we did make.
Sailboat racing is unique in many ways, but its mental side is the same as other sports. If you listen to top athletes around the world, you can hear in their voices the knowledge that they deserve to be at the top—as well as the humility that comes from working extremely hard to get there. We all need to keep learning, but we also need to develop the mental skills to stay on top after a great first beat.
📸 Thomas Hanf
READ MORE
READ MORE
guides
J/70 WORLDS TOOL KIT
Get The Most From Your J/70 Racing Experience!
Teams around the world are heading to Torbay in Torquay, England for the much anticipated J/70 World Championships. Our 2019 tool kit features tips on boat speed, boat handling, crew techniques, and much more from our team of J/70 experts.
#NSVictoryList
There is no better performance test of a one design sail than the results it produces. Add your team to the #NSVictoryList!
What To Expect in Torbay
Royal Torbay Yacht Club is excited to host the 2019 J/70 World Championship. We spoke with North Sails expert Charlie Cumbley to learn what sailors should expect when they leave the docks.
Register For Free Daily Weather Forecasts
North Sails has partnered up with our expert friends at Sailing Weather Service to provide complimentary daily weather forecasts. Register now and receive these daily updates sent directly to you each morning.
J/70 Upwind Trim Tips
North Sails expert Zeke Horowitz shares important J/70 upwind sail trim takeaways from his recent experience at Long Beach Race Week.
Light-Air Headstay Sag & Jib Trim
What do we look for in headstay sag to optimize jib trim for a variety of light-air conditions? World champion Tim Healy explains.
Managing Your Risks
North Sails expert Zeke Horowitz talks about placing your boat in the right place on the race course to make gains and minimize losses.
Light Air Speed Notes
A week of intense training with the Japanese teams in Newport, RI, taught Tim Healy a lot about light air tuning and trimming.
Five Downwind Modes
Displacement mode, wing-on-wing, or full plane? Understanding the J/70’s different downwind modes will help you choose the right option.
Fine Tune With North
Find your groove. Get your numbers. Be confident in all wind conditions. After countless hours sailing, testing, and competing in the J/70, our tuning guide will help you achieve race-winning speed.
Telemetry Testing for Faster J/70 Sails
A sail design can be improved, but unless you understand how to trim and tune it properly, you’re not going to get the benefit. Here’s a look at the North Sails technology that goes into designing fast J/70 sails.
Get Up To Speed
Pulling all the pieces together can be challenging. The North Sails J/70 Speed Guide leverages our expertise to help you make the most of your one design sailing.
Our Experts Make It Happen
Have questions? Contact your local J/70 expert today for more information on choosing the right J/70 sails.
READ MORE
READ MORE
guides
J/111 WORLDS TOOL KIT
Tools For Success At The J/111 Worlds
The J/111 Worlds is just around the corner. Is your team ready? This Tool Kit will help. Created just for J/111 sailors, by our J/111 expert team.
#NSVictoryList
There is no better performance test of a one design sail than the results it produces. North clients dominated the 2018 Worlds, sweeping the podium and taking eight out of the top ten spots on the scoreboard. Add your team to the #NSVictoryList!
Road To The Worlds: Establish The Plan
North Sails expert Allan Terhune describes what Team Velocity is working on right now in order to peak at the J/111 Worlds in August.
Fine Tune With North
Find your groove. Get your numbers. Be confident in all wind conditions. After countless hours of sailing, sail testing, and competing in the J/111, our tuning guide will get you up to speed quickly.
World Champion Tips
At the 2018 J/111 Worlds in Breskens, Netherlands, big-breeze speed was the key to success. Martin Dent and his team on JElvis scored nine straight bullets in the 12 race series! Here’s what worked for them.
Onboard Communication
Onboard communication for racing yachts is a key factor for performance, no matter what type of sailing. We have some suggestions to keep your boat moving through the water and around the corners more efficiently and effectively with better communication.
Working With The Best
Our J/111 sails deliver the best results for our clients. Contact your local expert and join us at the front of the pack.
READ MORE
READ MORE
guides
J/109 NORTH AMERICANS TOOL KIT
Tools For Success At The J/109 North Americans
The J/109 North Americans is just around the corner. Is your team ready? This Tool Kit will help. Created just for J/109 sailors, by our J/109 expert team.
Define Your Speed
Pulling all the pieces together can be challenging. Our brand new J/109 Speed Guide by class leader Jack Orr answers your speed and boathandling questions.
Tune For Speed
The North Quick Tuning Guide explains base settings and which sail models to use for the conditions. Learn more:
What Worked For Growth Spurt
At the 2018 J/109 North Americans, twenty teams battled for the title. We interviewed John Greifzu, owner-driver of Growth Spurt, who won the Corinthian title and second overall.
Onboard Communication
Onboard communication is a key tool for achieving peak race performance. We have some suggestions to help you communicate with your teammates more efficiently and effectively.
Working With The Best
Our J/109 sails deliver the best results for our clients. Contact your local expert and join us at the front of the pack.
READ MORE
READ MORE
guides
NEW J/24 TUNING GUIDE & MATRIX
Updated Tuning Numbers For The PT-2 Loos Gauge
North Sails is never satisfied when it comes to making faster sails and offering information to help clients optimize the performance of the sails. With decades of experience sailing the J/24, North expert and two-time J/24 World Champion Will Welles has released a new Tuning Guide complemented by a Tuning Matrix for the J/24 class including numbers for the new Loos Gauge Model PT-2.
“We have condensed the information and added the PT-2 numbers which were missing. I recommend to download/print the new Tuning Matrix and take with you next time you go sailing. The matrix offers a starting point based on numbers of the average boats. We left some room for you to log in your own numbers and go from there.” said Will Welles.
Open New J/24 Tuning Guide
Download North Sails J/24 Quick Tuning Matrix: Loos Gauge PRO PT2 | Loos Gauge PRO Model B
READ MORE
READ MORE
guides
MOTH NEWBIE: DAN NERI LEARNS TO FOIL
MOTH NEWBIE: DAN NERI LEARNS TO FOIL
The North Sails CEO talks about his recent sailing—and swimming, and crashing—experiences
When I first saw a photo of a foiling Moth in Seahorse Magazine I did not understand what I was looking at. Since then, as I watched foiling expand from extreme dinghies to multihulls and offshore monohulls, I took the attitude that foiling came a little too late for me. I figured that, at 60 years old, my learning days were behind me. But after my Laser training partner Scott Ferguson talked me into a ride on his Moth last summer, I was hooked. Two weeks later I bought a used boat, took delivery in September 2018, and my adventures as a Moth newbie began.
Welcome newbies
Like all recreational one design classes, the Moth class is welcoming to newcomers. The experienced sailors support the bungling beginners because they, too, had to fight through the learning frustration, the broken boat parts and the bodily bumps and bruises, before gaining the skills required to get around the bay or race course. As class veteran Anthony Kotoun explains it, “We all want to get you up to speed so we don’t have to wait around or worry about you.”
On land there are no secrets. Everyone is happy to share rigging and setup ideas and even spare parts. On the water, coaching is mostly by means of “fly-bys” to demonstrate the right take-off angle, heel and sail trim. Back on shore, the best coaching of the day comes as small suggestions, words of encouragement, and reminders that everyone struggled at the beginning.
It’s complicated
The boat itself is a complicated machine. After decades of Laser sailing, I valued a high ratio of sailing time to rigging and unrigging time. The Moth is a different beast. It takes an hour to set up, and half an hour to unrig and put away.
When my new-to-me boat arrived last fall, I was eager to learn as much as I could before the Rhode Island sailing season ended. With the days growing shorter, the water colder and the westerly breeze stronger, I felt pressure to cram in learning time between the end of the work day and the beginning of night.
Setup is part of the fun
At first it seemed like everything was extremely difficult, from setting up the foils to attaching the outhaul. My first day sailing alone I had so much trouble rigging up that I ran out of daylight and never got in the water. The next day was better, even though I ended de-rigging in the dark, shivering after 30 minutes of swimming and 30 minutes of sailing and cursing at myself while looking for ring dings in the sand. But over the first 10 hours of sailing (20 hours of rigging and unrigging), I progressed from fighting the boat to a sort of affectionate truce. I learned to embrace the boat maintenance tasks as a hobby. And I accepted that rigging and foil setup time is part of the game and not just another chore.
Making it my own
Every Moth is slightly different. Mine arrived with all the required controls plus a canting rig. When I emptied the box onto the lawn I found two sets of vertical foils, a total of 6 horizontal foils, three masts and 4 different sails. These parts are not all interchangeable and for some reason, Moth parts are rarely labeled. It turns out that Patrick Wilson, the prior owner of Moth #4425, is an expert rigger and a notorious gear-head. Gradually I have modified Patrick’s Moth with an emphasis on simplicity at the expense of top end performance. Now it feels like my own boat and when I get it going I find myself marveling at the magic it produces, skimming above the surface of the bay, making no sound except the flicking of the wand. Three words keep running through my head: “This is cool.”
After about 30 hours of sailing (and 60 hours of rigging and unrigging), I can foil with confidence in the limited window of 8-14 knots. My next goal is a foiling jibe, though I know that will take a lot more time. Compared to most dinghies, building the basic skill set for the Moth is difficult, especially when you’re almost too old to learn new tricks.
Read more about Dan’s Moth adventures:
How to Build Your Moth Foiling Skills
How to Rig a Foiling Moth
READ MORE
READ MORE
guides
MAST FURLING INSTALLATION GUIDE
MAST FURLING INSTALLATION GUIDE
Key Elements of Usage and Installation
This guide is intended to help better understand the key construction elements, usage and installation of your sail. If you have any questions after reading this document and before installing your sail, please contact your North Sails representative. It is best to have two people installing the sail which can be accomplished in less than one hour. Your boat needs facing directly into the wind and ideally the wind speed should be less than 8 knots.
Step 1: Unpack your Sail
Begin by removing your North Sails Purchasers Pack including your Quality Control and Warranty information. Reserve for future reference. Locate and identify the battens (if any) and reserve for installation later.
Step 2: Attach the Mainsail Tack
Begin by unrolling your mainsail on the side deck from luff to leech. Lift the mainsail tack area and attach to your tack fitting. Your new Mast Furling mainsail incorporates a North Sails exclusive Rope Tack. This feature is designed to provide a soft and easily furled corner attachment. The sail has less patching the normal corner, but has the Spectra/Dyneema rope splayed and sewn into the sail to proved strength. Please ensure the tack rope is connected to a smooth hook or shackle to ensure durability and that no chafing occurs.
NOTE: If your mainsail has a Crab Claw Cutaway and two webbing attachment points – Please read the Stowaway Mast Furling Mainsail installation guide.
Step 3: Attach the Mainsail Clew
Lift the mainsail clew to the end of the boom and run the outhaul line through the clew block. Depending upon the type of block and the rigging of the outhaul, you may need to remove the block sheave or the outhaul line stoppers to pass the outhaul through the clew block.
Step 4: Attach the Mainsail Head
Lift the mainsail head to the mast and attach to the head of the sail to furling head swivel. The mainsail head has the same rope corner as the tack for ease of furling.
Step 5: Hoist the sail and insert Battens (if applicable)
If your mainsail has no battens, you can now hoist the mainsail all the way and furl into the mast. If your mainsail has leech battens, you will insert each batten as you hoist the sail. If your mainsail has full length battens, you will assemble the battens before hoisting the mainsail and then insert the battens after hoisting following the leech batten procedure.
Leech Batten Installation
Most Mast Furling Mainsails with Leech Battens will include Round Carbon Rod Battens. These un-tapered battens are stiff to support the leech and also able to slightly twist around the luff extrusion for easy and compact furling. The leech battens should be located on the inside of your furled sail so they do not impact the mast gap edge hen furling and unfurling. Only sails with the smallest gaps will include flat battens. Your battens will be secure into the sail with a standard Velcro leech closure. The leech (upper) end of the batten has a small plastic cap taped on to fit compactly into the closed leech batten pocket end. The bottom (lower) end of the batten has a custom metal fitting changing the shape of the batten from round to flat to best secure the batten in the sail.
NOTE: Please follow the Velcro Stuff Batten Installation Guide when inserting the Vertical Leech Battens as hoisting your sail
Full length Batten Installation
If you have ordered a Mast Furling Mainsail with Full Length Battens, you will have received your battens in segments, which need to be assembled. Simply identify the segments from the batten labels and screw together using the just joiner. Furl the sail When the sail is new, it will be stiffer than your old sail. Please keep some tension on the outhaul when you are first furling the sail, to train the patches to accept the furl. Take note to see if there are any excessive wear points and that the battens are entering the mast evenly and smoothly.
Leech Line
Your new Mast Furling Mainsail includes and Around the Clew Leech Line. The leech line is not a sail shape control but an essential tool to prevent leech flutter. The leech line will have a purchase system and Velcro closure above the clew and a cleat with in front of the clew. Your sail will either have micro-blocks or a tunnel to direct the leech line around the clew. Use the leech line to prevent leech flutter in higher wind speeds and when reefed. Excessive leech flutters can cause serious sail damage.
Sail Shape Control
You can control the depth and position of draft in your new mainsail by adjusting the halyard tension. A tighter halyard will move the draft position further forward and result in a flatter sail. When your sail is new, pull the halyard up just enough to remove any horizontal creases along the luff. In stronger breeze you will need more halyard tension.
READ MORE
READ MORE
guides
J/70 UPWIND TRIM TIPS
J/70 UPWIND TRIM TIPS
Finding Your Groove In Building Pressure
📸 Bronny Daniels / Joysailing.com
North Sails expert Zeke Horowitz shares important J/70 upwind sail trim takeaways from his recent experience in California, USA at Long Beach Race Week. Zeke sailed with Jeff Janov on Minor Threat, and they tied for first place with just 18 points in the seven race regatta.
Less than 10 Knots
When the breeze is under 10 knots and you are looking for power, be sure to get up to speed by “pressing” on the jib before trying to grab any height. In these underpowered conditions, height comes from achieving flow over the keel, NOT from simply trying to point the boat higher. By pressing on the jib, you will power up the sail plan and allow your crew the chance to pressurize the weather rail. This helps achieve max flow on the keel, and your boat will start lifting.
Your leeward jib tell tale should be “nervous” most of the time and you should not sail any higher than tell tales straight back. It’s imperative to get your rig loose enough to help the headstay sag. You can always snug up the headstay by tightening the backstay if you get a little puff. Two turns off the cap shrouds and two turns off the lowers from base is probably about as loose as you should need to go (4-7 kts)*.
Trim the main so you have a nice open leech (tell tales streaming) until you are able to get weight on the rail. Once the weight is up, you can trim the main hard enough to begin seeing stall on the leech tell tales.
*The exact number of turns depends on your rig.
📸 Bronny Daniels / Joysailing.com
Above 15 Knots
When sailing in over 15 knots and chop, be decisive about your “modes” upwind. Take note of the wave angle on each tack and decide which mode you want to try on each board. For example, if one tack has the wave direction more on the bow, you may want to try a “bow down mode” to keep the speed from crashing when you hit a hard set of waves.
Bow-Down Mode
In “bow-down” mode, try centering the traveler car, pulling the backstay hard enough to just see inversion wrinkles in the middle of the main, and pulling the vang hard enough to see some inversion wrinkles down low. Play the mainsheet a lot to maintain a steady heel angle, with the jib tell tales straight back or the inside one just lifting. The name of the game here is speed, so set a target speed number and don’t let the bow come up until you’ve hit your target.
📸 Bronny Daniels / Joysailing.com
Higher Mode With Flat Boat
If the waves are more side-to, you can try a higher mode with a flatter boat. Bring the traveler car 1/3 – 1/2 of the way up. You’ll have the backstay tight, but not so tight that you see any inversion, and the vang will also be snug, but not so tight that you get low main inversion. The mainsheet will be eased a little more overall to help keep the boat flat. In this mode, you keep some power in the main with the higher traveler and fuller main, but you’ve got more twist in the leech which spills some power to keep you flatter.
It’s imperative to get the boat up to speed before trying to point, but with this mode, you can achieve more keel flow by keeping the boat flatter. At times, the driver may feel a touch of lee helm that they must push against, until the main trimmer ‘catches up’ by bringing the mainsheet in slightly. This mode is not as ‘forgiving’ but it can be lethal when the boat is up to speed in open water.
*With this second mode, you might need to try a little less inhauler to help keep the headstay straighter, since your backstay and main sheet are not trimmed quite as hard.
Learn more about North J/70 products
📸 Bronny Daniels / Joysailing.com
READ MORE
READ MORE
guides
MELGES IC37 TIPS: VOLUME FOUR
MELGES IC37 TIPS: VOLUME FOUR
Expert Notes On IC37 Boathandling and Boat Trim
📸 Melges Performance Sailboats
North Sails experts have been busy figuring out the IC37 since the first boat became available in 2018. In Volume Four of our class tips, we suggest solutions to some common boat handling challenges.
See also: Experts Notes On IC37 Sails | What We Learned at The Leukemia Cup | Training Weekend Notes
Best Practices for One Winch from a Pro Pitman
Pro Pittman Aubie van Beuren shares his suggestions and best practices. At the start, have the jib halyard loaded on the winch with the handle in and the clutch open. That allows for quick tensioning and easing of the halyard in tacks, as conditions warrant.
On the offset leg, the pit person hikes as long as possible and then goes legs in to transfer the jib halyard from winch to clutch. Some halyard tension will be lost, but the luff should be softer for the offset and downwind legs. The winch is now available for the spinnaker hoist.
The kite halyard should live on the winch for the downwind leg. I will also wrap the tack line around the winch with a couple of “safety wraps” to prevent slipping. If the tack line needs to be adjusted, the spinnaker halyard can be temporarily transferred to the clutch.
At the bottom mark, use the winch to control the spinnaker halyard through the drop. Once the kite is under control, load the jib halyard onto the winch and tension as needed for the windward leg. Finally, open the clutch to allow for fine tuning upwind.
📸 Melges Performance Sailboats
Best Boat Trim
Crew weight on the IC37 needs to be as active side to side as it is fore and aft. Since the boat is very wedge-shaped, more heel makes the bow want to drive down into the water. To compensate, move the crew aft earlier up the wind range than expected.
There are two good rules of thumb for most conditions about where the crew should sit:
How much noise does the water make exiting the transom? If you hear a lot of bubbling/gurgling noises, your crew is too far aft.
The knuckle of the bow should always be about two inches underwater. If more than that is submerged, your crew is probably too far forward.
In very wavy conditions, we add a third rule of thumb: If you take three waves over the bow in quick succession, you are too far forward in the boat.
In very flat water, pressing farther forward than normal will help reduce wetted surface.
On the downwind legs, when there is enough pressure to be constantly planing, moving weight farther aft will help stabilize the boat. Getting more of the wide stern in the water and getting the bow out helps the boat track better and makes it easier to drive. If there is too much weather helm downwind, it could be because the crew weight is too far forward and the bow is digging in.
Visit and bookmark the IC37 Class page, your one stop for IC37 resources from North Sails.
📸 Melges Performance Sailboats
READ MORE
READ MORE

guides
MELGES IC37 TIPS: VOLUME THREE
MELGES IC37 TIPS: VOLUME THREE
Expert Notes On IC37 Sails
📸 Melges Performance Sailboats
The North Sails IC37 class experts sailed the IC37 for most of the 2018 season and are now coaching the fleet during the first three events of 2019. In Volume Three of our class tips, North Sails designer Mike Marshall provides answers to common problems we’ve seen on sail setup and offers his insight to some of the sail decisions that were made during the charter fleet’s inaugural season.
Batten Box Stud Installation
The batten boxes are designed to have the studs screwed as far in as possible while still being only hand tight. The end of the stud attached to the slide might look like it is farther into the sail than the other bushings on the luff, but that is because the batten slides stick out of the mast farther than the intermediate slides.
This is important: don’t over-tighten the studs. They should be screwed in as far as possible by hand and then backed out half a turn. This allows the box to rotate on the stud and line up with the track when the main is hoisted. If the stud is in too far and the box can’t rotate to vertical easily, you risk bending the stud and breaking the batten box.
PIC 1: The stud is fully screwed in but not parallel to the luff. This is incorrect. It needs to be backed out half a turn to allow the box to settle vertically on the mast. PIC 2: The stud is parallel to the luff. This is correct.
Jib Buckles And Spinnaker Damage
The jib buckles have been specifically placed on the port side of the jib to minimize interference with the spinnaker. The spinnaker is most likely to come in contact with the luff side of the jib during a weather strip on port tack. The spinnaker will have minimal prolonged dragging contact with the jib luff during all other takedowns.
The most common way to rip the kite is if the spinnaker sheet doesn’t get eased enough through a jibe. When the boat turns down, the crew must aggressively ease the spinnaker sheet to get the sail away from the boat. If this doesn’t happen, the spinnaker will fold over itself, the old sheet, and the headstay, causing a pinch point where the kite can tear. We have witnessed this firsthand in a jibe where the jib was down and in the pulpit; the sheet wasn’t eased enough, and the spinnaker folded in on itself and tore about 3 meters above the pulpit.
Spinnaker Zipper
It was decided early on that the spinnakers would not have tack zippers. There were two reasons for this. First, with very close racing, sending someone down below is potentially around 10% of your crew weight off the rail. This could be very detrimental to a close cross at the next windward mark. Second, in the spirit of reimagining fun racing, sending someone down below to be banged around while repacking the kite didn’t seem like the right decision. All of this led to the conclusion that the zippers would only be used at the first windward mark of each race. At the second one, the crew will have to learn how to keep the kite in the boat without zippers anyway. Thus, the hassle of zippers was avoided and they were removed. Incidentally, this also prevents a lot of kite-tearing potential from zippers not being broken/opened properly or cars not being removed.
Gybulators
IC37 spinnakers do not come with gybulators for two reasons. In the initial trials of the boat with a shorter pole, we tested outside jibes and found them slower than inside jibes; the foot of the kite is so long that it is an incredibly large amount of sheet to pull in. Since inside jibes seemed to be easier, the pole length was increased to accommodate them. Second, with the pulpit setup and jib configuration, the stiff gybulator made it very difficult to get the tack of the sail past the forestay. At any angle other than vertical, the sail would be stuck on the leeward side of the jib behind the pulpit. If you want to do outside jibes, tape a batten to the bottom of the front of the pole to act as a bowsprit.
Visit and bookmark the IC37 Class page, your one stop for IC37 resources from North Sails.
📸 Melges Performance Sailboats
📸 Melges Performance Sailboats
READ MORE
READ MORE

guides
J109 SPEED GUIDE
North Sails class leader Jack Orr answers your J109 speed and boat handling questions.
Who sails a J109?
First built in 2004, the J109 had a successful production run of over 375 boats in North America and Europe. The boat was conceived as a 35-foot racer/cruiser in the tradition of the J35, updated with an IRC-friendly hull. Rigged with furling jibs and a sprit, the J109 is easy to sail and is comfortable for a family on a cruise or racing in a big one-design fleet. A good all around boat, the 109 rates well under most handicap rules and has an excellent race record worldwide. The first generation of owners jump-started class racing, but most boats raced handicap or cruised. In recent years, class racing has had a resurgence as second and third owners have bought the boats to race in a popular one-design class.
The J109 powers up quickly in light air, so it’s important to sail class regattas near max crew weight.
What’s involved in crewing?
Unlike the J/105 , even with a 105-percent class jib, the J109 is quick in light breeze and powers up quickly. To keep the boat on its lines, max crew weight is important for upwind speed.
The boat can be sailed with as few as five crew, but the class allows seven, plus an eighth if one person weighs under 132 pounds. In some major class events, there is a weight limit of 1,213 pounds excluding the driver. Although seven crew seems like plenty of hands, they are all busy!
Racing in class events, you can gain or lose boat lengths in a hurry so it’s important to fill the key positions with solid teammates. Start with a strong bowman who can muscle the chute around in jibes and takedowns. (It’s OK if they are big.) With the addition of inhaulers on the jib sheets, the jib trimmer needs to understand how jib trim affects pointing and mainsail trim. The mainsail trimmer controls the power to keep the boat on its lines; since everyone needs to be hiking, the main trimmer can also keep an eye on the racecourse.
All that being said, the boat is easy to sail and the basics can be learned quickly. Having one or two key crew with some pick-up crew is fine for most weeknight or weekend sailing.
What are three top tips for J109 speed?
Spend time in the boat with a committed core crew. Practice!
Learn proper sail trim and rig tune. It’s critical to keep the boat on its lines and at top speed. Having the crew weight and sails properly balanced wins races.
Prep the hull and rig, clean the bottom, and save your best sails for big events.
What should buyers know when choosing a J109?
Production of J109s ended several years ago. With the resurgence of class racing, used boats are in demand. Most boats are in the $120K - $150K price range.
The boats for North America were built by TPI; J/Boats France built for the rest of the world. Overall quality was good, and the boats are well built. Some of the TPI boats had issues with the keel sump, so make sure that’s been addressed when looking at a boat.
Many boats were used for cruising and have been modified accordingly over the years. Look for boats without extra winches or big modifications to deck layout or keel, as these won’t be class legal. Also, J/Boats built a number of shoal-draft J109s; for racing, you’ll definitely want to buy one with a deep-draft keel.
How many sails are required?
The J109 class allows you to sail with two jibs, two asymmetric spinnakers, and one main. Sails can be changed between races as conditions change. The Light/Medium Jib is generally used in 0 to 14 knots, and the Medium/Heavy has proven fast in as low as 10 knots true wind speed (TWS) in flat water. The A2 spinnaker is good up to 20 knots TWS. The heavier A4 works well in 18 knots and above.
Upwind sails have no limitation on materials and construction, but they do have a minimum weight limit. Spinnakers must be woven nylon and have a minimum cloth weight.
Because boats often come with a large inventory of used sails, many new owners buy a new main, spinnaker, and medium jib for class racing, using the older sails for handicap races or cruising.
Class sail purchases are limited. The first year, you can register two new mains, jibs, and spinnakers. After that, you are allowed one new sail of each type per year. Most owners expect their sails to be competitive for multiple seasons, so 3Di’s improved durability has become a big advantage. Here is a link to North Sails’ current J109 product offering.
J109 Tuning
Jib spreader marks help repeat trim settings.
What are the keys to rig set-up?
Maintaining headstay tension and matching mast bend to luff curve help keep the boat balanced and at the proper heel angle, so adjusting rig tension to match changing conditions is key to sailing fast.
The J109 is set up with a Harken furler as standard, and although it is adjustable, it’s not something you will ever change on the racecourse. Once set, in fact, the headstay is rarely adjusted. Instead adjust the cap shrouds (uppers or V1), diagonals (D1, D2), and backstay to match conditions.
Controlling headstay sag is critical to keeping the boat balanced, especially as the breeze strengthens.
The mast butt should be positioned all the way forward in the adjustment slot, so you only need to set that once.
The J109 Quick Tune Guide includes detailed measurements and shroud tensions for different wind strengths. Shroud tension affects headstay tension and how much the headstay sags under different loads, so it’s very important to get this right.
Jib sheet inhauler positions should be marked on the deck for repeatability.
What other control systems are important on the J109?
Setting up to cross-sheet the jib (and then practicing your tacks) is critical in windy conditions, as is having good leverage on the vang. Marks for setting the jib inhaulers are important. The mainsheet gross tune could use more purchase in heavy air, so make sure the fine-tune has plenty of line available.
J109 Upwind Sailing
How much heel is fast on a J109?
In general, sail the J109 with less than 20 degrees of heel by playing the traveler and feathering in puffs. A skilled driver can keep it flatter, but the most important goal is to maintain a constant heel angle while minimizing rudder movement. If you need more heel to maintain consistency, that’s OK.
Sailing flat is fast, but maintaining a consistent angle of heel and minimizing rudder movement are the top priorities.
Upwind, where does the crew sit?
The boats are a bit stern heavy, so we always work to keep people forward and out of the cockpit. In light air, locate one person forward of the shrouds; in heavier air, bring the forward-most person behind the shrouds to keep weight at max beam. The rest of the crew should sit close together at max beam.
When the wind lightens enough to take someone off the rail, send the jib trimmer to leeward first. When possible, move everyone a half a body width farther forward; the mainsail trimmer will scoot to the front of the cockpit.
A soft shackle easily attaches jib sheets to the clew, allowing sheets and inhaulers to stay rigged during sail changes.
How do you trim the J109 jib upwind?
A key move with the jib is to use just enough halyard tension to keep the draft positioned correctly. New 3Di jibs have the draft naturally forward, so less halyard is needed than with conventional sails. Mark the spreaders and the deck to help your trimmer repeat fast settings.
Tension the halyard just enough to place the draft correctly, and set the lead so that the tell tales break evenly from top to bottom.
As the inhauler pulls the clew inboard, sometimes it will appear that the foot looks too flat, this isn’t always the case. The lead should be set so the tell tales break evenly, these are your guide as to balancing the leech and foot tensions. Make sure the sail has some twist at the top. As the clew gets pulled inboard with the inhauler, it’s easy to oversheet the sail.
In 8-15 knots TWS, the jib is inhauled until the clew is inside the handrail.
Adjust the inhaulers for different wind conditions. In light to medium (8-15 knots TWS), the jib clew should be inhauled until it’s inside the metal handrail. As the wind increases, ease the clew so it trims outside the rail. In very light air , sail with the clew outside the rail as well.
How do you trim the J109 main upwind?
It’s hard to stall the top of the J109 mainsail because the sails are designed with a lot of twist so you can sheet on hard as it gets windier. Even in 8 knots, we recommend stalling the top tell tale 60 percent of the time. The extra leech tension has the added benefit of pulling the headstay tighter, too, minimizing headstay sag.
The J109 doesn’t like much heel. From 11 knots up, our team is fully hiked, and at 13 knots, we’re pulling on backstay and cunningham. The backstay flattens the main well and begins to twist open the sail again, minimizing heel and weather helm. That’s the real trick on this boat: tune the rig so your trim and your backstay work for both sails at the same time. If the headstay gets too saggy and the main gets too flat, you probably don’t have enough V1 and D2 tension.
Vang tension is critical in a breeze. In 8-10 knots, pull the vang snug. As the boat begins to get overpowered, pull it on firm. When using a lot of twist, it’s time for a two-handed pull, bracing feet against the cabin house. For the sake of your boom and mainsail, remember to ease both vang and cunningham at the weather mark.
Because the leech profile is so vertical, even a small change in jib lead location will make a big difference to the sail’s power.
How do you shift gears upwind?
Besides hiking harder when the wind increases, shifting gears begins with moving the jib lead aft to increase twist in the leech. Even a small change will make a big difference.
Other ways to depower: pull on max outhaul, apply backstay as needed, and begin easing your traveler down in the puffs. Don’t hesitate to add a lot of vang tension so you can ease mainsheet instead of traveler; the traveler car rarely moves lower or higher than the bench seats on either side of the cockpit.
Who says what when sailing upwind?
We like to have one person on the rail consistently calling the breeze so the main trimmer can be proactive in keeping the boat upright. Likewise, calling waves allows for better steering (and easing sheets in lighter air). Dialogue between the helm and main trimmer is critical, especially with wheel steering because it is harder for the driver to feel the pressure on the rudder.
When it’s windy, the conversation is usually about increasing or reducing twist in the sails. Is there too much helm and we’re slow? Twist open the leeches. Not enough height? Reduce twist by closing leeches. The best sailor on many J109s is often the main trimmer, because the position requires trimming for the best balance between height and boatspeed.
Adjusting leech twist on both sails is crucial to balancing height and speed.
J109 Downwind Sailing
Downwind, where are J109 crew located?
Keep weight forward, out of the cockpit. Many people stand up, but it’s faster to sit down and keep weight lower. On most boats, the main trimmer is at the companionway and the chute trimmer is at or ahead of the forward edge of the cockpit. All others move forward: in 0-8 knots true wind, put two crew forward of the shrouds; in 9-16 knots, they can move just aft of the mast.
The boat likes to be sailed fairly flat and, ideally, the helm goes neutral. If it’s light enough that you’re sailing VMG angles, move enough crew to leeward for a slight leeward heel.
In running conditions of 10-plus knots, move all crew to weather and sail the boat flat. Over 12, sail with a little weather heel. As soon as control becomes an issue (around 16 knots), slide the crew aft. In 20 knots and above, several crew will be sitting in the cockpit.
How do you trim the spinnaker downwind?
Ease the spinnaker sheet to rotate the sail out in front of the boat as much as you can without it collapsing. The main should be all the way out with the vang soft.
In lighter breeze when sailing tighter angles, the tack line should be all the way down. As the wind increases and you can sail lower angles, the tack will move up as high as the pulpit. This allows the luff to rotate around to weather and get more spinnaker area out from behind the mainsail.
The key to speed is conversation and coordination between helm and trimmer. In light air, we look for an angle where the boat feels good, with slight heel to leeward. One common mistake is to sail too high in lulls and soak too low in puffs. Yes, you do scallop your way down the course, but smooth it out and do it gently. The good guys gain a lot this way; for everyone else, this is one of the best areas to practice and improve.
When the tack moves to leeward of vertical, pull on tack line and sail higher angles.
How do you shift gears downwind?
The key transitions are in 9 to 11 knots, learning when you can sail deep and when to keep the boat sailing higher and faster. The tack line on the spinnaker is a good focal point: If the tack moves to leeward of vertical, pull the tack line toward the pole. If it moves to weather, ease it out up to three feet.
Another way to think of this is that in light air, when sailing VMG angles, the tack line is pulled towards the sprit and the main is trimmed for the angle. In medium air, when sailing deeper, the tack line is eased out. In heavy air, when control becomes an issue, the tack line is tightened again to keep the chute stable.
Another downwind tip is to “fraculate”—reduce headstay slack by trimming in the sheets on the rolled-up jib. This firms up the backstay and transfers the energy in the sails more directly to the hull.
To get to a leeward mark or finish line, you can also sail wing and wing, with the spinnaker on the opposite side from the mainsail. This takes practice and should be reserved for tactical situations, say the last five or six boatlengths of a leg. You can sail lower and just as fast, but don’t try it for extended periods; it’s hard to keep the chute full, and a collapse will lose you distance overall.
When sailing deep, ease the tack line off up to three feet for maximum projection and rotation.
J109 Boathandling
What are your top tips to starting well in a J109?
The J109 has a big keel and rudder, so you can sail pretty slowly before the start and not slide sideways much when you accelerate. However, the boat takes time to get up to speed. Practice accelerating from half speed to full speed before each race to learn how long it will take. Never let the boat stop completely or get too far from the line.
What are the keys to tacking a J109 well?
Tacking the jib is pretty easy because it’s not a big sail, so you only need two trimmers in the cockpit. The other crew members cross over the coach roof to keep their weight forward and give the helm more visibility.
How the trimmers coordinate depends on whether your jib sheet 1) leads to a footblock and a leeward winch, 2) to a footblock and a windward winch, or 3) directly to a cabintop winch.
In light air, the cabintop winch set-up can be handled by the jib trimmer and the next person forward, which has the advantage of keeping weight forward. However, those winches aren’t set up for breezy conditions.
We prefer cross-sheeting to the primaries and having the main trimmer handle the release. Going into the tack, the main trimmer eases the mainsheet fine tune a little, releases the jib, and pulls up the traveler. The jib trimmer is the next person off the rail and trims the new sheet, moving to windward right away rather than grinding away down to leeward. The main trimmer drops in the winch handle and does the final trim as the jib trimmer starts hiking.
Don’t bring the jib in all the way until after the boat accelerates up to full speed. Put multiple marks on the jib sheets to line up with the base of the windward winch (if cross-sheeting); after trimming to the first mark, the jib trimmer hits the rail and the final five inches of jib sheet are ground in by the main trimmer.
What are the keys to jibing a J109 well?
A good J109 jibe is a dance between the rate of turn and spinnaker sheet ease. As the boat bears away, the driver should watch the clew of the chute; when it gets to the headstay, turn more quickly as the new sheet is taken in. If you turn too fast without easing the sheet enough, or if you turn too slow, the chute ends up on the windward side of the headstay.
Especially in lighter-wind areas, many trimmers handle both spinnaker sheets. In more breeze, it’s common to have two sheet trimmers. Either way, it’s important for the bow person (and sometimes others) to actively help the new sheet around the headstay and aft to avoid a twist. Keeping crew weight on the old windward side before the jibe will help the boat turn; after the jibe, move quickly to the new high side to help flatten the boat so it can accelerate.
After a jibe, cross quickly to the high side to flatten the boat and help it accelerate.
In light-air jibes, don’t turn the boat too fast and jibe the spinnaker first. Then the mainsail trimmer grabs all parts of mainsheet and “pops” the main through to keep the upper leech from hanging up on the backstay.
In heavy air, get the main across as quickly as possible, while the boat is at full speed. Otherwise you may have to turn the boat too far, which may lead to a round up as you finish the jibe. Easing the vang a little bit will help.
How do you make a fast spinnaker set?
There are two rules to remember on J109 spinnaker sets: First, the boat’s bow must be at the windward mark before the bow person extends the sprit. Second, to set the spinnaker successfully, keep it out of the water by not pulling the tack line out too soon.
The bow person begins the set by freeing the chute from the forward hatch. Wait to start the hoist until the boat makes its turn. When it’s windy, as the mast person hoists, both the bow person and jib trimmer pull the tack line out to its mark. Then the bow person rolls up the jib.
If a jibe-set is needed, there are two approaches: one is to re-rig the chute on the correct side of the boat and hoist as the boat jibes. The other option is for the bow person to walk the clew around the headstay during the hoist, or even before you hoist.
What are the keys to a good spinnaker takedown on the J109?
Most people douse the spinnaker to windward. Leeward drops make it too easy to shrimp (drop the chute in the water). Either way, turning the boat to a more downwind angle will make any takedown easier.
On a normal windward takedown, unroll the jib before the helmsman bears off and the trimmer eases the spinnaker sheet. The bow person pulls (aka “tractors”) the clew around to the windward side of the jib as the halyard starts to come down. One crewmember stands below and pulls the chute through the forward hatch. If it’s windy, don’t blow the tack line too soon to keep the chute out of the water; wait until the spinnaker is collapsing and at least two crew have a good grip on the material.
On a leeward takedown: the bow person grabs the lazy sheet and, with the crewmember below, pulls the chute under the jib and down the hatch. On these drops, don’t release the tack line until you’re able to pull the spinnaker straight down.
What are the most common takedown mistakes?
The most frequent error we see is simple: the spinnaker sheet isn’t eased enough for the bow person to pull the chute around the jib. The second most common error is also simple: if you do shrimp your kite, stop the boat completely before trying to pull the sail back aboard.
How do you recover from a broach?
Most broaches don’t last long; once you ease the spinnaker sheet, the boat will pop back up. Ease mainsheet and boomvang as you start to broach, and your recovery may be immediate.
What J109 best practices do you recommend?
Set daily objectives and evaluate after sailing, so you can get better every day.
Identify crew responsibilities.
Mark everything so you can duplicate settings, especially jib leads and sheets.
Practice tacking and jibing; choreograph movements so each crewmember knows what to do.
Document rig tune and settings.
What’s the coolest thing about the J109 class?
This class is very friendly and well-organized. (See J109 class website) You’ll find some really good technical sailors who know about rig tune and are willing to share knowledge. We recommend new people find a more experienced buddy and ask if you can sail together at events. Watch, observe, ask questions, and you’ll improve steadily.
READ MORE
READ MORE
guides
OPTIMIST WORLDS TOOL KIT
Get Ready For The Opti Worlds. There is no better performance test of an Optimist sail than the results it produces. Around the world, kids are winning regattas with North Sails.
READ MORE
READ MORE
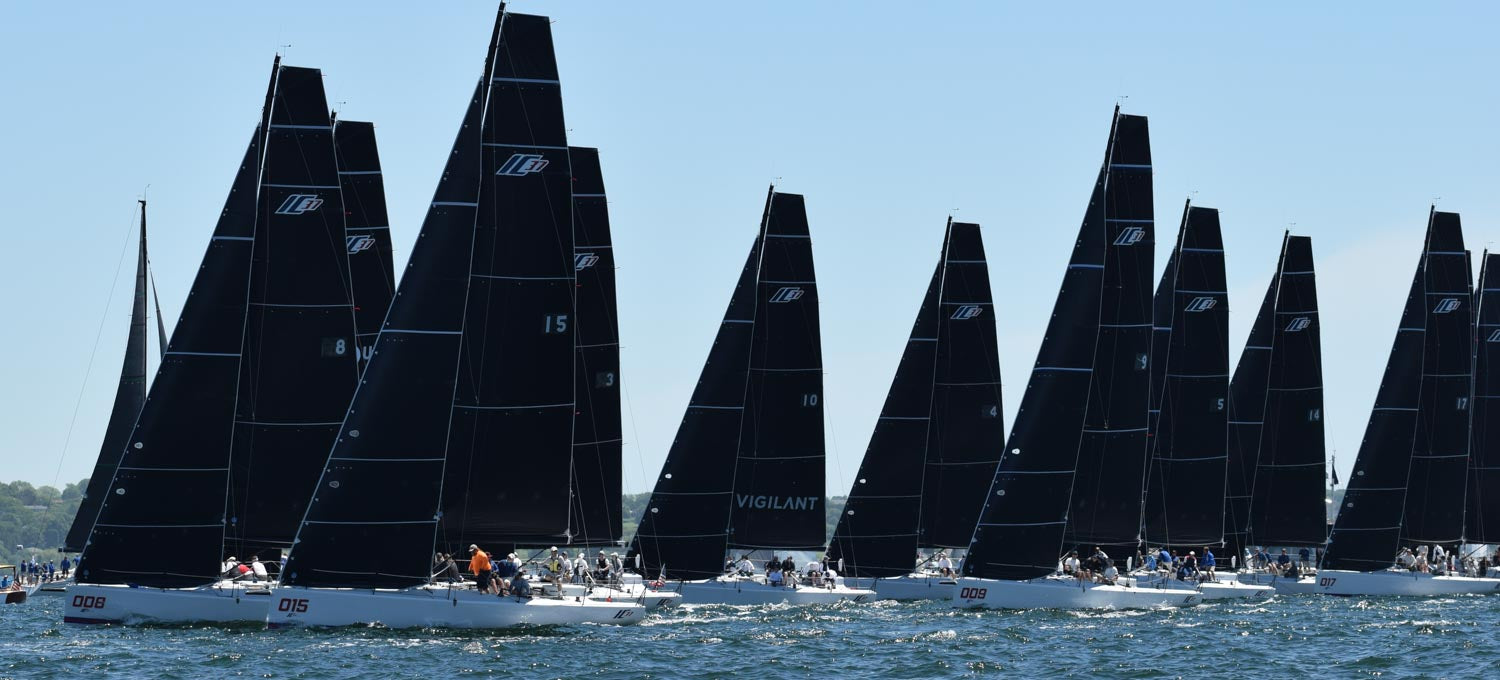
guides
MELGES IC37 TIPS: VOLUME TWO
MELGES IC37 TIPS: VOLUME TWO
What We Learned at The Leukemia Cup
📸 Elizabeth Elder/New York Yacht Club
It can’t get more exciting than this for the Melges IC37 fleet and the New York Yacht Club members. All nineteen teams lined up for the Leukemia Cup for their first “official” regatta. Congratulations to Cory Sertl and Peter Denton’s Das Blau Max for crossing the finish line first.
As the teams figure out the boats, we noticed that the gap between mid-fleet and podium performance is small and getting smaller. Small improvements can make all the difference and means minutes off the course. Here are the takeaways from our experts Ken Read, Kimo Worthington and North U Bill Gladstone:
Spinnaker Sets
The jib is fairly large compared to the spinnaker size which makes it hard to set the spinnaker due to backwind from the jib. Mark the spinnaker halyard with a piece of tape so the mast person pulling up the halyard knows when they have “rung the bell”. As soon as the mast person says “made”, in light air under 10 knots TWS, the jib halyard is released immediately and completely, un-cleating the jammer and smoking the luff down the headstay to get the kite to fly properly, but not before the mast person says “made”. In over 10 knots TWS, a complete release of the jib sheet on the “made” call will ensure that the kite fills properly and immediately. Then, trim in the jib slightly if your intention is to use it as a staysail. And keep in mind, under 10 knots for sure is too light for a jib staysail. 10-12 is marginal. Over 12 is likely.
Jib Trim
“I personally think that the jib track starts all the way inboard and only moves out when the mainsail starts too luff due to excess backwind,” explained Ken Read, Melges IC37 Guest Coach & North Sails President. “I didn’t see many with the car all the way in yesterday. I raced in with a boat in the final race with the long upwind leg and found our boat to be quite fast with the car all the way in.”
Due to the shape of the cockpit, the jib trimmer when trimming to leeward, sits well outboard from the clew of the jib. This makes an optical illusion for the jib trimmer as the lower part of the jib is very round and looks to literally be pointing back towards the middle of the boat. That is actually not the case. The lower leech of these jibs is quite open to allow for the jib to be sheeted quite far inboard so take advantage of the lead positioning and keep trying to sneak it inboard.
📸 Melges Performance Sailboats
Runners During Tacks
In fresh breeze, with the runners loaded hard, it pays to trim the new runner on before the old runner is eased – the goal is to transfer the runner load rather than ease one side and reload the other side. This requires that the tactician loads and grinds the new runner before the helm goes down, as the old runner needs to be eased promptly as the bow goes through the wind. (When it is windy enough to require this, there should be at least two crew behind the driver – usually tactician and floater.
Marking the runner with tape near where the line goes around the winch at max load helps to keep the runner trimmer’s head down grinding instead of looking up at the main to see how much is on.
Halyard
Play with the controls, constantly. Jib halyard tension directly affects shape and often it is an overlooked control as the breeze picks up or dies down. Keep the cabintop winch loaded with jib halyard when going upwind to allow for fine tuning as velocity shifts happen – clutch stays open. On final approach to windward mark, the pit person closes clutch, swings legs in, transfers load from cabintop winch to clutch and preloads cabintop with spin halyard ahead of hoist.
Mainsail Trim
In light air carrying the boom just above centerline allows for a proper twist profile without having the main fall into the jib. Don’t get carried away with this. A boom width above center seems to work; up near the runner is too much. Unless running very deep, actively trim main when reaching. It is very easy to ease too far out and lose any advantage from a properly trimmed main.
Spinnaker Drops, Step By Step
Timing is everything, clear actions are everything else. First step: put your strongest person on the takedown line, ready to go in the cockpit. Second step: if you have an extra body, someone down below acting as squirrel forward and to starboard helps to gather the sail down below (faster and cleaner douse). Third step: a decisive turndown to unload kite should be timed at the exact instance when a douse happens. Blow sheet and halyard while takedown line is being hauled; all load is now out of sail and belly is aimed at the hatch. When foot and belly is under control, blow the pole while bow team is gathering tack – this helps bring pole in. When all under control, finally blow the tack. Pole should be in, tack following suit.
Your resource page for the IC37 by Melges
Sunday Pre-Racing DockTalk with Ken Read
https://www.northsails.com/sailing/wp-content/uploads/2019/06/Melges-IC37-Class-YT.mp4
READ MORE
READ MORE
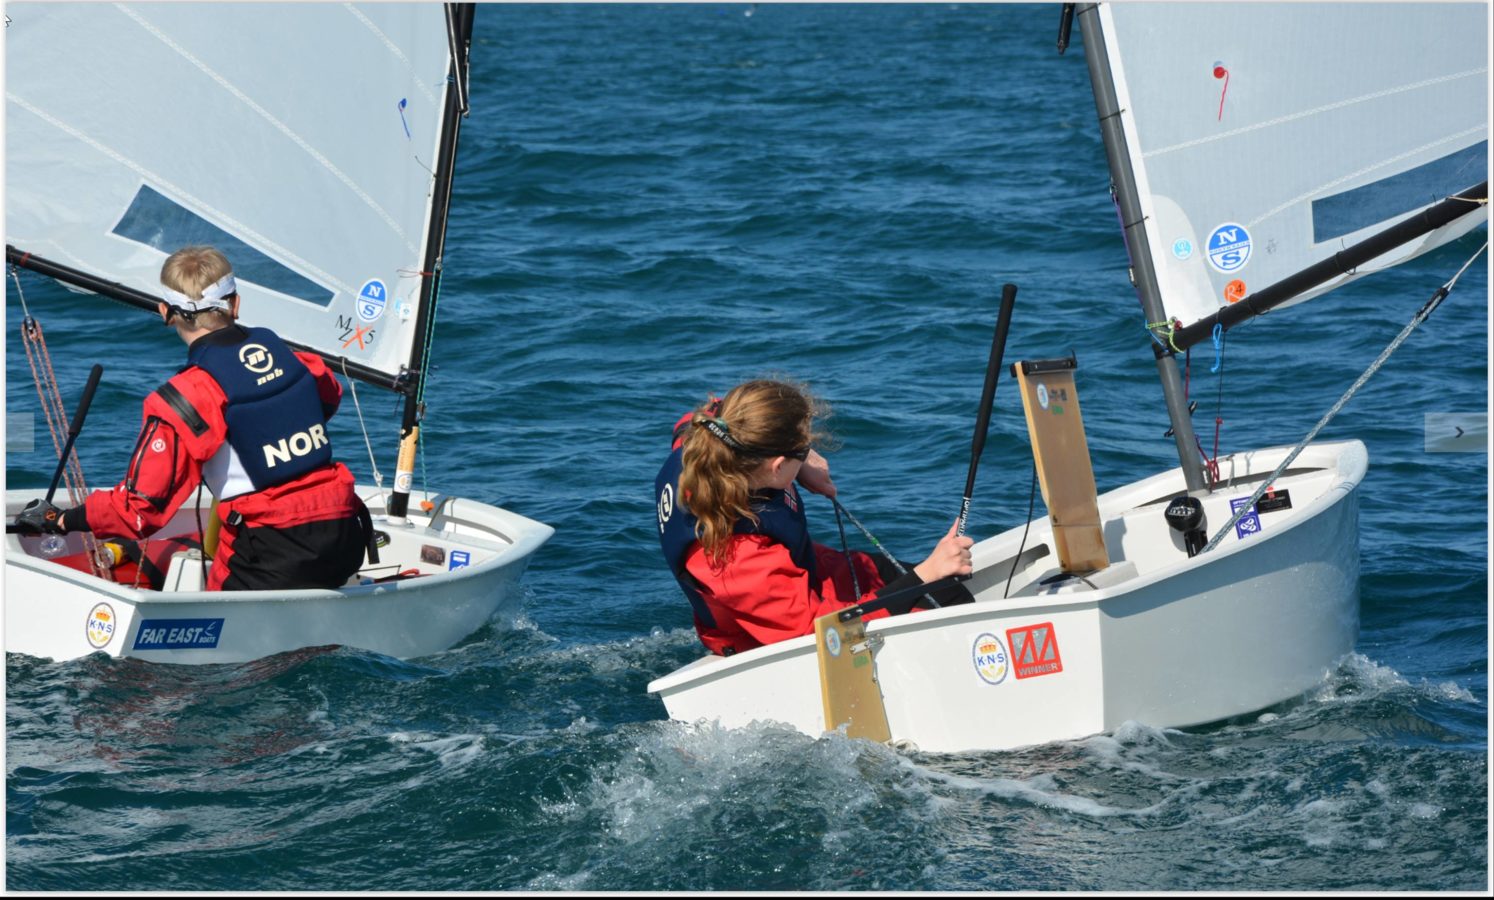
guides
WHICH OPTIMIST SAIL IS BEST FOR ME?
In the order of their importance these are: the sailor’s weight, the expected wind conditions, and the sail’s construction.
READ MORE
READ MORE

guides
MELGES IC37 TIPS: VOLUME ONE
MELGES IC37 TIPS: VOLUME ONE
Racing Season Begins With Training Weekend In Newport, RI
📸 Melges Performance Sailboats
A historic weekend in Newport with nineteen brand new IC37s sailing together for the first time ever, in fantastic weather conditions paired with a fun and educational environment. All teams were eager to learn and sail the new boats. North Sails and North U presented a full-weekend clinic and coaching session, sharing their expertise to kick-start this amazing new fleet with the potential to be one of the most fun one design summers ever for the New York Yacht Club.
North experts Tim Healy, Kimo Worthington and IC37 sail designer Mike Marshall, with the help of North U’s Bill Gladstone compiled a series of tips and takeaways from the training session to share with the teams in preparation for the Leukemia Cup.
📸 Melges Performance Sailboats
Consistent Spinnaker Takedowns
For both windward side and leeward side takedowns, time the drop with a decisive turn down to unload the spin. Timing and positioning is everything.
Approaching the leeward mark: The Bow Team & Pit
Just prior to the start of the takedown, save time and speed up the maneuver by preloading the takedown/retriever line. No slack should be present once the maneuver initiates. At this time the sheet gets released and overhauled, take down line gets hauled down and halyard comes off. The lead bow person can assist the retriever line by also pulling down and focus on getting the middle-foot of the kite up to keep the tack inside the lifelines. The second crew assists with the middle of the kite to the clew, making sure no cloth is over the lifelines. If you divide up the foot, and keep pulling until you reach the corners, the kite shouldn’t ever be in the water. The tack is released with the pole at the same time after foot is in control and on deck or in the hatch. The tack line is then pulled into hatch until the knot stops at the clutch and the pole is pulled in. If it happens at the same time, the tack release will help bring the pole-in, and the tack will be the last corner inside the hatch. This is a good place to start for consistent takedowns. We are sure as teams get more time with the boats this will get refined.
As the wind picks up, start the takedown process earlier and be careful not to overstand the gate marks. It is much better to soak a bit into the marks than it is to be coming in hot with no wiggle room and sail past the marks. You will find in big breeze, a conservative take down will almost always gain a point or two at each leeward gate. Understand your crew strengths from the mast forward and set them up for a successful mark rounding. Depending on the takedown, they may need more time.
📸 Melges Performance Sailboats
Leeward Mark Approach
When it’s breezy aim for the middle of the gates so you so can round either mark and give yourself room for the drop. It’s a big loss to overstand the gates.
Ease the vang downwind in bow up mode. The traveler should be all the way to leeward and just use the mainsheet for leech tension. A loose vang will reduce helm so driver can go bow up in order to get to the proper heel angle and to reach the target speed. As speed builds, apparent wind will go forward and VMG will increase.
Backstay on downwind in overpowering conditions (15+knots). This will keep mast aft in order to keep the luff of the spin tight, keeping draft forward and exit straight for better heavy air, bow up, shape. Backstay on will also flatten the main so the boat will not trip up in a big puff or crashing into a wave. Remember: Release old backstay in a Jibe! Not releasing will be a guaranteed broach in big breeze.
When it comes to managing the upwind layline, it’s better to overstand a little than to tack shy of the layline and be forced to gybe out. Remember an IC37 accelerates over boats that are pinching and going slow trying to make the mark. You can use this to your advantage.
Achieving The Correct Upwind Sail Settings
Your outhaul should be max in over 12 kts. Also, a little vang in heavy air helps flatten the bottom of the main. When it comes to your upwind heel angle and sail shapes, the IC37 is optimized at 18-20 degrees of heel.
The goal with your sail setup is to create as much power as possible to achieve that heel. This involves keeping the runner eased, the main sheet trimmed so the number-two batten is just open, and the traveler is high. For the jib set up, the halyard should be on the loose side and the lead set for a powerful foot. The sheet should be trimmed so the mid-leech is just closing. Once you have achieved the correct upwind heel angle, you do everything that you can to get the bow down, and the boat moving faster so that the keel starts generating lift. This will give you the ability to point. Opposite to trying to achieve heel, trying to achieve speed involves making the sail plan rapidly flatter to reduce drag.
📸 Melges Performance Sailboats
Steps To Achieve Speed and Reduce Drag
Increasing shims and backstay tensions
Easing the mainsheet
Moving the jib lead out and flattening the jib foot
Think of the boat as having two power levels, and not a linear power increase. One level is where you are looking for heel. The second level is where you have all the heel you need, and are translating the surplus power into speed.
Go to the North Sails IC37 Tuning Guide for detailed and up to date tuning information.
📸 Melges Performance Sailboats
📸 Melges Performance Sailboats
📸 Melges Performance Sailboats
📸 Melges Performance Sailboats
READ MORE
READ MORE
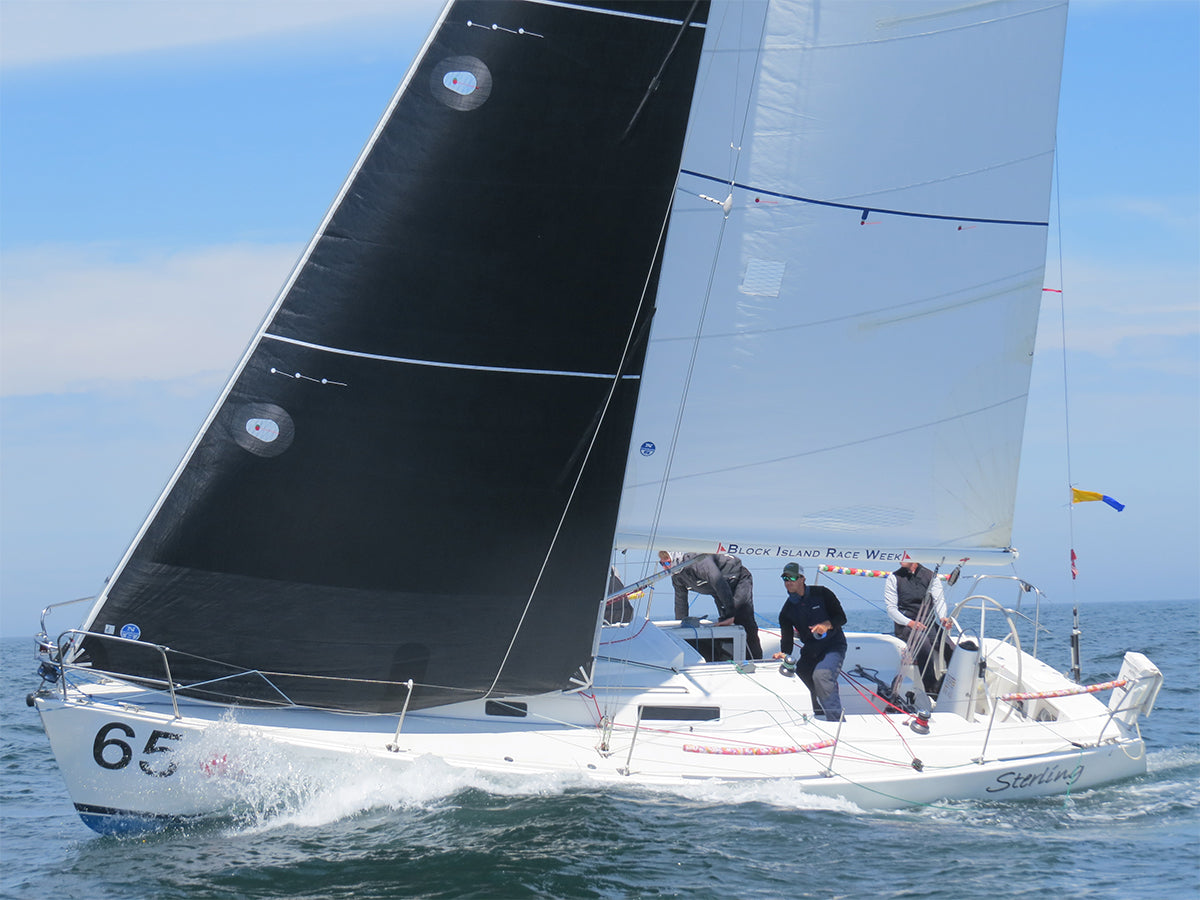
guides
J/105 JIB WEIGHT RULE CHANGE: WHAT IT MEANS FOR YOU
J/105 JIB WEIGHT RULE CHANGE
What It Means For You
How does the J/105, a boat that was introduced in 1991, remain one of the strongest one design classes 28 years later? There are two answers: the sailing qualities of the boat itself, and the Class Association Rules.
The boat is simple to sail but complex enough to attract top sailors and crews. For a 34 ft boat, the J/105 is pretty affordable, especially when it is both an acceptable weekend cruiser and capable offshore platform. So it maintains a high resale value.
But the real success of the J/105 Class is a direct result of the conservative management of class rules, which includes a careful consideration of updates. We all balk at change, especially if we don’t know what the outcome of that change will be, but it is both natural and inevitable.
So, you ask, “How is this jib bag weight change going to affect me?” J/105 North specialist Will Keyworth one-word answer is….“positively!” This is a great rules update for all J/105 owners who actively race their boats, and class leaders drafted it only after requesting input from all the class sailmakers. “My view is that the result will be sails that are better, not just lighter.”
The result will be sails that are better, not just lighter. You don’t have to buy a new sail to comply with the rule, but the next sail you buy will be a better one.
You’ve probably already had discussions with other J/105 owners that start off with any of the following questions: Will a lighter sail last as long? How does this specifically affect the Light, Medium, and Heavy jibs? Do I have to buy a new sail now that the rule has changed? Will it cost more? All great questions, so let’s discuss them.
First, a bit of class history to explain how we got here. Since this rule was introduced in the mid 90s, class-legal jib materials have gotten much stronger: from woven Dacron, to Mylar film/Darcon laminates, to Kevlar laminate, and finally to Carbon laminates. Meanwhile, the Class minimum weight stayed the same. When Kevlar (and later carbon) became the material of choice, sailmakers had to add extra weight to the sails just to comply with the class bag weight. This weight was typically added by applying extra corner patching, especially in the tack; that bulk made it difficult to furl the sail tightly. So to answer “Will a lighter sail last as long?”, consider this: None of that “parasitic” weight did anything to improve durability or performance, and it actually made handling the sail harder.
How Does This Specifically Affect The Light, Medium, and Heavy Jibs?
The rule change from 23lb to 19.8lb represents a 14% reduction in bag weight, but even so an AP or Medium jib will have to be slightly over-built (with more load-bearing fibers than it needs) to comply. A Light jib will have to be significantly over-built, while the Heavy jib will end up at the correct weight without adding any extra fiber.
The new bag weight will enhance performance by reducing parasitic weight and improve handling, all without reducing durability.
Do I have To Buy a New Sail Now That The Rule Has Changed?
You don’t have to buy a new sail to comply with the rule, but the next sail you buy will be a better one.
Last But Not Least: Will It Cost More?
Since no expensive material (Carbon or Aramid) will be removed, my guess is that there will be no significant price change.
The bottom line is this: the new bag weight will enhance performance by reducing parasitic weight and improve handling, all without reducing durability. Better performing sails that are easier to handle and equally durable? That sounds like an improvement that will help keep the J/105 going strong, for at least another 28 years.
Is North Working on New Designs? When Can I Order the New Jibs?
Our designers are working on new jibs shapes for the J/105. A sail testing is planned for late summer. Sails can only be purchased with 2020 sail tags and are not legal until Jan 1, 2020. Advance purchase orders can be placed starting in November of 2019 for 2020 delivery.
READ MORE
READ MORE
guides
UPWIND TACTICS: ONE ON ONE
UPWIND TACTICS: ONE ON ONE
By Bill Gladstone
In this installment North U Director Bill Gladstone explores upwind tactics against a single boat as you approach the starboard tack layline.
Consider this scenario: We’re on starboard tack about five lengths below the starboard tack layline and about to cross a port tack rival by a boat length. The mark is still a fair distance ahead. No other boats are a concern.
What’s the Goal? Our position – one length ahead and owing one tack – essentially puts us even. Our first goal is to round ahead; a more ambitious goal is to round a few boat lengths ahead. Rounding a length or two ahead is rounding “under pressure” (but still better than being behind). Rounding a few lengths ahead would allow us to “sail our own boat” downwind without fear of an immediate threat.
What should we do? There are 4 options: Lee-Bow, Cross & Tack, Carry-On on starboard, or a Delayed Tack after sailing a few lengths. Let’s explore them all.
Fig 1: From Position 1, we have 4 Options
Option 1: Lee-Bow
A Lee-Bow tack under the port tack boat would allow us to give them bad air but given the short distance to the layline this play could leave us pinned – unable to tack until our rival tacks. This move might actually leave us behind. There must be a better choice. Opt 1 – Lee Bow
Opt 1 Fig 1: A Lee-Bow Tack to a short layline may leave us pinned.
NOTE: A Lee-Bow can be a great move IF if there’s enough distance that we will be able to push our rival back and be free to tack. In fact, this might be the first choice in that case. But not here; not with the short distance to the layline.
Option 2: Cross & Tack
We cross by a length and tack, leaving us to windward and bow to bow headed to the layline. With the Cross & Tack our rival is pinned and we get to make a safe layline call. We tack; our rival “hips up” and tacks; and we lead to the mark, rounding 1 to 2 lengths ahead. In the lead, but under pressure. If we were going to the finish, this would be just fine…
Opt 2 – Cross & Tack puts us in control and assures we’ll round ahead.
Option 3: Carry-On
Never mind the rival: Sail our boat. Rather than tack and make a long layline call let’s carry on. This is a passive approach that leaves us at the mercy of a small shift or puff. After we split and both boats tack we may hold our one boat length advantage, but we’ll be on port. Not strong…
Opt 3 – Carry-On is a passive approach (red)
Option 4: Delayed Tack
In this scenario we sail a few lengths – less than a “speed build”– and then tack.
Opt 4 – Delayed Tack puts our rival bow out so they are forced to make the next move. (blue)
Then what? Our rival will be bow out and first to the layline. When they tack on the layline we’ll tack on their lee-bow. Note that by extending less than a speed build before our tack we assure that our rival will not be back to full speed at our next meeting. Now we’ll be able to give them bad air all the way to the mark. In this way we’re able to turn a small advantage into a few boat lengths lead – hopefully enough so we won’t be “under pressure” but will be able to let us “sail our own boat” downwind.
Fig – Layline Lee-Bow lets us extend our lead (green)
That didn’t work out too well for our rival. What else could they do? An early tack would be a gift to us – as two extra tacks would hand us a comfortable lead. The other option would be to over-stand and wait for us to tack. That too is a gift, as each length they overstand gives us a length’s advantage (minus a small payback for their reaching angle after tacking).
Delayed Tack – Over Stand: When our rival over-stands we extend our lead. (Green extends. Blue sails more distance.)
Oops, NOT so fast…
Upon closer inspection I realized we were on the Yellow Boat, not the Red Boat. My bad. What to do?
When our rival executes a Delayed Tack we’re in a tough spot. Getting to the layline first leaves us two choices, neither good: tack on the layline and get crushed or over-stand and lose. How can we avoid the layline? As noted, two extra tacks is a gift to our rival. One option to explore is trading speed for height: Rather than race full speed to the layline we pinch up to close gauge with our rival.
How do we sail high and slow? Overtrim the main to force the boat up. Trim the jib a little too.
By sailing high rather than fast we can let them tack first, “hip up” and tack where we can stay close enough to put them “under pressure” when we round.
Fig – Pinch & Hip Up: We can trade speed for height(shown in blue), reduce separation, and hopefully round close enough to put our rival ‘under pressure.’ (green under pressure from blue)
Summary:
So, for a short hitch to the layline a Delayed Tack pays big dividends. For a longer hitch the lee-bow tack would be a strong choice. Also, for a tack to the finish a “Cross & Tack” would be sufficient – at the finish, a lead is a lead.
And for the bow out boat a trade of speed for height is the best play. (And the windward boat should do the same. Don’t tell him.)
Next Time:
We’ll turn downwind: trailing, but with our rival “under pressure.” ‘til then, sail fast.
READ MORE
READ MORE

guides
ETCHELLS WORLDS TOOL KIT
Get The Most From Your Etchells
The 2019 Etchells Worlds is around the corner and here’s our Etchells Tool Kit for you and your team with tips and relevant information on sail trim, boat tuning and local knowledge.
#NSVictoryList
There is no better performance test of an Etchells design than the results it produces. In 2019 alone, North Sails clients won all the major regattas in Australia and the US.
Quick Tips That Make All The Difference
As your team prepares for the Worlds, we have compiled a series of speedy tips from North Sails Etchells experts that will help you step up your results.
What Worked For The 2018 Worlds Champions
Sailing in a 94-boat fleet stacked with past world champions, Martin Hill didn’t go into the 2018 Etchells Worlds in Brisbane, Australia expecting to win. Find out how team Lisa Rose rose to the occasion on the last day to win the title.
Dog’s Mast Lever System
The Etchells is one of the most competitive one-design classes in the world and sailors have been searching out extra speed gears for over fifty years. One recent innovation is two-time Etchells World Champion Andrew “Dog” Palfrey’s Mast Lever System.
Corpus Christi Bay In Late June
For the past 50 years, Mark Foster has raced and sailed in Corpus Christi, the venue of the 2019 World Championship. Find out more about the wind, waves, and current patterns that normally occur during a June afternoon.
Benj’s Secrets
Multi-time Etchells World Champion Steve Benjamin shares pretty much everything about his Etchells program – tuning numbers, sails, crew and boat setup, the team and their role in the game.
The Tactician Role
World Champion Michael Menninger shares his insights from the Etchells tactician seat. Managing starts, strategy decisions, planning downwind legs, and other important decisions on the boat.
Fine Tune with North
Find your groove. Get your numbers. Be confident in all wind conditions. After countless hours of sailing, sail testing, and competing in the Etchells, our championship-winning sails will get you up to speed quickly.
Get Up To Speed
Pulling all the pieces together can be challenging. The North Etchells Speed Guide will help you leverage our expertise to make the most of your Etchells sailing.
Our Etchells sails deliver great results for our clients. Contact your North Etchells expert and join us at the front of the pack.
READ MORE
READ MORE
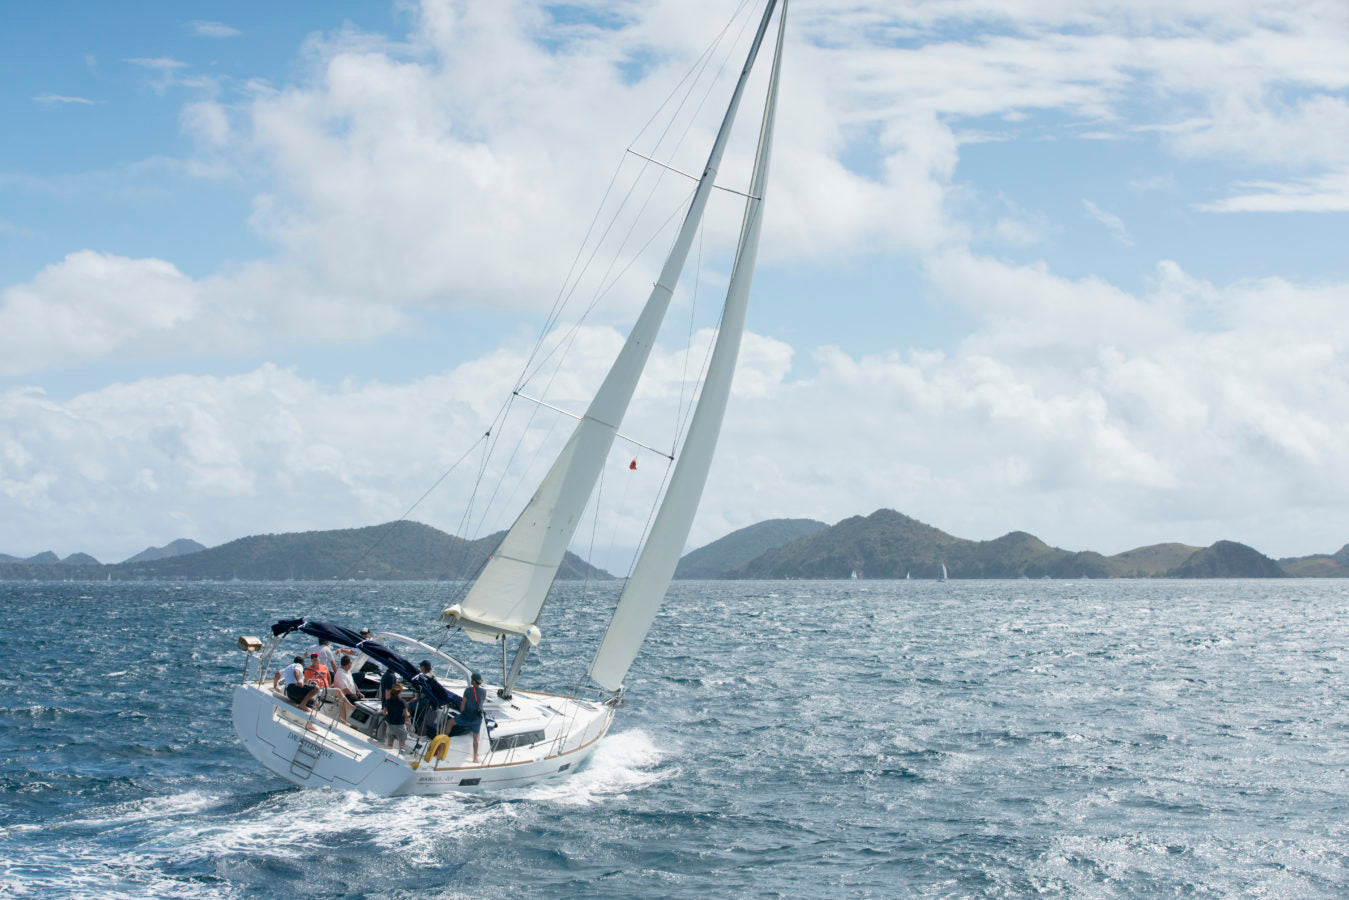
guides
CRUISING SAIL TRIM: PUTTING IT ALL TOGETHER
If you do everything you can to reduce sail power with the sails you’ve got up, and you are still overpowered, it’s time to reduce sail area.
READ MORE
READ MORE
guides
ETCHELLS SPEED GUIDE
North Sails expert Noel "Nitro" Drennan answers your Etchells speed and boathandling questions.
Who sails in the Etchells Class?
Etchells one-design keelboats have been around since 1966 and provide one-design racing at its highest level from Australia to the U.S. to Europe. The class culture is focused on providing excellent racing against both pros and amateurs, including many of the same pros found aboard America’s Cup and grand prix boats. At the elite end, coaching is common; the amateurs prepare well enough to beat the pros, which means the pros also need to prepare well if they want to win. The Etchells has many long-term class sailors, a testament to the class and the quality of racing it provides.
What is the ideal Etchells crew size?
The crew weight limit is 285 kg. (629 lbs.), and you can either race with three or four crew members. This gives a wide variety of crew options. Ideally, your crew size is close to the maximum class weight and they are able to hike hard. That being said, many crews don’t hike hard all day long and still perform well through excellent steering and sail trim, which is the most important factor in class success.
What’s the biggest difference between sailing with three or four crew members?
While there’s more space on boats with only three, larger crew, there are more hands with four for maneuvers. Crew communications can be different, too. Many of the four-up crews have the luxury of a designated tactician, whereas three-up crews have to divide the sailing roles and tactical decisions between them.
Where can you buy an Etchells?
Fortunately, the Etchells has three world-class boat builders on three continents. Second-hand boats are also readily available (see class website), ranging from $3,500 US for a starter boat to $60,000-90,000 for a boat in tip-top race condition.
How do you transport an Etchells?
An Etchells is relatively easy to tow. Most SUVs can pull the all-up boat-and-trailer weight of 2,300 kg (5,000 lbs.). Our top tip is to have your mast lifters sorted out before the regatta to speed the pack-up. We use a single-post lifting pole, as the aluminium masts are quite light.
What kind of inventory does North recommend?
North Sails has well-proven off-the-shelf sail models linked to a current tuning guide, so getting up to speed is easy. That being said, we are always looking for your next speed edge. The current North inventory has options to cover the wide variety of wind and sea states found at regattas all over the world. A few of our sail models have been around for years; the GM series of headsails has been a class favorite for over 25 years and is still winning races today.
Etchells Tuning
What are the basics of tuning the Etchells rig?
The North Sails tuning guide helps you set up your mast and rig properly. It covers rig set-up including spreaders, mast step, mast rake, and some key jib-trim pointers. It also describes the base shroud tension settings we recommend and the changes you need to make as wind speed rises and falls. A key step during the set-up is to measure the mast base relative to the mast collar using the method described in the tuning guide, marking the aft deck 12 feet (3655mm) from the aft part of the mast collar and measuring the mast step from that position at 12 feet 6 inches (3830mm). The boats are close to identical, but this exact mast-port-to-mast-step measurement relationship is key to each boat.
What are the “base” shroud settings for the Etchells?
We recommend a base shroud setting for 9 to 11 knots as per the tuning guide. From there, it is an easy process to power up by loosening both upper and lower shrouds below 9 knots, or to depower when the wind is above 11 knots by tightening the shrouds. Recently the class has evolved to adjusting the lower shrouds through a larger range than the upper shrouds. On our boat, I usually only adjust my upper shrouds a total of five turns (two turns below base or three turns tighter than base). I adjust my lower shrouds 11 turns in total—four turns below base and seven turns tighter as it gets windy and we get overpowered.
📸 Bob Grieser
Upwind Trim Guidelines
Where does each person sit when sailing upwind?
Upwind, fore-and-aft crew positions are fairly stationary but nudging slightly forward in light air and slightly aft when windy and/or in waves.
What are the keys to Etchells sail trim?
When sailing upwind, we recommend focusing on helm balance as much as the actual sectional shape of the sails. In no boat more so than the Etchells do you trim the entire sail package together, rather than set up the mainsail and headsail individually. If the helm is balanced, the boat will respond. Note that even though it is smaller, the headsail usually provides the majority of the drive force, so it deserves your full attention.
What are the key controls for changing gears when wind and sea state change?
The mast lever has been a big improvement, as it definitely makes quick mast-bend changes easy. Now it’s possible to maintain a nice mainsail luff curve while adding forestay sag to suit your light-air headsail.
When do you change from a lighter-air jib to one for windier conditions?
The most common light-air jib is the LM2L, which is designed for up to 12 knots—although we’ve seen some crews use it successfully in much higher windspeeds. The best option in 12 to 18 knots is the LM2H. The still-popular GM jib is favored by many sailors as an all-purpose sail from 10 to 25 knots.
📸 Bob Grieser
Downwind Trim Guidelines
What are the keys to downwind speed in the Etchells?
Downwind in the Etchells rewards both deep-angled tactical racing and strong surfing techniques. It is usually a pretty good workout downwind, pumping the spinnaker sheets and mainsheet, while moving body weight to help catch waves.
In lighter air, what are your top tips for downwind speed?
It’s very important to rake your mast forward in light air enough for a small inversion in the middle of the mast. Also, if there is any chop downwind, I like to keep my crew weight as low as possible, sitting or crouching on the cockpit floor.
Where does each crew member sit when sailing downwind?
Downwind in light air, moving crew weight forward is a good thing. There have been quite a few times we have seen teams gain on a run when a crewmember goes up on the foredeck to change jibs. We recommend keeping crew weight forward until the bow starts immersing into the back of the next wave.
Boathandling Guidelines
Any recommendations for starting in an Etchells?
As in all competitive classes, starting is paramount—and probably even more important in the Etchells with its long, relatively heavy, metre-style hull. If you’re not up to best speed at the gun, you definitely fall off the front row. Typically, if you start well and can hold your lane for three minutes, you are going to be up there at the first upwind mark.
How do you tack the Etchells?
Good roll tacking and jibing in light air pays big dividends. A long slow tack gives you the chance to gain many meters to windward, as the boats will carry their way directly upwind.
What are some tips for good light or heavy air jibes?
When it’s windy, especially in big waves, I like to jibe the mainsail first, keeping the crew in the cockpit, and then jibe the spinnaker pole once the boat is stable. We often notice that the four-crew boats can gybe better than three-member crews. In light air, they can roll the boats harder, and when it’s windy, they split the crew roles more effectively.
How do you make a fast spinnaker set on the Etchells?
Here’s a good routine that will help the forward crew get the spinnaker up and drawing in good order: 1) get organized on the offset leg; 2) ease the ram lever; 3) drop the mainsail traveler; 4) pre-set the spinnaker sheet to its downwind mark; 5) bear away to a downwind angle at the offset mark, so the spinnaker trimmer does not have to sheet on hard once the sail is drawing.
What is the key to a good spinnaker takedown?
Spinnaker douse systems with hard boxes have made takedowns a much easier process. The boxes are usually lightweight fiberglass or sailcloth on a frame that is retracted by shockcord to the side of the hull. The takedown is a manual system, but it works surprisingly well for either a windward or leeward drop. If it’s really windy, a leeward drop is safer, ideally on a starboard tack approach to the leeward mark.
How easily does the Etchells broach?
The Etchells are difficult to broach but they do tend to roll to windward in windy downwind conditions. When it’s really windy, we recommend easing the pole forward slightly and putting the bow up a little so you can keep all the crew on the windward side. This definitely feels a lot more in control, especially when the bow begins burying into the wave in front.
What boathandling drills do you suggest?
Always practice time-and-distance runs to be at your best speed at the starting gun. Set up practice starts with a goal of never having to bear away or run down the line as the gun fires. Drone footage of practice or race starts is an awesome way to review your starting technique. You’ll learn a lot from simply reviewing your turn rates. The long, slow meter-boat type hull loses minimal boatspeed, which can be very efficient in your pre-start maneuvering. I try to keep my turn rate long to maintain as much boat speed possible; in light air this can take up to 25 seconds per circle.
READ MORE
READ MORE
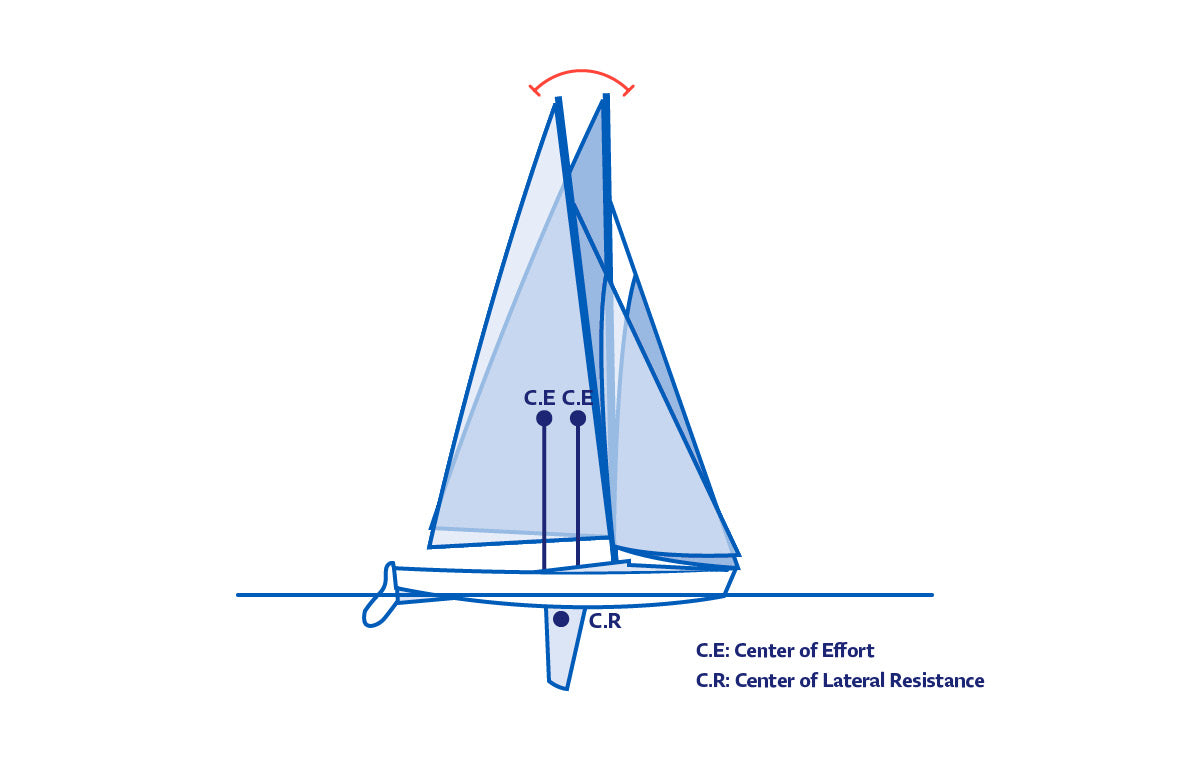
guides
SPEED READING: ACHIEVING BALANCE IN YOUR SAIL PLAN
ACHIEVING BALANCE IN YOUR SAILPLAN
North Expert Skip Dieball Offers Three Ways To Improve Helm Balance From Sails And Foils, And Increase Your Speed Upwind
Racing dinghies and keelboats alike, a key to speed is maintaining a balanced helm upwind.
All sailboats have a different feel when you steer them. Some have a naturally heavy windward helm, and some have very neutral or sometimes even leeward helm. All things being equal, your goal is to sail with little windward helm, which makes the boat more enjoyable to sail and, more importantly faster, through the water. To achieve that balanced state, you have a lot of tools above the rails that you can use.
Most popular one-design boats have a North Sails tuning guide for your particular design. These guides help you get the boat set up correctly to achieve a nice helm balance. Tuning guides give great suggestions on shroud tension, forestay length, mast-butt position, etc. All play into getting the boat in the ballpark for good performance.
To go the next step, let’s explore three key factors: Your mast rake (and centerboard position if you have one); Your sail trim and angle of heel; Your sailing angle of attack relative to the wind direction.
On any sailboat, when the center of effort in the sails (CE) aligns with the center of lateral resistance (CR) of the boat and foils, the helm will balance. If the CE moves aft, windward helm will develop and if it moves forward, leeward helm will be felt.
Balance Mast Rake & Board Position
First, let’s establish what causes helm—the tendency of the rudder to turn toward the wind (weather helm) or away from it (leeward helm). When perfectly balanced, your boat’s Center of Effort (center of the sail plan lift) would be closely aligned with the Center of Resistance (center of the appendage lift). The further the CoE and CoR are from one another, the more helm your boat will naturally have).
As you can see in the illustration, if you have the ability to move the CR or CE, you can get your boat closer to perfect balance. In fact, a little mast rake can go a long way. For example, we’ll lengthen or shorten the forestay on the Etchells as little as 1/4” and the resulting movement aft of the CE will get the boat into a noticeably more balanced helm state. We adjust this for race conditions each day, and make sure we are happy with the adjustment is important before we get to the starting line.
In centerboard boats like the Lightning, Interlake and Finn, you have the ability to adjust your CR through small changes in centerboard position. Generally, you’ll want the centerboard all the way down in light to moderate conditions. This induces necessary helm for the lighter conditions. When you start to get loaded up and have to hike harder to keep the boat tracking, you may consider pulling up the board a little at a time to move the CR more inline with CE, thus reducing the helm. Be sure to create marks or visual indicators of the board position for each condition.
BALANCE TIP #1: Set up your rig to your tuning guide, then create a tuning journal to document settings and correlate to boat feel.
Of these two Etchells, the boat on the left has a firmer main trim, which is causing more heel and thus more helm and creating a tighter angle of attack. The boat on the right has a more twisted look to its sails that yields a flatter boat and less point. 📸 Bill Goldsberry
Sail Trim and Heel Angle
Rig and centerboard adjustments have a big effect on the helm, but if you are stubborn, like me, you’ll want to do everything else you can first. As I prepare for a race, my team and I will sail upwind and focus in on how the boat is set up and going through the water. We’ll talk about helm and boat set-up, but what I like to discuss as well is how the sails are set up and whether we feel we can hike the boat down.
Sail trim has such a huge effect on how the boat feels, and we want to be sure that we have a good range of trim as we go upwind through gusts and lulls. Markings on the spreader, sheets, deck, etc. all give us a quick reference points and let us get the sails set in the ballpark.
If the boat is too powered up, I’ll look to make some adjustments to the sheets to see if easing gives the boat a nice feel, or if in easing, the boat becomes too inefficient going upwind (I.e. if the sheets are too eased and we’re not pointing well enough). If we have to ease too much to get the boat tracking, we’ll depower through backstay, boom vang, traveler or other controls to flatten out the sails. Knowing the range of these controls and trim is super important.
BALANCE TIP #2: Learn the controls to depower and balance the helm—but don’t forget to hike hard first!
Minimizing heel angle is critical to maintaining helm balance, as extra heel increases windward helm, and one thing that rarely fails in getting the boat to track with good helm is hiking. Believe me, I’ve searched for ways to sail fast while not hiking hard—it doesn’t work! Make sure when you are setting your boat up that you and your team give the boat all the force you can in terms of hiking. That, for me, adds to the range of sail trim and control.
Refine Your Angle of Attack
The angle of attack is the angle you sail the boat upwind. As we all know, there’s a range in this angle of attack. It is also referred to as the “groove”. Some boats have a wide groove, meaning that you can steer a wider course upwind to achieve the same helm or feel. Some boats have a very narrow groove.
Ideally, you’ll want a groove that will be forgiving enough to steer around big waves, while sailing a little tighter and higher for short stretches.
How you attack the breeze and the edges of this groove will affect the helm greatly. The lower you sail (fat), the more the boat will likely heel and the more helm you’ll have. The higher you sail (pinchy) the less helm you will have and ultimately you’ll slow down and lose flow over both the sail plan and the keel/centerboard/rudder.
Your goal should be to rein in the range of the angle of attack so that you have a nice groove and sail efficiently upwind at a consistent angle of heel. If the helm/trim are causing you to steer too pinched up, then adjustments have to be made to get you into a part of the groove that is more efficient.
BALANCE TIP #3: Practice early in the season to get a handle on your angle of attack while sailing.
Connect with Skip Dieball for further information.
READ MORE
READ MORE
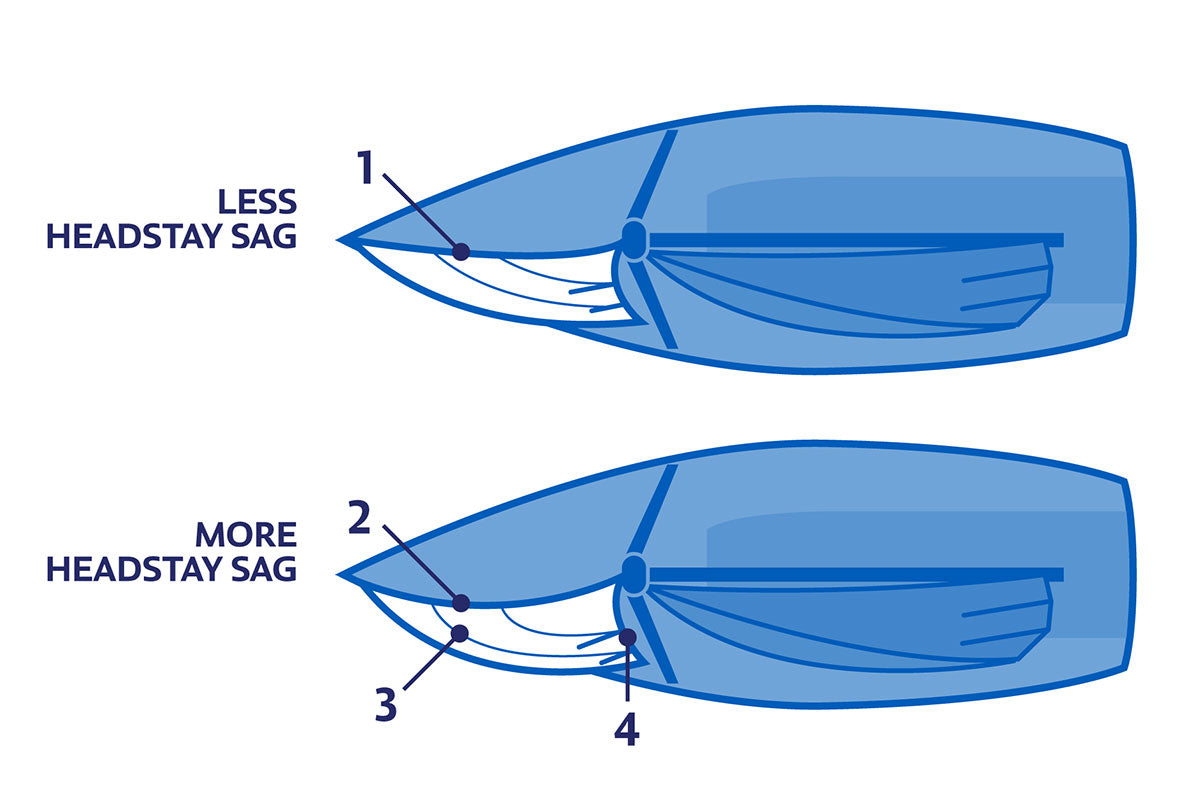
guides
J/70 LIGHT AIR HEADSTAY SAG & JIB TRIM
J/70 LIGHT-AIR HEADSTAY SAG & JIB TRIM
What do we look for in headstay sag to optimize jib trim for a variety of light-air conditions? One Design expert Tim Healy explains.
1. The boat at top has a tighter headstay, which gives the jib a finer entry, less power and less drag. 2) The boat below has a sagged headstay, which gives the jib more depth and power. 3) Watch for a “knuckle” in the front of the sail if the headstay sags too much, which can make it hard to point. 4) The jib leech is tighter on this boat; too much headstay sag will close the slot between jib and main.
A couple of years ago, I sailed the Bayview One Design Regatta (BOD) in Detroit with Skip Dieball, the Etchells World champion that year. Skip knows a thing or two about making sailboats go fast and it was fun to interact with him and get his input and feedback on the J/70. I wrote an earlier version of this article after that regatta, and then reread the story last summer while we were preparing for the J/70 Worlds in Marblehead. The Worlds turned out to be windy, but we sailed two light-air regattas in Newport, RI, beforehand, and this reinforced and refined some of my ideas. I hope some of these notes can help you understand your J/70 setup better and help you go faster.
The regatta conditions that year in Detroit were largely light with occasional moderate chop, so rig tension, headstay sag, and jib trim were especially important factors in setting up the boat. Skip and I regularly discussed the synergy between these three variables to answer the question what should we look for in headstay sag on the J/70 to optimize jib trim through a variety of conditions? Afterwards, I gathered my thoughts on how one affects the other and how to tune and trim for maximum performance with a focus on light air, and I have augmented those with insights gained during 2018 summer racing.
How J/70 headstay sag improves pointing:
The shrouds should be tensioned so that we have 2-4 inches of headstay sag at the mid-stripe of the jib and 1/2 to 3/4 inch of mid-mast side sag. The basic idea is that headstay sag adds depth to the jib.
Adequate headstay sag in light to moderate wind reduces the need for weather sheeting the jib. Sagging the headstay powers up the middle of sail, but fine tuning the lower section is important. Tension the weather sheet so that the clew is just above the edge of the cabinhouse to 2” off the cabinhouse. In flat water, you can trim 1” inside the cabin house edge, maximum.
The mast side sag is an indicator that the mast is free to move/flex with little restriction by the lowers. This will allow the mast to be more flexible and dynamic in light air and increase headstay sag.
The middle of the jib luff sags not only aft but also to leeward, which changes your angle of attack to the wind.
At the same time, the mid-leech “rotates” slightly to weather, reducing the need for windward sheeting referred to above.
The net result of the headstay sag is that the boat can point higher. So how do we get there consistently?
Light Air & Flat Water
In light air and flat water, it is important to create the power in the sail plan that the J/70 wants, while keeping flow across the sails. In lighter conditions and flat water, the jib needs depth for added power and sagging the headstay is the easiest and most direct method to create depth in the jib.
When the headstay sags, it not only sags to leeward but also sags aft, towards the jib tracks, which puts the luff closer to the leech, thereby adding depth to the jib. What we find is at the middle section of the jib, when it is sagging 4-6″, the luff of the jib is actually falling off to leeward slightly and the leech, by default, “rotates” to windward just a bit. This creates a scenario where the middle of the jib luff has a better angle of attack to the wind and, because of this better angle of attack, you will be able to point slightly higher without luffing or losing flow over the front of the jib.
In this scenario, when the mid -leech “rotates” to windward, the effect reduces the need to windward sheet as aggressively because the leech has, effectively, moved inboard already because of the sag.
When you have this setup correctly, it is still important to make sure the jib leech tell tales are flowing 90%-100% of the time so that the airflow stays attached to the jib, and the sailplan does not have any “breaks” or “stalls” in the airflow. That said, it is OK (and actually encouraged) to test to make certain you are at maximum trim by sheeting in periodically until you see the jib leech telltales stall slightly, then ease out till they are full streaming. This is your jib sheet trim range which may be as little as 1” of sheet.
It is important to stay on top of your rig tensions in these conditions and find the settings that work best for your rig and driving style. In general, rig tensions that are loose enough to create 4″ of sag are good for light air and flat water. As you can see in the tuning guide, the “base” setting is 16/10 minus 2 turns on the lowers for 10 knots so when the breeze is quite light (0-6 knots), I will loosen 1-2 turns on the uppers and between 1-2 turns on the lowers. This gets my uppers closer to 14 and the lowers are very loose (they do not register on the gauge). The mast side sag at the spreaders should be about a 1/2 inch when the lowers are loose enough. This side sag is also a signal that the mast is free to bend forward as well as off to the side. This forward bend is good in light air to create a flatter main that can be sheeted tighter without stalling the leech. This will also help pointing ability.
Light Air & Choppy Water
When chop is introduced into the picture, a loose rig is still good, but you may find that the rig will pump too much in heavy chop. This is normal, but in order to temporarily stabilize the rig, pull on enough backstay to take the deflection out of the backstay flicker at the top of the mast and put a small amount of tension to pull back on the mast. This should minimize the pumping of the rig and headstay and keep a more consistent sail shape through the chop. As soon as the patch of chop is over, release the backstay to get slightly more sag back in the headstay.
Final Thoughts
The J/70 is one of the few boats where weather sheeting is effective, but it has to be done with an eye on the headstay sag. With a saggy headstay, you will tend to use less weather sheet. With a tight headstay, in general, you can use more weather sheet. Keep in mind that the angle of attack and leech position will change with the headstay sag, and adjust your weather sheet accordingly.
These are tips that can make a big difference in light air speed. Feel free to contact Tim Healy or any member of the North Sails One Design Team if you have other questions on how to make your J/70 boat GO BEYOND.
For more on this subject, read “Why is Headstay Sag Fast Upwind?”
For more on the J/70, read “J/70 Speed Guide.”
READ MORE
READ MORE
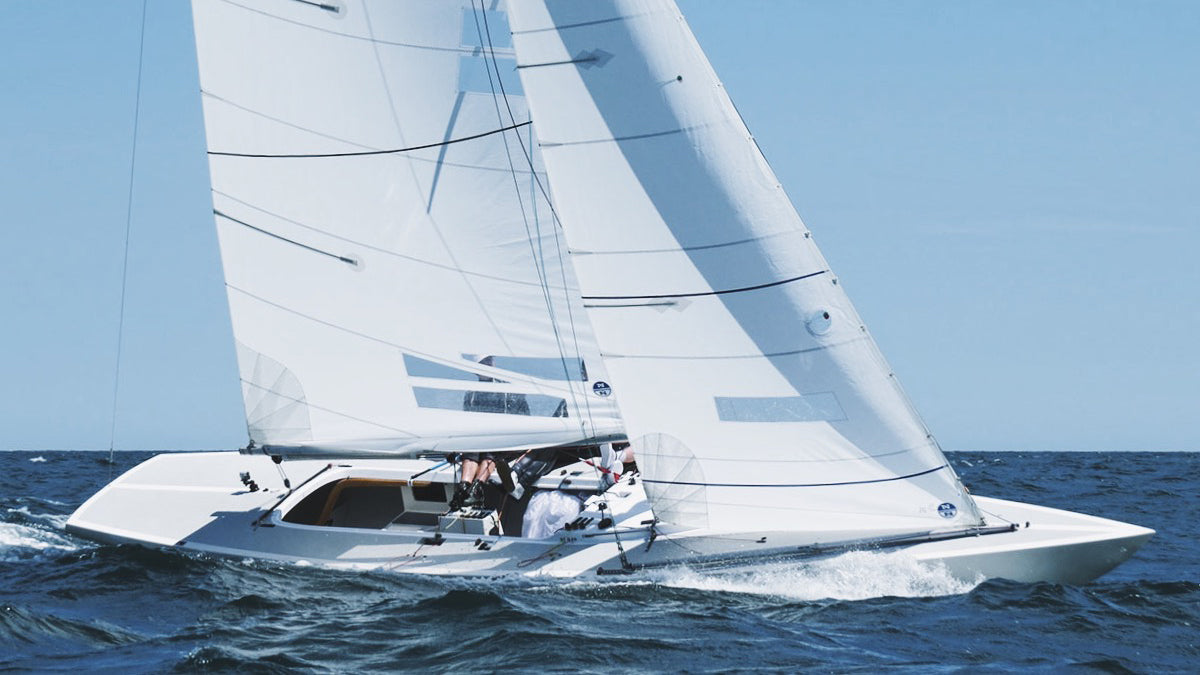
guides
ETCHELLS SPEEDY TIPS
ETCHELLS SPEEDY TIPS
Quick Tips That Make All The Difference
Whether you are preparing for the Worlds, a local regatta, your country’s nationals or your club’s summer series, we have compiled a series of speedy tips from North Sails Etchells experts that will help you step up your results.
Don’t forget the jib trim setup. We spend a lot of our time focusing on the mainsail when the headsail is usually 67% of the total drive force.
Light Air Jib Setup Under 8 knots
Use the soft full length batten.
Add forestay sag by easing the backstay.
Add prebend in the mast by easing the mast lever or reducing mast blocks.
Trim the sheet to have the upper leech tell tale flying 90 to 100% of the time.
Jib Trim
Use the tuning guide’s spreader marks as your trim guide for consistency.
Battens For Light Air
Use the soft full length top batten combined with the shorter length lower leech battens. They make a big difference.
Getting A Good Start Is Critical
The more you can practice starting, the better. Work on your line sights before each start and work to get a “movie” line sight for the bow person, watching to leeward as you approach the line so they can be calling accurate distance to the line as you approach. That, plus a good clear call on time is invaluable.
Straight Starting
The Etchells is a heavy keelboat with the rudder attached to the skeg and does not turn that well. Try not to bear off too much on starboard in the last 45 seconds to the start. Keep the jib trimmed in, or luffing about halfway if necessary, to help the helmsperson find the right angle to build speed in the last 15 seconds or so.
Watch The Layline
Unless you are in the top 3-5 boats at the first windward mark, NEVER EVER get to the layline more than 10 lengths from the mark because you’ll spend too much time in bad air from the boats ahead. Instead, find a clear lane back to the middle, and then work to get up to the layline inside ten lengths from the mark. Bad things happen to good people who get to the layline too early!
Do Your Homework
Arrive a few days before each event to get reacquainted with the boat and your teamwork. A day or so of practice really helps shake the cobwebs, and, if you are working with a coach, is a chance for some good analysis of setup and general trim. Having a good training partner helps a bunch, especially if both teams are keen to learn and share.
Never Stop Practicing Time/Distance Drills for Starting
Good starts typically yield good finishes. In the uber-competitive Etchells fleet, getting off the line is essential as the fleet thins out very fast and lanes are at a premium. Try to get proper line sights (safe ones!) and practice accelerating and decelerating as you approach the line. The goals are always the same: cross the starting line as close as you can, on your best exit angle, and at top speed!
Don’t Wait Too Long To Take Down The Spinnaker
The Etchells will keep its momentum into the bottom mark and any loss you think you give up with an early drop is overshadowed by a clean rounding in a good lane with speed and everyone hiking. Speaking of hiking, it works every time, so don’t take long breaks in the breeze. The Etchells responds nicely to a hard hiking crew, even though it hurts!
Tuning Evolution
It is amazing to see how this great boat continues to evolve. The addition of the mast lever and intricate in-haul systems have really helped make the boat so much more adjustable from the rail. You can adjust your sailing mode to the racing situation: maybe a high mode to live in a lane, or a more open bow-down mode to capitalize on a shift. I have been sailing these boats since the 1980s and I am still learning every time I race them.
Smooth Versus Bumpy Water Set Up
I have found that fast settings for smooth water often do not work as well in bumpy water and vice versa. Bumpy water versus a big sea swell also changes what set up works best. In general terms, fuller sails with more twist seem to work well when the water is rough, while flatter sails with harder sheeted leeches seem to be better when the water is flat.
Spreader Angle and its Effect on Mainsail Luff Curve
Each Etchells mast is a little different in bending characteristics. The mast ram can have a big effect on getting the mast to match the sail’s luff curve, but spreader angle also has a part to play here. A more forward or straight-out spreader angle makes the mast stiffer. A more aft-sweep spreader angle lets the mast bend more easily, particularly in the middle section. A fair curve that matches the sail best is the ticket.
In Miami, Consistency Pays
Miami continues to be venue where consistency pays. Taking chances usually produces a high scoring race. I try to be conservative on the line, starting in the middle third. From there, I work my way to the favored side as I progress up the first leg.
New Sails are Better Than Old Sails!
We used unbuttoned sails for the first 3 winter series events to save our buttoned sails for the Midwinters, a sanctioned event. Fresh sails do make a difference, especially with jibs.
Flat Water Tuning
Biscayne Bay is very specific with its flat water conditions. Most other venues tend to have more chop or swell, so you’ll have to revert back to settings with a little less rake and slight fuller flying shapes.
Find A Clear Lane
Find a clear lane free from boats too close to leeward, so you can put the bow down and reach max speed.
Put The Keel To Work
It often takes as long as a minute to reach max speed with the bow down. After you do, you start to sail higher as the keel begins to work.
Crowded Leeward Mark
At the leeward mark, if you are in a group of boats with only a marginal chance of gaining an inside overlap, hold back and round behind to allow a high lane exit. This allows you to sail to the side for longer. Tacking back into the middle too soon after rounding is usually a loser.
READ MORE
READ MORE
guides
VX ONE TUNING GUIDE RELEASE
VX ONE TUNING GUIDE RELEASE
Get The Most Out Of Your VX One
North Sails is proud to release a complete Tuning Guide for the VX One class. The new guide was based on six months of tuning and practice, leading up to and including the 2018 North Americans in Charleston, South Carolina. North VX One experts John Bowden, Jackson Benvenutti, and sail designer Mike Marshall worked together to develop the guide. The base rig tensions and turns for each step have been adjusted as well to keep the mast bend better aligned with the sails. Language has been added to the guide to clarify the way that sails should be trimmed and the boat should be sailed in all conditions.
“The new base numbers in the tuning guide were the ones that our team used to win the VX North Americans in Charleston. They help to better depower the boat in heavy air and power it up in light air.” – John Bowden.
While we can’t guarantee you immediate victory on the race course by following this guide, we can assure you that you’ll be taking a big step in the right direction!
Open Tuning Guide
READ MORE
READ MORE
guides
CHARLESTON RACE WEEK TOOL KIT
North Sails is never satisfied and always seeking to build sails that help our clients to win. Our victory list is here to prove it.
READ MORE
READ MORE

guides
GENNAKER LAUNCHING BAG INSTALLATION GUIDE
GENNAKER LAUNCHING BAG
Installation Guide
Most of the really memorable spinnaker mishaps can be avoided if the sail is equipped with a dousing sleeve. Inside the sleeve, the sail is protected from most snags. When the sleeve is hoisted there is no pressure on the sail, so the crew can take their time and make sure everything is sorted out before raising the sleeve. However, the sleeve and retrieval line add another layer of complexity and potential for tangles. That’s why, except on very large boats that are equipped with purpose-made spinnaker launching bins, we recommend storing your cruising spinnaker and sleeve in a racing “box turtle” bag or zipper “sausage” bag. For trouble-free launching and retrieval, follow the steps below.
Step 1
In a sail loft or on a clean dry lawn, tie the head of the sail to a tree or post. With a helper holding the tack, run the sleeve up and down to remove any twists.
Step 2
Pull the sleeve all the way down. If the sleeve fits the sail correctly, the cone will come within a foot of the clew, but will not go past the clew. Next, attach the clew and tack to opposite ends of the bag with the Velcro web straps. Stuff the loose foot fabric into the bag and place the cone in the center of the bag opening, on top of foot material, clew, and tack.
Step 3
Coil the retrieval line loosely and shove it up into the outer sleeve, so the line disappears above and outside the cone. This will keep the retrieval line from getting tangled and will prevent you from inadvertently rigging the tack line, halyard or sheets through the loop. (When you hoist the sleeve to the top of the mast, the retrieval line may fall to the deck on its own; if not, reach in and pull it out.)
Step 4
Flake the sleeve into the bag, forcing each flake deep into the corners. Pass the center Velcro webbing through the head ring and close the bag. Now the sail can be hooked up to the tack line, halyard, and sheets. You will hoist right out of the bag.
If the cone is allowed to run freely up the luff as the sail fills, it is possible for the cone to run fast enough that it creates a fair amount of friction. This could cause enough heat to melt the fabric over large areas of the sail. The friction of the retrieval line running through the palm of your hands can also cause enough friction to melt human skin. The skin repair is free (except in extreme cases), but the cost of replacing the melted spinnaker fabric can be pretty high. Before raising the cone, control deployment speed by wrapping the retrieval line around a deck fitting or winch.
READ MORE
READ MORE
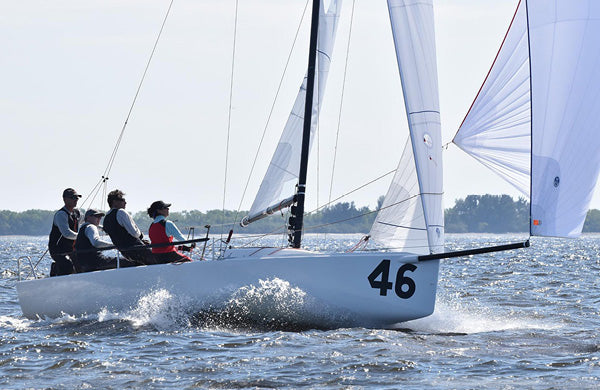
guides
SPEED READING: MANAGING YOUR RISKS
SPEED READING: MANAGING YOUR RISKS
Maximizing Your Chances To Make Gains
Zeke Horowitz, skipper of J/22 Uncle Fluffy, 2019 World Champions. © Chris Howell
J/22 World Champion and North Sails Expert Zeke Horowitz explains how you can maximize your chances to gain through smart boat positioning on the racecourse. Sailboat racing is all about controlling what we can—boat speed, boat handling, preparation, and decision-making. But we can’t control everything. So we need to think about ways to manage risk so we can rely on good speed and conservative tactics. In this article, we’ll review strategies you can apply to your position decisions to ensure your boat is in the right place to make gains while avoiding big losses.
Pre Start: “It’s all about the homework”
Get out early to sail most of the first beat and figure out if there are any trends in terms of where the velocity is, how often the wind is shifting, current differences, wave differences, etc. Take note of the range of compass numbers on both tacks so you’ll know right away if you’re lifted or headed. Then, check the starting line. Is there a line sight? Is there a favored end based on compass bearings compared to wind direction?
Now you can relate this info to what you learned sailing upwind and decide on an overall strategy. Is there a persistent shift? Is there a side to race to based on current? Is it oscillating? With all of this info, decide which area of the line to start so you can be ready to make gains right off the line.
If there is a favored end of the line or side of the racecourse, it’s important to start near that end. But if the wind is oscillating, start in an area so you can sail on the lifted tack off the start, regardless of the favored end. If you know the wind is oscillating and in a left phase during the start sequence, the pin will be favored. But since the next shift will be a right phase, it’s probably better to start near the middle or even boat end, because you will have an easier time tacking right away to get on the port lift, and you’ll be closer to the next shift than most competitors. Maybe a few boats that make a risky start at the pin look advantaged early, but you are on the lift, in less traffic and headed towards the next shift, which will be a righty. Now you’re in a position to gain right away.
Starting in Oscillating Breeze: Pre-race homework says wind is oscillating and the pin end is favored. Boat at the pin is upwind at the start, but can’t tack onto the lift right away because of traffic. Boat at unfavored weather end tacks onto the lift and then immediately after the start on the first shift, and gains the lead.
Beats to Windward: “Game of Thirds”
I like to divvy up the beat into thirds. At the bottom of the beat, it’s all about positioning yourself so you can execute the game plan. If you’re in bad air, you need to decide if tacking for a clear lane is the move or if it’s better to suffer for a while in bad air to get going the direction you want. If there aren’t many shifts, or there isn’t a particular favored side, then lane management is everything and you should not sail for a moment in bad air if you can help it. But if you know you need to get to one side, you may have to sail in bad air to get over to that side at the bottom of the beat.
If the wind is oscillating, you may have to come to terms with the fact that you won’t have much clear air on this beat, because sailing on the lift towards the mark is more important than sailing in clean air. If you know you’re on a lift, duck a boat coming across on the header instead of tacking on its lee bow, even if it’s a big duck. Keep going the right way, staying in position to gain at the next cross.
For the second third of the beat, start looking for opportunities to consolidate. You’ll have an idea of where you stand, and you need to weigh your options for staying ahead of the boats behind you while looking for the opportunity to jump the pack just in front. If you can take separate a bit from any pack of boats, you’ll be able to sail faster. So look for a good opportunity to separate into clear water and avoid being the boat going slow in the middle of the pack.
Most importantly, look up the course past the laylines and start developing a strategy for the top of the beat. If you want to get to a certain side for the last portion of the beat, be disciplined about lee-bowing packs or taking smart ducks to ensure you’ll be one of the first to get out there. Also, look for opportunities to consolidate any gains you’ve already made on packs so you can put them in the bank.
As you near the top of the beat (the final third), think about what the last shift or pressure advantage will be. Often, you can make gains getting to the edges at the top, avoiding the cluster in the middle. As the fleet gathers under the top mark, the wind velocity dies there under “the blob.” Be a little more on an edge, and you’ll have an opportunity to gain. If you’re not in the lead pack, think about the boats that will round ahead and try to avoid that traffic. If possible, also try to avoid getting to a layline too early; if the wind shifts, you won’t make any gains.
Finally, as you approach the weather mark, start developing a downwind strategy. Will there be a long jibe? Is there a pressure or current advantage? Are you rounding in a shift that will dictate the favored jibe right away? Being decisive here can help you jump that pack just in front of you!
Best Pressure/Shift at the Top Mark: Port approach is often clearer but more risky. Watch for traffic and boats rounding the windward mark ahead. Look for an edge with more wind or last favorable shift.
Runs to Leeward: “The Train and Making Gains”
The top third of the run is all about escaping from the top mark. If it’s the first weather mark, the traffic of boats still going upwind and the “blob” representing the mass of the fleet as a whole make the area directly under the mark a no-go zone. Unless you see a massive right shift or you know the run is going to be all port jibe, do a bear-away set. Jibing early at the first top mark can be tragic, and the smart money calls for a regular bear-away set on starboard.
Keeping that in mind, though, if you’re clued into the last shift or the position of the leeward mark and you know port jibe is going to be strong, then don’t hesitate; call the jibe set and jump the boats around you so you can be the first on the favored jibe heading down the course.
On the other hand, if you feel the left side of the course is favored and you want to stay on starboard, then commit early to the high lane around the weather mark so you don’t risk getting rolled and forced the wrong way.
Things usually settle in by the second third of the run and you can focus on speed and positioning. Manage your lane behind you to always have clear air, but when it is time to jibe, position yourself to make gains by sailing artificially low for a few moments, moving the trailing competition high of you. While it looks like they are creeping up to get on your breeze, you jibe into clearer air, setting yourself up for the last phase of the run.
The most important thing to decide in the last third of the run is where you want to be for the next beat. If you know you have to go to one side, then that dictates the gate mark you’ll round. If it’s not clear, then try to observe if there is a favored gate (one more upwind than the other), and if that isn’t clear either, decide if one gate will provide a cleaner escape—fewer boats coming down that side of the course giving you bad air as you turn upwind.
You also need to position yourself relative to the nearest boats so you can have a clean rounding. Try to get to the inside of any packs to get mark room. Or look for the chance to split from the pack or the boat rounding just in front of you so that you have less traffic and more clear air as you round. If you’re in a pack of four, and three boats are going to the same gate mark, it usually pays to go to the opposite gate with more speed and clearer air. Even if you want to go the other way, you can come around and tack fairly soon. Now you’ve avoided rounding in a pack and you’re still going the right way. Rather than being in a position where you’ll likely lose distance on that pack, you’re positioned to make another gain. Just make sure you’re not sailing straight into a blob of boats coming downwind with spinnakers!
The name of the game here is being able to decide when the opportunity is to “stay on the train” to avoid a loss and balancing that with positioning the boat on the train so that you’re more likely to gain than lose. Above all else, none of this will matter if you don’t take the time to develop good speed. Good luck this season!
Making Gains at the Gate: If you want to go to the right side, round that gate mark. If there is a pack of boats close ahead, round the other mark and then tack with clear air to gain on all but the leader.
READ MORE
READ MORE

guides
RBS SLICE BATTEN INSTALLATION GUIDE
RBS SLICE BATTEN
Installation Guide
North Sails RBS Splice Battens provide a convenient way to ship and stow 19mm and 25mm battens with lengths up to 7.4 meters. With proper installation, the RBS Splice battens will afford the same level of performance as standard battens, with minimal distortion to the sail.
NOTE: The splice connector is permanently attached to the front section of batten. DO NOT try to remove the connector from the front end.
Step 1
Lay out the battens with the labels facing up and the arrows pointing towards each other.
Step 2
Identify the front and back sections, making sure that the tapered end of the back section is aligned with the splice connector.
Step 3
With the arrows pointing toward one another, insert the tapered end of the back section into the splice connecter. Apply enough pressure to the back section to seat the batten completely in the connector.
Step 4
If the two sections are connected properly, the batten will be perfectly straight. If the batten is improperly assembled, the back section will be angled.
Step 5
Tape the junction of back section and connector.
To take battens apart, remove the tape and hold the back section of the splice connector. Flex the front end up and down, while exerting pressure in the opposite direction as the arrow.
For a short video demonstration, click here.
READ MORE
READ MORE

guides
SPEED READING: SETTING GOALS
SPEED READING: SETTING GOALS
One Design Expert Zeke Horowitz Shares His Winning Formula
© Chris Howell
J/22 World Champion Zeke Horowitz explains how to put his winning formula to work for you this season.
If you’re a competitive sailor, you’ve probably read about the value of setting goals for your racing. By setting and trying to achieve your goals, you measure your progress as a competitor, whether the goal is to finish every race at a windy regatta, finish in the top half, score a finish in the top five, or flat out win the regatta.
It’s important to always be striving, but for most sailors, there’s usually one regatta each year where we really want to perform our best. Sometimes it may even be two years ahead. It might be the Fastnet Race or the J/70 World Championship. But it could just as easily be the Labor Day Regatta or the district championship for your one-design class.
If you haven’t named that event yet, do it now! Then follow these seven steps to be best positioned to peak at the right time and have your best result when it counts.
Step 1: Set up your team.
Your team is the most important part of your success as well as your fun. There is no substitute for sailing with people you enjoy and with whom you work well. Approach your team with the idea that you’ve got a season of sailing ahead of you with a goal of delivering your top performance at the big event. Get everyone on the same page and committed to an energetic effort to achieve this goal.
© Chris Howell
Step 2: Set up your schedule.
Look at the regatta schedule leading up to your big event. Take note of any events that have a high priority: Are any of them at the same venue as your big event? Are any local to where your boat is? Are any more likely to attract a big fleet? Send this full schedule to your team and try to work out which events make the most sense.
There is HUGE value in doing events with the ENTIRE team. You can always look for subs if someone can’t make it, but try to prioritize your regatta participation based on the whole team’s participation. Always include at least one day of practice as a “shakedown” before the regatta if schedules permit. If it fits at any events, try also to include a day of tuning practice with another team, so you can have a tuning partner and learn faster. A shakedown session and a tuning session could also be fit into the same, single day. Sailing before a regatta pays many benefits and can really help the whole crew be on point for racing.
© Bernie Kaaks
Step 3: What’s the budget?
This is obviously a big piece of the puzzle in our sport. You need to consider travel, logistics, food, boat equipment, sails, etc. Make sure your budget fits comfortably with your schedule. It’s often better to sacrifice a regatta if it helps your team with more room in the budget for equipment or more comfort at your other events. If you sacrifice equipment, time or comfort instead, you likely have a much less productive experience. I find having a top-quality experience at one less regatta is a good tradeoff.
Step 4: The Boat
In sailing, there are many elements that are not in our control—wind shifts, tides, competing boats, decisions made by race committees, etc. But one element that we can and must control is our equipment. The boat is the most important piece of that. Be realistic about the condition of your boat and make the changes needed to have the best boat possible. If you’re chartering a boat, do lots of homework, get pictures, and make arrangements for any upgrades necessary. Broken or non-functioning equipment is a massive time waster. Add in specific days to your schedule for boatwork. And don’t leave anything until the last minute. When you get to the big event, you need to be 100-percent confident that your boat is perfect.
Step 5: Sails
Depending on your class rules, you will have more or less room to get creative with sail purchases. But regardless, you need to be sure you have the newest sails possible for your biggest event. In some boats, that means having sails that are “broken in”; but even then you must make that part of your plan. Look at your event schedule leading up to the big event and decide when and where you should have each sail in use based on your goals for each event (see step 6). This is another element that you can control, and it’s important to do it as well as you can given the budget.
© Andrew Palfrey
Step 6: Goals within goals.
Your team is clear that your big goal is to peak at the big event. In the meantime, it’s critical to set specific and trackable goals for each practice day and each regatta on your path. Maybe the first regatta you want to work out specific crew communication and boat handling. Then work on starts and boat speed at the next one. Decision-making at the top of the beats, etc. It’s imperative to not only set these goals before every day on the water, but to then debrief them with your team after each race, each day, and each regatta.
Your goals for the next events will change based on your debriefs and based on what you learned at your last one. But you need to spend time working on all of the small details so that you’ve had a chance to learn your lessons and reflect on your mistakes before the big event. That way, your team can have confidence in doing all the little things well, and you can focus on the conservative tactics and superior boat speed needed for the big event.
Step 7: We’re finally here – the big event.
If you’ve done the first six steps well, then you know your boat, sails, and equipment are at 100 percent. You’ve taken the time to gain confidence in your speed and your boat handling. You’ve learned about your team and how to communicate effectively. You’ve determined roles for each teammate both on and off the water (who makes sandwiches, who puts the bow numbers on, etc.). Essentially, you’ve controlled all of the elements you are physically able to control.
Now your task is to have fun, continue to control the things you can, and make conservative, high-percentage decisions on the racecourse that allow your team to rely on its strengths. Continue debriefing after each race and each day throughout the event. Keep learning!
There is always going to be luck involved with our sport, and there’s not much you can do about it. In fact, most top sailors will tell you that it takes a bit of luck to reach the top of the podium.
With this approach, you’ll be able to put yourself in a position to achieve your goals. Whether or not you achieve this goal at the big event, treat it just like all your warm-up events and debrief it with your team. At that point, it will become another step along your path to the next big event, where you can choose to peak next year. Good luck, and have fun!
©Mauro Melandri | Zerogradinord
READ MORE
READ MORE
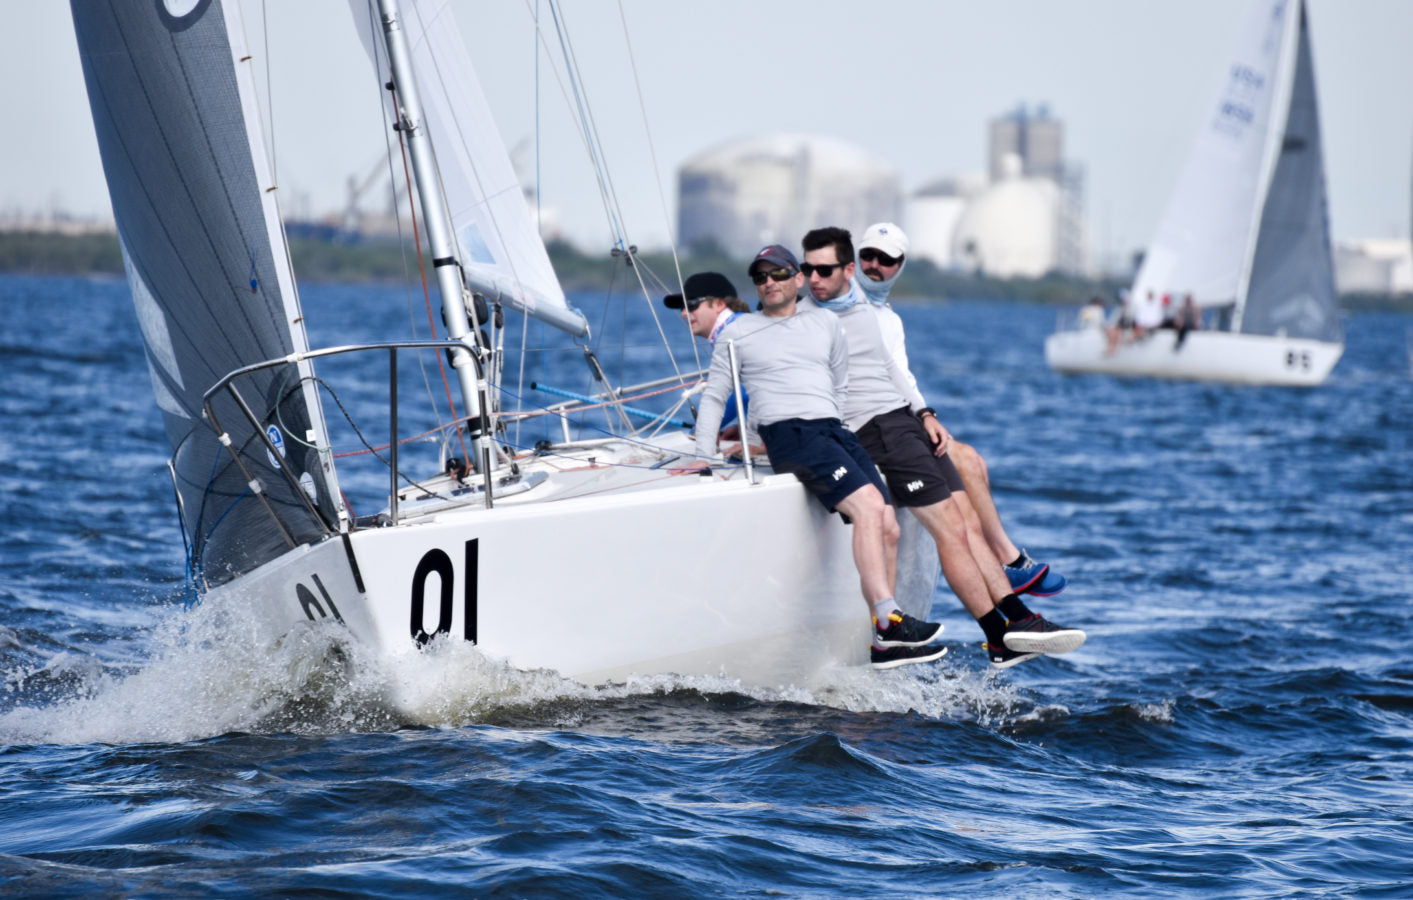
guides
STARTING, TACTICS, & SET UP
STARTING, TACTICS, AND SET UP
Strategies From the 2019 Midwinters In Tampa, FL
2019 Midwinters Champion, Rossi Milev neck and neck downwind with Robby Brown, 2018 National Champion © Chris Howell
On the first two days of Midwinters in Tampa, the breeze built from a 5-8 knot SE to the ‘normal’ SW seabreeze. On the final day, the breeze filled first from the south and shifted southwest much sooner, eventually strengthening to 12-15 knots. Every day, the strategy remained the same.
Daily debriefs after sailing provided some great insights from sailors at the top of the fleet, including: North Sails Expert and J/24 World Champion Tim Healy, Hydra Sailing Solutions coach and Old Dominion All-American Marty Kullman, and Brown University Coach and Collegiate All-American John Mollicone. Marty was tactician for Bangor Packet. Tim Healy was tactician for New England Ropes. John Mollicone was Tim’s helmsman. Take notes!
Using your prostart properly
Q: When you tack onto starboard, how do you judge how far away from the line?
A: Time and distance using your Velocitek, ask yourself: how many meters- how many seconds?
Example: Your Velocitek reads 50 meters at 60 sec., so you are travelling at roughly two knots, which is actually pretty slow. When you are that slow, it’s hard to control the boat once you get on the line.
tip: You want to be a touch further away from the line so you’d be approaching at about one second per meter.
Q: How much time do I have to burn so I’m not over early?
A: It depends on what shift you are in at the start.
Main Point:
Get out there early and practice your accelerations, then distance and time from the line. This will help you figure out the best place to start accelerating and you can trust what the velocitek is telling you.
© Chris Howell
Q:How do you properly ping the line?
A: When you get your pings, you want to cross the starting line close hauled. Come in on starboard at the same angle you would be close hauled. That’s where your bow is on the line. Do the same at the pin. The far side is easiest for the bow guy.
tip: The slower the better when you do your pings. This is so you can do it the same every time and you can trust what the tool is telling you. When you get comfortable with that, one guy is in charge of meters, one is in charge of time, and you can figure out fast if you need to be coming up to the line faster.
Main point: Always come in on starboard/port at the right angle, your true close hauled course, so your ping is accurate. Do it the same every time. At some point you’ll develop a routine and it will all become easier each time. You’ll learn to trust what the velocitek is telling you.
Strategy at the start
After you get comfortable with all the prestart tasks you develop a routine. For a port approach you are looking for a place to tack at 1:30 or closer to 1:00 . When you do decide, if you have someone behind you and they may tack below you. It’s good to go behind a couple boats and tack so you can guarantee yourself a hole.
Think about it this way:
In the light air, when the wind goes left you are racing earlier, maybe even trying to make the pin end. When the wind goes right you are burning speed at the start, going head to wind more, keeping in mind that you can’t set up too early.
You really need to know what shift you are in. Right shift, starting on starboard, you are going to get to the line faster. Left shift? It will take longer for you to get there.
Main Point: Know what shift you are on before the start
Example: If you are 20 meters away from the line and get a 10 degree right shift there is less distance to cover to get to the line because you are now able to sail more perpendicular to the start line and will take less time to get there. In a 10 degree left shift, there will be more distance to sail to the line because you will be sailing much more parallel to the starting line and will take more time to actually get to the line. .
Tip: Your tactician needs to articulate to the skipper: “We need to get going, go quicker, it’s a left phase, etc.”
© Chris Howell
Prestart Sail Setup & Technique
Tip: Make sure your traveller is preset, even if you are on port at the time (port approach)
Don’t have a lot of backstay on, but you can preset if you need it (in windier conditions). Mainsheet and final genoa trim is all you need to focus on as skipper at the start.
Average Genoa Trim:
You want to go 3” off the spreader tip on average. Sometimes a little tighter or looser but 3” average. You can trim tighter when it feels right.
Main Point: Trimmer on final approach needs to be in sync with skipper to get up to speed. Make sure your main comes in tight, trim in, and how tight you trim in all depends on my lane off the line.
tip: Another thing that’s important is to make sure your mainsail is up all the way. We mark it so we can see if it slipped. It will always stretch the first time, so you gotta tighten it before the first race and between races.
At The Start
Q: Is there a boat to leeward of me off the start?
A: If there is, you need to put them away.
Foot over them at the start to get them out of the way early. This only applies to a threat to leeward. If your tactician tells you that you have to pinch off someone to windward that’s when you revert to high mode.
Ask yourself: Am I in height mode? If yes, you trim the main in hard. Then you can pinch off the guy to windward before he has the chance to roll me.
Your trim all depends on how much space to leeward you have. Should you climb or foot? Sailing higher is slower, but sometimes to pinch off the guy to windward you can get away with sailing your high mode to get rid of them.
Main Point: At the start, think about what mode you are in and get over-top the leeward boat ASAP
© Chris Howell
Strategy beyond the start
Local knowledge is great but you have to sail with what you see. On day one, we hedged right but the pressure was left. Day two you had to connect the pressure, but don’t spend time sailing to it in a header. Sail on the tack that’s pointing at the pressure if you can to get there quicker.
Q: Why is it important to go upwind early when you get to the race course?
A: So you get to know what’s happening. To get a good idea of the shifts that are happening, you have to give yourself time to sail upwind so you can figure it out. You have to go with what you feel and where the pressure is strong. Make sure your boat is set up correctly for speed.
Main point: You have to go with what you feel and see.
Q: When you are in the middle, and you feel light. What’s the next best step?
A: Be patient and get to an edge. Sail towards the pressure if you can, but get to an edge. Once you are at the edge, you want to make sure you are into the pressure all the way before you tack. If you are too shy of the pressure, you won’t get the full effect.
© Chris Howell
Technique off the line and on the beat
Q:If you are deep in the fleet, and you’re thinking about shifts vs. clear air, which do you choose and why?
A: You can’t be in bad air, you need to find a shift so you get out of there. The amount of air that twists off a J/24 sail is major. Sail in bad air for three minutes? NO, it’s better to do two tacks. There are times where you’ll have to hold out for a short time, but you don’t want to be in bad air for long. You need to maintain your boat speed as often as possible.
Example: It cost us five boat lengths in one race, but we double tacked because we could keep our speed. It was worth it.
Tip: As tactician, you ask the skipper, are you starting to feel it? Are you having a hard time? Then you have to tactically decide how to get out of there. Sometimes it can be worth sticking it out, but your skipper will tell you if they can hang on a bit longer. This can bide you some time if you are looking for a clear lane, but you can’t wait that long.
Main point: Your skipper will tell you if they are struggling. Then you can decide what the next best thing is.
Tip: The lighter it is the more bad air affects you. If you feel like you are getting affected, foot or tack away. Ask yourself: “Is it really painful worth tacking away? Or not so bad where you can hang a bit longer?”
Main point: You need to have a high mode. Yes high mode is slower, but, if you can sail fast in high mode you can stick out the situations where it’s necessary to wait for a lane to clear.
© Chris Howell
© Chris Howell
READ MORE
READ MORE
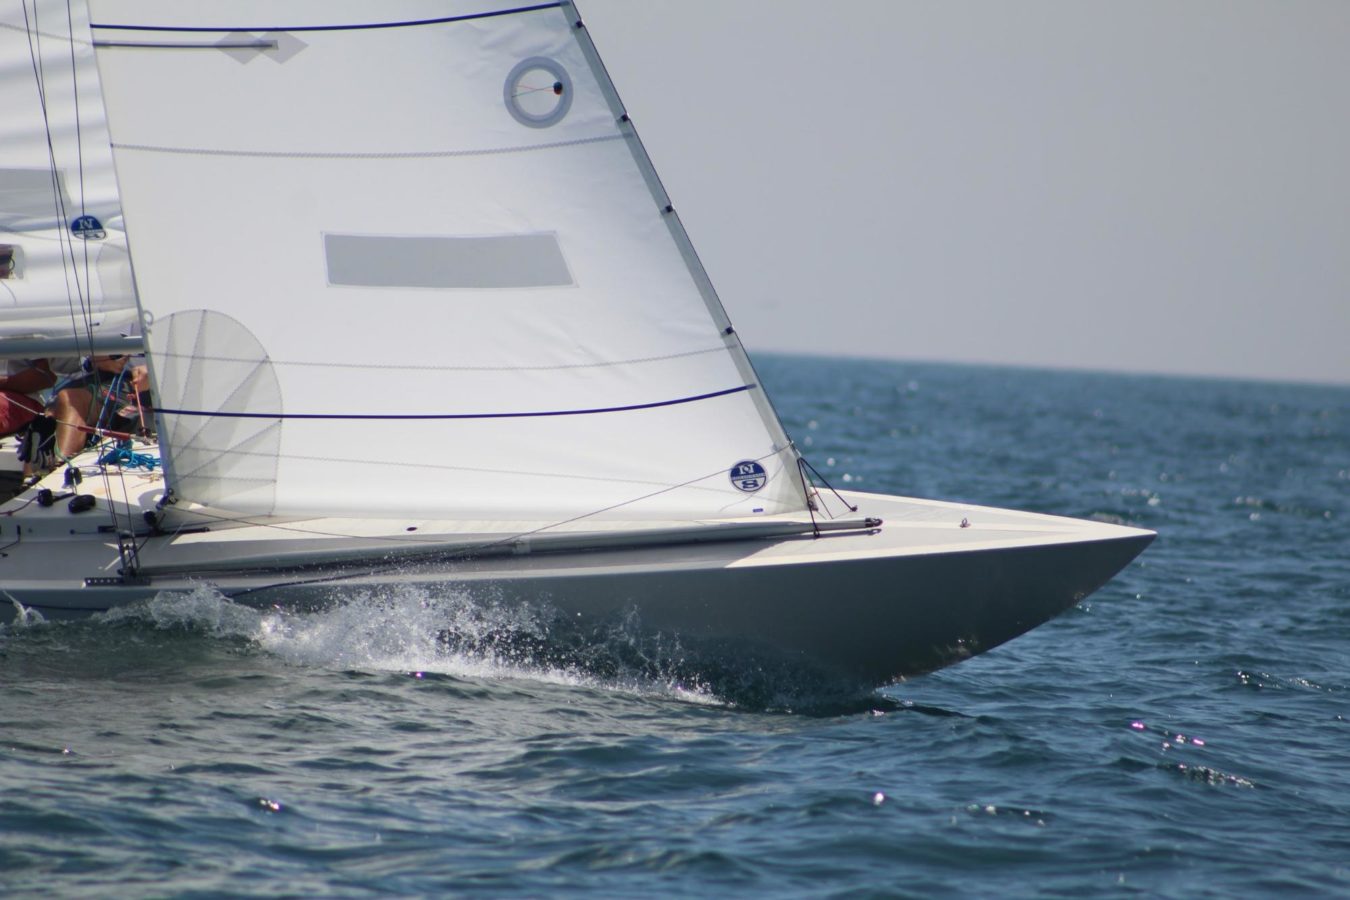
guides
SPEED READING: ETCHELLS MAST LEVER
SPEED READING: ETCHELLS MAST LEVER
Tips From Expert Andrew “Dog” Palfrey
The Etchells is one of the most competitive and prestigious one-design classes in the World. Sailors have been challenged to find the boat’s extra speed for over fifty years. We had a chance to interview two-time Etchells World Champion Andrew “Dog” Palfrey, the developer of the popular Mast Lever System.
Dog, thank you for all your great contributions to the Etchells class. Compared to a few years ago, the boat sure seems easier and more fun to sail. Being able to make some very simple, but substantial adjustments easily makes the boat easier to sail fast across the wind range.
Many thanks for the nice comments and also for the opportunity to help spread the good word to our fellow Etchells sailors. It is gratifying for me to go to Etchells events and see almost universal take-up of the Lever system. As you mention, it does make life easier for the teams to extract best performance from the aero package.
Focusing specifically on the use of the mast lever, in simple terms: What is the correct move with the lever and the mast at the deck as you go from light to moderate breeze to stronger breeze during a race?
Along with the sheets, the traveller and backstay, the mast lever control is a primary control in helping to get the best from the mast and sails.
The most challenging thing about the Etchells mast and rigging geometry, is that we lack direct control of the headstay (via runners). Also, we can only declare one mainsail and two jibs for the big events, so the ability to power-up and de-power both sails is fundamental to extracting the best performance from an Etchells across the wind-ranges and sea-states we sail in.
I primarily consider the lever system to be a tool that either stiffens or softens the bottom two-thirds of the mast. In basic terms, we want to stiffen the mast in heavy airs and soften in lighter airs. So, to answer your question, on a day where the breeze is strengthening, we would progressively move the mast (via the lever) aft at the deck – thus stiffening the lower two-thirds of the rig.
We need to remember that the effectiveness of the lever is limited by the position of the mast, relative to the mast partner hole (in the fore-aft plane). Headstay length and mast-step position are the variables here.
“In an ideal world, we are always going upwind with the mast all the way back in the partners hole. Why? This gives us the ability for the mast tip be as far forward as possible on the downwind leg. We know this to be fast in all but very windy conditions.”
If we are sailing upwind before the start, and the perfect position sees a gap between the trailing edge of the mast and the back of the mast partners hole, I will consider going aft on the step or lengthening the headstay to close that gap. However, if the forecast is for the wind to increase, I will make sure there is a gap there. This way we have the ability to effectively stiffen the mast by pushing the mast back with the lever. So, having the step a little further forward and/or the headstay length a little shorter than perfect is good insurance in a building breeze.
© Onne Van der Wal
As you either move the lever back or let it forward, what changes are happening to the headstay sag and lower mast bend?
Really good question. In basic terms, moving the lever alters where the maximum bend is allowed to happen vertically in the mast, with the application of backstay and/or mainsheet load.
Simply put, if the lever is pushing the mast aft at the deck, the bend will occur higher up the mast (and vice versa).The effect of a stiffer lower section of the mast also sees the headstay become firmer with the application of backstay and/or mainsheet.
When looking for power, we are generally looking to induce headstay sag. So we allow the mast to bend below the hounds (this also helps the mainsail shape in light airs). The lever will either be pulling the rig forward at the deck (creating pre-bend), or in a neutral position. The mainsail is designed so that minimal backstay is required in lighter winds. Sometimes we are looking to sag the headstay more without changing the mainsail shape at all. This is possible with subtle changes of the lever, backstay and mainsail changes together.
When it is windy and we are looking to de-power, we are generally looking for a firm headstay. This generally means stiffening the mast below the hounds, so the effect of backstay and mainsheet more directly tightens the headstay.
“When I look around the fleet when I’m sailing or coaching, the biggest variances I see are in headstay sag. When I am sailing, I find the hardest thing to set up accurately is the headstay sag. This is because it is not easy to see and replicate and there is no way to accurately reference the sag directly with a mark. But it is one of the key drivers in extracting best performance out of an Etchells.”
I look closely at the entry angle of the jib. If it is very fine, we probably need more sag. Likewise, if it very blunt, I will either ease more jib cunningham or look to remove some headstay sag with the application of mast lever and a little backstay. I also carefully observe the dynamic behavior of the headstay. If it’s windy and wavy and the headstay is moving around a lot, I will prioritize firming it up with more aft lever, tighter backstay and mainsheet.
Is there ever a condition where you leave the lever uncleated? Just allowing the mast to float in the partners?
Never. Allowing the mast to move, or “pump” over every wave will be constantly changing the shape of both sails in a subtle, but counter-productive way. However, in light to medium winds, I do like to know where neutral is.
In our tune-up, I will ease both the forward and aft control lines and observe where the mast is happy sitting. That tells me where the step is positioned relative to the gate and helps me make decisions on whether I should think about moving the step or the headstay length. But then I will cleat the lever controls off again.
Regarding the boat hardware: In 2014, when I first set up the lever in an Etchells, there were lines on both the forward and aft controls. But for the past three years I have set up the forward puller with shock-cord, so that is automatic. The advantage of this is that you only have to deal with one control line (the aft puller). I set the shock cord system up with a cleat, so I can disengage it in heavy air (when it is not required). I also disengage it when checking where neutral is. The disadvantage is more weight, as you do need heavy shock-cord to offset any “pumping” and a 6:1 system. But I think the weight is worth it. Being able to adjust the important controls easily (and from the windward rail) is key.
Is there a good rule of thumb that can be used for how much “gap” behind the mast to start with? Say at the dock with light tension (10 the the Loos gauge) on the headstay and the mast floating?
Yes. As I mentioned above, one of the hardest things to accurately quantify is headstay sag. So any tools that help me replicate fast settings are valuable. The “gap” you mention is one of those tools.
On my personal tuning guide, I have the shroud calibration numbers to suit the North Sails tuning guide tensions. But I also have a column for the “gap”. It’s really important, as it is a key indicator of exactly how the mast will behave in the fore-aft plane when sailing upwind and down.
When on the dock, I will set the backstay up so it pulls the headstay firm. Making sure the lever controls are uncleated, I then apply more backstay and watch the mast at the partners. When it moves forward slightly (the mast starts to bend), I stop pulling the backstay and then ease a small amount so that the mast moves back to its neutral position. This is approximately 10 on the Loos Gauge, but I find this method is better than measuring the headstay with the Loos Gauge (as they are inherently unreliable at low loads).
I then look at (and measure) the gap. I also check shroud tension and headstay length at this time.
In light airs, I am looking for no gap at all – even to the point where the mast is hard against the aft edge of the mast gate and bending around it by a factor of 5 or so mm.
In heavy airs I like the gap to be around 20mm, or 3/4’s of an inch.
The gap is controlled by both the step position and headstay length. Personally, I adjust both step and headstay. But there are many ways to skin the same cat. John Bertrand rarely changes his headstay length and does more adjustment on the step.
I would say the most important thing is to develop your own boat’s tuning guide. When racing, make sure you know where you are relative to that. So, if conditions change, or you are lacking speed or height (or have too much – or not enough power), you are best armed to make high percentage decisions on what to change.
“Keep in mind that the sails are a living organism. As they age, they do grow a little. This generally means they become a little deeper and a little rounder in the aft sections. This may not be a negative thing in lighter winds and a bumpy sea. When you add a new sail to the boat, be prepared to exercise some flexibility to your setup to achieve the same effect.”
We are engaged in a wonderful game that is both complex and yet quite simple at the same time. Our sport rewards experience, so don’t be afraid of trying things. But try to keep a record of what works and what doesn’t. Above all, don’t stop asking questions!
Andrew sailing with John Bertrand
Andrew “Dog” Palfrey is a two-time Etchells World Champion, professional sailor and America’s Cup coach. Follow Dog’s blog at www.sailing.dog
READ MORE
READ MORE
guides
J/105 TOOL KIT
Get The Most From Your J/105
Your next regatta is just around the corner. Is your team ready? Our J/105 Tool Kit will help. Created just for J/105 sailors, by our expert team.
#NSVictoryList
There is no better performance test of a one design sail than the results it produces. In 2018 alone, North Sails J/105 inventories helped teams win regattas all over the US.
Tips From The Champ
Champion Terry McLaughlin shares some tips that helped team Mandate win the 2018 North Americans.
Downwind Tips & Tricks
How to sail as deep as possible while still keeping your speed up. Before your next regatta, read this downwind manual from expert Will Keyworth.
Define Your Speed
Pulling all the pieces together can be challenging. Our J/105 Speed Guide will help you leverage our expertise to make the most of your sailing.
Fine Tune With North
Find your groove. Get your numbers. Be confident in all wind conditions. After countless hours of sailing, sail testing, and competing in the J/105, our championship winning sails will get you up to speed quickly.
Working With The Best
Our J/105 sails deliver the best results for our clients. Contact your local expert and join us at the front of the pack.
READ MORE
READ MORE

guides
WHY IS HEADSTAY SAG FAST UPWIND IN LIGHT AIR?
WHY IS HEADSTAY SAG FAST UPWIND IN LIGHT AIR?
How Headstay Sag Affects Everything From Speed To Point
Sailboats with headstay sag often point higher and maintain boatspeed better in light-air conditions. One Design expert Tim Healy describes the rewards and the risks.
Many sailboat classes limit the number of jibs that a boat may carry, and some classes allow only a single jib. These limitations challenge competitors to find ways to maximize power in light air. One of the key methods to power up a sail is to induce sag in the headstay, also known as the forestay.
Headstay sag on a sailboat is the distance between the midpoint of the headstay if it were perfectly straight and the actual midpoint while sailing. The best way to estimate this measurement is when sailing upwind, sight up the forward side of the headstay and note how far the midpoint of the headstay has sagged when compared to the mast.
When the headstay sags, it not only sags to leeward but also sags aft, which puts the luff closer to the leech, thereby adding depth to the jib.
How to Increase Headstay Sag
The key controls for manipulating headstay sag are shroud tension, mainsheet tension, and in some cases, headstay length.
You would think that headstay length would be the primary variable, but that’s only the case on boats with keel-stepped masts, such as the Farr 40, Etchells, and Shields, that limit range of mast movement at the mast step and deck partners. On those boats, lengthening the headstay by easing the forestay turnbuckle or adding extra toggles can be an effective way to increase sag. In some classes, such as the J/24, a maximum headstay length is prescribed, limiting this adjustment. And on almost all classes, there are good and practical reasons not to overdo the lengthening of the headstay, including a negative effect on mainsail shape.
In light air, the number one adjustment for headstay sag on boats with either deck-stepped and keel-stepped masts is varying the shroud tension. More tension effectively pulls the mast aft—assuming the chainplates are aft of the mast. If the lower shrouds are farther aft, they will have the most effect; on boats with aft-swept spreaders (J/24, J/70, Melges 24), the uppers will have more effect.
The other way to induce headstay sag is to minimize mainsheet tension. If the mast is stiff, trimming the mainsheet will quickly increase headstay tension and reduce sag.
Ideally, in light and puffy conditions, when you ease the mainsheet in a lull, you’ll see the headstay sag to leeward, powering up the sail. If you don’t get that response when you ease in a lull on a Thistle, Lightning or J/70, your shroud tension is too tight.
One other way to check that your shroud tension isn’t too tight is to sight up the aft side of the mast while sailing upwind. If you see a small amount of sag to leeward in the middle of the mast, that’s a good sign that your shroud tension is right.
Easing off the rig isn’t the only way to increase headstay sag. On a Lightning, you can add a block behind your mast at the deck. On a Thistle, you can put wedges under the mast butt. On a Snipe, you can pull the mast forward at the partners. On a J/24, you can move the mast butt aft. And on an Etchells, you can do any or all of the above.
When you sag the headstay, the maximum draft in your jib moves forward. To compensate and keep the draft aft, ease halyard tension, which also creates additional power. If you increase headstay sag but the halyard remains too tight, you’ll get a big “knuckle” in the front of the sail and an entry that’s too deep, so you won’t gain the overall power you’re seeking. You should see horizontal wrinkles in the front of the sail.
What Headstay Sag Does to Sail Shape
When headstay sag is increased, the headsail becomes deeper and more powerful. If your boat is under-powered, this can make a big difference when it comes to developing speed, especially in choppy wave conditions.
The other major effect of increased headstay sag is that it effectively rotates the middle sail, changing angle of attack. The mid-luff of the sail moves to leeward as well as aft. At the same time the mid-leech rotates slightly inboard, similar to the effect of weather-sheeting, which increases pointing ability.
Once the boat becomes overpowered sag can become a liability, which is why tuning guides usually call for more rig tension as the wind increases.
What Too Much Headstay Sag Does To Sail Shape
You can have too much of a good thing. With too much headstay sag the leech will rotate inboard too far, becoming extra sensitive to sheet tension and stalling too easily. Equally problematic, the entry angle becomes too extreme; when you bear off to rebuild speed, you have to sheet out too much to power up the sail.
Another problem is that the angle of attack varies too much at the front of the sail from top and bottom. You may also see a knuckle in the front of the jib, regardless of halyard tension, and the middle of the sail becomes too flat, without generating significant power.
Light Air and Flat Water
Let’s review how this should work in two light-air conditions, starting with flat water. Here, it’s important to create power in the sail plan, and sagging the headstay is the easiest and most direct method to create depth in the jib.
This creates a scenario where the middle of the jib luff has a better angle of attack to the wind and because of that angle of attack and the inboard rotation of the mid-leech, you will be able to point slightly higher without luffing or losing flow over the front of the jib.
When you have this set up correctly, it is as important as ever to make sure the jib leech tell tales are flowing 90 to 100 percent of the time so that the airflow stays attached to the jib. That said, it is OK (and we actually encourage you) to test maximum trim by sheeting in periodically until you see the jib-leech telltales stall slightly, then ease out until fully streaming. This is your jib sheet trim range, which on some boats may be as little as 1” of sheet.
It is important to stay on top of your rig tensions in these conditions and find the settings that work best for your driving style. In addition, make sure you have some mast side sag at the spreaders, which is a signal that the mast is free to bend forward as well as to leeward. Forward bend creates a flatter main that can be sheeted tighter without stalling the leech, which will also help pointing ability.
Light Air and Chop
When chop is introduced into the picture, a loose rig is still good, but you may find that the rig will pump too much as the waves get larger. This is normal, but in order to temporarily stabilize the rig for a set of bigger waves, pull on enough backstay to snug it up. This should minimize the pumping of the rig and headstay and keep a more consistent sail shape through the chop. As soon as the patch of chop is over, release the backstay to put more sag back in the headstay.
On boats that employ in-haulers or weather sheet the jib to increase pointing ability, be careful not to overdo it. The jib leech can become prone to stalling, which can be particularly slow in waves.
We encourage you to experiment, not only with your headstay sag but with your sheeting technique. Keep notes of what works and what doesn’t, and you’ll quickly master the art of headstay sag.
READ MORE
READ MORE

guides
DEPOWERING & POWERING-UP
SAIL POWER: DEPOWERING & POWERING-UP
By Bill Gladstone
This article is derived from the North U Trim Seminar. North U offers seminars, clinics, books, media, online training, and coaching. Visit NorthU.com to Learn More
In the previous segment we explored sail shape and sail power in moderate air, and how proper shape varies with sea state. In this segment we explore Angle of Attack in moderate air trim and also techniques for de-powering in heavy air and powering-up in light air.
Moderate Air Trim
Angle of Attack
At full power in moderate air we adjust the mix of depth and twist to suit the conditions – adding depth and twist as chop increasing to improve acceleration and create a wider steering groove, or trimming with less depth and less twist for higher pointing and higher speed in smooth water.
Meanwhile we adjust and fine tune angle of attack through steering and traveler to maintain full power, speed, and balance. Much of the time this falls largely to the driver – footing off when underpowered or feathering up when overpowered to keep the boat at full power.
As we push to the high end of moderate air, and particularly in puffy conditions, a helm response alone is not enough. In these conditions playing the traveler is also critical to maintaining proper heel, balance, and speed. (On boats without a traveler there are alternate techniques, covered in Sail Controls, later.) When the main trimmer is doing a great job the angle of heel and helm load will not change – the trimmer will play the traveler as the wind changes, down in the puffs and up in the lulls. When perfectly executed the main trimmer is really driving the boat upwind, with the rudder following along as a trim tab.
Fig. 401 Angle of attack is controlled both by the driver and sail trimmers. Increase power by bearing off or trimming in; reduce power by feathering up or lowering the traveller down. Pulling the traveller up and sailing higher might provide the same speed at a higher angle. It would be worth a try…
Heavy Air
De-Powering
In overpowering conditions sail power can be reduced by reducing angle of attack, by flattening the sail depth, or by increasing twist. Each reduces power, but which is preferred? Often it is best to start to de-power by flattening sails while keeping closed leeches to maintain pointing ability. This is the case as the wind often builds more quickly than the waves, so we get relatively smooth water in a building breeze.
In chop or waves it may be preferred to use twist to control power while maintaining depth for acceleration. If steering is difficult, then de-powering with twist can create a wider, more forgiving steering groove. Most commonly, the de-powering progression would include changes in both depth and twist.
Angle of attack is played moment to moment by the driver and trimmers to maintain speed, pointing and balance at full power: neither overpowered nor under-powered. A core challenge of upwind sail trim is achieving not just the correct total power, but the correct blend of angle of attack, depth and twist; and then adjusting total power and the mix to keep up with ever-changing conditions.
Fig. 402. The boat shows great trim in fresh breeze, with sails flat and twisted, and the traveler down. Note the modest heel and balanced helm. Note also matching shape of the jib and main.
Steering in Waves
When the boat is difficult to steer in the waves that often means it is out of trim. If you’re underpowered as you squeeze up and knocked on your ear as you bear off it is not bad steering – it’s poor trim. Adding some twist and depth will create a wider steering groove and provide more punch to get through the waves. We are often told to steer up the faces and bear off down the backs of waves. We’re going to change that: If the boat is well trimmed it will find its own best path through the waves. You can help by playing the traveler (or sheet if vang sheeting) rather than steering with the rudder.
Fig. 403. For best performance in waves set up with some depth for punch and with twist to provide a more gradual onset and release of power.
Light Air Trim
Less than Full Power
And what about light air, when we don’t have power to trade? When sailing in underpowered conditions we sail with a wide angle of attack to increase power, a deep sail shape for added power, and as little twist as possible without stalling airflow. As we’ve seen in earlier segments, trimming to the wind gradient often requires substantial twist in light air. The wide angle of attack and deep sail shape that add power in light air are also prone to stalling, so substantial twist in needed in lighter winds to encourage airflow and prevent stalling.
Fig. 404. In light air we maximize power with a wide angle of attack, deep sail shape, and just enough twist to prevent a stall.
Re-Powering
In a fading wind the chop will often linger so power is added with depth as the breeze fades while twist is maintained to preserve a wide steering groove.
One final bit
We’ll see more on this theme of Mix of Power throughout the remaining Upwind Trim segments. We’ll also address the balance of power between the main and jib as part of our ongoing mix of power discussion.
Pro Tip (wink wink)
To protect your reputation as a sail trim expert NEVER make a change in trim as the breeze fades. Here’s why:
In a building breeze pretty much any change you make will improve speed, so when you see a puff coming, make a change. The puff hits and voila – performance and your reputation improve.
In a fading breeze, no matter what you do, performance will suffer. If you make a change as the breeze fades then your reputation will suffer along with performance – DON’T do it.
© Copyright Bill Gladstone
READ MORE
READ MORE

guides
BB-10 TUNING GUIDE
INTRODUKTION
Formålet med denne tuning guide er at give vores BB-10 meter kunder nogle retningslinjer i, hvordan man får størst mulig udbytte af sine nye North Sejl. Tuning guiden er udarbejdet af Theis Palm.Følg vejledningen så nøjagtigt som muligt. Det er dog altid en god idé at eksperimentere på sin egen båd, da mandskabets vægt, bådens balance, riggens beskaffenhed samt lokale forhold også kan have indflydelse på det absolut optimale trim.
MASTETRIM
1. Salingshornenes længde og vinkel er vigtig for storsejlets facon, da disse er med til at kontrollere mastens krumning og dermed også forstagets spænding. Længden af salingshornene måles fra siden af masten til wiren der er placeret i salingshornet, målet er 86 cm, målet tages i midten af salingshornet. Salingshornenes vinkel måles ved at binde en tynd snor fra det ene overvant til det andet og her efter måles afstanden fra snoren og ned til bagkanten af masten skal være 12 cm. Ved samme lejlighed afsættes et tapemærker på 76 cm målt fra siden af masten. Dette mærker bruges senere til trim af fokken.
2. Herefter holdes forstaget og overvanterne ind langs masten og strækkes så meget som muligt. Der afsættes et mærke på wirerne, ud for overkanten af det sorte ved bomfæste. Dette mærke er nu udgangspunkt for mastens hældning.
3. Forstaget placeres i det forreste af de fem huller i skinnen på fordækket.
4. Kontroller at afstanden fra overkanten af det sorte mærke ved bomfæste til dæk målt på siden af masten er 64 cm. Differencen skal korrigeres på det mål på forstaget som følger.
5. Mastens hældning bestemmes således, afstanden fra det afsatte mærke på forstaget til dækket målt parallelt med forstaget til dækket er 1,39 m.
6. Kontroller nu – når den korrekte mastehældning er konstateret – at masten hviler på hele sin trædeflade på mastens fod. I modsat fald vil rig trykket blive ukonstant og forstaget hermed uroligt.
7. Mærkerne på overvanterne bruges til at kontrollere at masten står lige i båden ved at måle fra mærke til dæk i begge sider. Dette er mere præcist end at måle fra mastetoppen.
8. Riggens spænding er svær at definere, da ikke alle er i besiddelse af den samme rigmåler.Til denne vejledning har vi anvendt en Loose Gauge type PT-2 M, hvor vi har følgende mål.
Overvant
Undervant
Let
0-2 m/sek.
27
23
Mellem
3-9 m/sek.
31
28
Hård
10+ m/sek.
4
34
9. Når undervant spændingen er sat, kontrolleres om masten står lige. Tallene på undervanter er kun en guideline, som er erfaringer fra vores egen båd. Det er vigtigt at masten står lige op til 10 m/sek. Herefter strammes undervanterne til masten falder 5-10 cm til læ ved fokke godset alt eftermandskabets vægt.
10. Strutten sætte meget let, masten skal krumme i en jævn kurve fra mastetop til fod.
STORSEJL
TRIM AF STORSEJLStorskødet er meget kritisk og små justeringer har stor betydning for højde og fart. Skøder man hårdt, lukker agterliget mere og giver større rorpres, men til gengæld mere højde. Dette trim kan anvendes i mellemluft på fladt vand, så længe man kan hænge båden ned. I let vind slækkes skødet således at ticklers ved den øverste sejlpind flyver ret bagud. I hård vind skødes godt hjem og hækstaget hales indtil båden igen bliver let på roret uden at man mister højde. I forholdsvis store bølger skal sejlet twiste mere, for at få så stort et styreområde til vinden som overhovedet muligt, samtidigt giver det også bedre fart og hermed også højde. Som tommelfingerregel trimmes den bagerste halvdel på den øverste sejlpind parallelt med bommen i stort set alle vindstyrker.
UDHAL PÅ BOMUdhalet er en anden vigtig trimfaktor. I let vind (0-2 m/sek.) skal sejlet være 4 cm fra sort mærke. I mellemvind (2-5 m/sek.) 2 cm fra sort mærke og over 5 m/sek. hales helt ud på mærke.
CUNNINGHAMUndlad helt at bruge cunningham i let vind. I mellem vind hales kun så meget at rynkerne langs forliget forsvinder. Når vinden er over 7 m/sek. hales der hårdt for at medvirke til at åbne kappen og holde faconen fremme i sejlet.
LØJGANGENJustering af løjgangen påvirker rorpresset væsentligt og bruges alt efter mandskabets vægt. Løjgangsvognen justeres således at bommen, så længe som overhovedet muligt, er på centerlinien af båden, altså til luv (dette for at bevare så stor vindkanal mellem storsejl og genua/fok som overhovedet muligt og for, at kunne sejle maximal højde). Når vinden så frisker og hækstaget er halet maximalt køres løjgangen til læ indtil båden er i balance og let på roret.
HÆKSTAGETHækstaget har to funktioner: at kontrollere dybden i storsejlet og hvor meget forstaget falder mod læ. Det vil sige, at et strammere hækstag betyder et fladere og mere åbent storsejl, mindre forstags fald og hermed også fladere genua/fok. Vi har mærket vores hækstag op for hver 3 cm, så vi hurtigt kan komme tilbage til et godt trim og have båden veltrimmet lige efter mærke rundningerne.
BOMNEDHALBrug aldrig bomnedhalet på kryds. Bomnedhalet bruges på følgende måde: hal til den bagerste halvdel af den øverste sejlpind står parallelt med bommen, både på halv vind og læns, under alle vind forhold.
GENUA/FOK
SKØDEPUNKTSkødevognens placering er kritisk for forsejlenes trim. Som udgangspunkt måles 4,90 m. fra pinboldt i forstag til centrum af skødeblokken til genuaen og 3,10 m til fokken. Forsejlene skal luffe jævnt langs forliget, det vil sige, at ticklers skal stå ens både i top og bund.
SKØDESPÆNDINGGenuaen halse til den står 3 cm fra enden af sallingshornene i alle vindstyrker, underliget er helt inde ved overvant fæste i over 3 m/sek og 1 cm fra under 3 m/sek.Fokken hales til den lige røre salingshornet og akkurat bliver stram langs underlig mærkrt på salingshornet bruges som reference.
FALD SPÆNDINGStræk aldrig faldet for hårdt, da faconen ellers kommer for langt frem. Stræk kun lige så folderne ved løjerterne forsvinder. I let vind må der gerne være små folder ved løjerterne, idet faconen i fokken derved flyttes lidt bagud og dybden øges en smule, dette giver det bedste profil.
SPILER
Spilerstagens fæste på masten bør sidde i en højde af 1,60 m. over ruffet. Stage justeres således, at den står vandret. Derved opnås den størst effektive længde af spilerstagen og det størst mulige projicerede areal til vinden. Vores spiler er designet hertil. I let vind justeres stagehøjden således, at skødebarmene på spileren flyver lige højt, for at få den bedste indfaldsvinkel på det luv sidelig, samtidig med at det læ sidelig er maximalt åbent.På skæring i hård luft må spilerstagen under ingen omstændigheder komme nærmere til forstaget end 50 cm for at forhindre båden kommer ud af kontrol og skærer op.
READ MORE
READ MORE

guides
KNARR TUNING GUIDE
Download – Knarr Trimguide (Danish)
The purpose of this tuning-guide is to give our clients in the Knarr class some guidelines on how to get the most out of their North Sails. This tuning-guide was compiled by Henrik Søderlund and Theis Palm.
Always experiment and try finding your own trim using these guidelines. The weight of the crew, the balance of the boat together with specific local wind and sea conditions all have influence on the fastest and final trim.
MAST TRIM
Before stepping the mast in the boat, some very important measurements have to be checked to follow this tuning-guide correctly:
Lead the upper shrouds and forestay along the mast, the upper have to be out of the spreader tips. Pull them as hard as you can and put a mark on all three wires at the top at the black near the gooseneck on the mast. These three marks are now used to check if the mast is centered in the boat, and to check the mast rake.
Place the mast foot the following way. First measure 1.21 meter from the bow and place the forestay here. Move the foot of the mast aft, until you measure 2,00 meter from the forestay position (this is the maximum J measure to the class rules) block the mast on the backside. Leave 20 mm free space on the front side of the mast.The mast foot adjusts the following way: In light winds (0-8 Knots) the mast should be relative hard on the aft edge and pressed 10 mm aft along the mast foot rail for the mast to bend smoothly, and make the forestay loos. In winds above 8 knots move the mast foot back to basic position.
Set the mast rake. Pull the permanent backstay until the forestay stays straight. Then measure the distance from the black mark on the forestay to the deck (along the forestay) the distance is 1,13 meter. Control the distance from the deck to the upper black band at the gooseneck measured on the backside of the mast, the measurement is 80 cm. If there is a difference it should be adjusted on the forestay measurement.
The upper shrouds proper position is located measuring perpendicularly from the center of the mast to the attachment point on the shroud base.
The marks on the upper shrouds (from step 1) are now used to verify that the mast is vertical. This is best done by measure from the mark on the upper shrouds to where the turnbuckles enter the deck – the distance should be the same on both sides. It is very important, that the mast is straight from side to side and not being distorted at deck level.
The lower shrouds are placed 35 cm behind the upper shrouds according to the class rules.
All rig tension measurements we used a Loose Gauge PT-2. The upper shrouds should read 11 as a base setting. In 9 – 15 knots tighten 1½ turn and from 16 knots and up, another 1½ turn.
The lower shrouds are tensioned, so that the mast is completely straight in the boat. The lowers is tighten in the same time as the upper shrouds. In general the rig is very slack to get the mast as fare forward as possible on the downwind leg.
The jumpers are adjusted by pulling the permanent backstay. Then look up along the sail track and check that the jumpers are equally tight on both sides. If this is not the case, they should be adjusted till the mast is completely straight. When the mast is relaxed it will bend slightly forward.
SAIL TRIM
Mainsail Trim
The mainsheet is critical in setting the shape of the sail and small adjustments can have a big effect on speed and pointing. If the mainsheet is sheeted tight, the leech will close and put more pressure on the rudder – on the other hand pointing ability is improved. This can be used in medium winds and flat water, where the boat can be kept flat by hiking. In light winds the mainsheet is eased so that the top tell-tale flies straight. In heavy winds, sheet tight and pull the backstay until the rudder feels light again (but without losing pointing). In large waves, let the leech twist a little more to have a wider steering angle. This increases speed, and therefore pointing, at the same time. As a thumb rule the top batten is trimmed parallel to the boom in almost all wind strengths.
OUTHAULThe outhaul is also an important factor when trimming as it controls the draft in the bottom of the sail. In very light winds (0-5 knots) the sail should be 2 cm from the mark. In medium winds (5-12 knots) about 1 cm from the mark and in more wind than this pull the sail all the way to the mark.
CUNNINGHAMDo not set the cunningham in light winds. In medium winds set the cunningham so that the wrinkles along the luff disappear. When the wind exceeds 15 knots pulled it hard to open the leech and keep the draft forward in the sail.
TRAVELLERAlways to windward in any condition
BACKSTAYThe backstay has two functions: To control draft in the mainsail and to control forestay sag. When the backstay is tightened, the mainsail flattens, the leech opens, and there is less forestay sag and therefore, a jib with less draft. It is a good idea to put marks on the backstay, e.g., every 5 cm, to facilitate finding the right trim after mark roundings, etc.
KICKINGSTRAP/BOOM VANGThe kickingstrap is used when sailing upwind in strong wind and also downwind. Upwind, the kickingstrap push on the mast and opens the leech in the bottom part of the mainsail and keeps the boom down when easing in the gusts. Never use the kickingstrap upwind in less than 18 knots and use caution. Remember always to ease the kickingstrap for downwind sailing when bearing off, otherwise the boom might break. Downwind the kickingstrap is trimmed so that the top batten is parallel to the boom – on all sailing angles and in all conditions.
Jib Trim
North Sails jibs are made for sheeting points both on deck and cabin top. However, we recommend sheeting from the cabin top to make the jib-leech twist more freely and thus allowing the gap between main and jib to be as wide as possible. Furthermore, the control of the jib is improved (particularly in heavy winds) because of the shorter distance from clew to block. The jib-lead track is placed with its center 48 cm (fig2A) from the boat’s centerline.
When sheeting from the cabin top, we recommend using a swivel block on the deck, so that the jib sheet does not create an overwrap on the winch.
SHEETING POINTThe position of the jib lead is crucial for the jib trim. As a reference point measure 2.68 m from the pin in the forestay to the centre of the block (if the lead is on the cabin top). The jib shall luff evenly, i.e. tell-tales must fly at the same time in top and bottom.
JIB SHEETAs a general rule sheet the jib so that the middle batten is parallel to the centerline in most conditions, but in light winds (0-5 knots) leave 2-3 degrees of twist. If the sea is lumpy, move the jib lead 2 – 3 “holes” forward to get more draft and power in the jib (the middle batten shall still be parallel to the boat’s centerline). In heavy winds move the lead 1 – 2 “holes” back without letting the foot of the sail become tight and flutter.
HALYARD TENSIONNever pull the halyard too tight. This will cause the draft of the jib to move too far forward. Pull it until the wrinkles in the luff disappear. In light wind the best shape is obtained when leaving small wrinkles in the luff.
Good luck on the water!
READ MORE
READ MORE
guides
PUFF RESPONSE UPWIND IN HEAVY AIR
PUFF RESPONSE UPWIND IN HEAVY AIR
By Bill Gladstone
This article is derived from the North U Trim Seminar. North U offers seminars, clinics, books, media, online training, and coaching. Visit NorthU.com to Learn More
Proper response to a puff is critical to optimum performance in variable conditions. In our previous segment, Puff Response Upwind, we covered the best response to a puff in moderate air. In this segment we’ll look at Puff Response Upwind in Heavy Air.
Heavy Air vs Moderate Air
We’ll start by drawing a distinction between heavy air and moderate air: In light to moderate conditions as the wind speed increases our boat speed increases. We define Heavy Air, at least for the purposes of this article, as winds where an increase in wind speed does not result in an increase in upwind boat speed. Many boats cross this threshold around 15 to 20 knots True Wind Speed.
Fig. 1: As the wind increases in heavy air our boat speed does not.
The Puff Hits
As a puff hits the True Wind increases (“GUST!”). The stronger True Wind creates a stronger Apparent Wind and a wider Apparent Wind Angle. The best response is to trim sails to match this wider Apparent Wind Angle – usually by lowering the traveler. The trim response maintains a balanced helm and consistent angle of heel.
It can be helpful if crew looking upwind can call or count down the arrival of puffs so the main trimmer and driver can be ready (“Puff in 3-2-1!”).
Ideally the jib would be eased in concert with the main but in reality that can be hard to do – and even harder to retrim. On boats where you can play the jib it can be very fast. J22s come to mind as one boat where the jib and main are both played through the puffs. See Figure 2.
Fig. 2: A puff results in stronger Apparent Wind and a wider Apparent Wind Angle. The proper initial response is a change in trim – lowering the traveler (or making other adjustments) to match the new wind angle.
Acceleration – NOT
The trim response maintains a balanced helm and consistent angle of heel. In heavy air we then feather up to point a little higher. Feathering up will push the apparent wind forward… See Figure 3.
Fig. 3: As we feather up in the new wind the apparent wind moves forward and we can re-trim.
Limits
You can feather up in puffs to a point… but your rig can never outpoint your keel. At some point you’ll be lowering the traveler (or adding twist or… see below) and leaving it down.
Wasted
If we don’t respond to the puff with a change in trim then we waste the energy of the puff in heeling force, weather helm and leeway rather than take advantage of it with a smooth feather up to a higher angle.
More…
Why a Trim Response? Why not just feather the helm?
Why not just feather through the puff? Because a Trim Response is faster. A trim response maintains a balanced helm and reduces leeway. A feathering response gives you a brief bit of height (usually accompanied by more heel and leeway). In actual practice your response will likely be a combination of both trim and feathering. Feathering alone will not be fast or sufficient in most conditions.
Why use the Traveler?
In this depiction we use the traveler to respond to a puff. Lowering the traveler reduces angle of attack. This is often the preferred method on a moderate displacement keel boat.
Alternatives to the Traveler
On some other boats – for example high performance boats with square top mains and high aspect keels, and on multi-hulls – it is more effective to play the mainsheet and change twist. On still others – for example, Etchells – a big pull on the backstay is very effective.
Some boats use “Vang Sheeting” (where the mainsheet controls angle of attack) and respond to puffs by playing the main.
Which is Best?
Snappy Answer: Whichever is fastest.
Longer Answer: You’ll have to test to see what works best on your boat; but the bottom line is that a Trim Response is preferred to just feathering/ steering through the puff.
Puff Response in Heavy Air
In actual practice your response will likely be a combination of trim and feathering. Feathering alone will not be fast or sufficient in most conditions.
© copyright Bill Gladstone
READ MORE
READ MORE
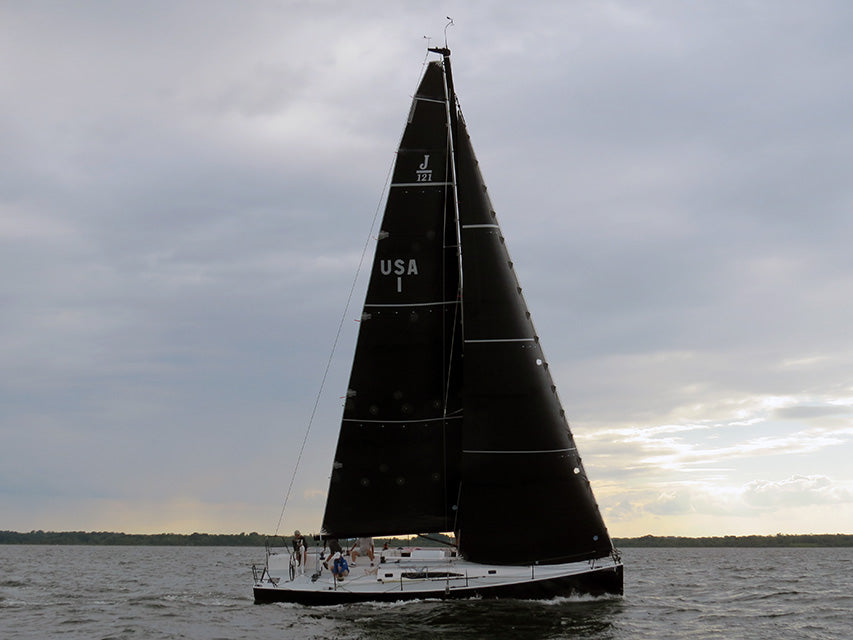
guides
J121 SPEED GUIDE
North Sails experts Kimo Worthington and Chuck Allen answer questions in this speed guide for the J121 class.
Who sails a J121?
There are several distinct types of people who sail a J121, and most are experienced sailors. Some race the boat one design, some race shorthanded or fully crewed offshore, and some head south and cruise the Caribbean. Many are individualists who have been changing keels and adding sails. In the 2018 Newport Bermuda Race, four J121s raced in three different configurations. The point is, the J121 is a versatile boat that’s ready to sail offshore, and the sailors who do buy one all seem to agree that they’d rather do something other than race windward-leeward course configurations.
The J121 is a versatile boat that’s ready to sail shorthanded and/or offshore.
What’s the ideal J121 crew size?
That’s a trick question for this boat. The most crew you’ll ever need is five or six, total, for an event like Block Island Race Week, but the boat was designed for sailing doublehanded. It sails well without water ballast, but it really shines when you fill the windward tank with 850 pounds of water; that’s like having four or five extra people on the rail. Testing in a strong breeze, we have found the performance is spectacular with a reefed main and inner jib.
The most crew you’ll ever need on a J121 is five or six, and the boat is designed for doublehanding.
How do you move a J121 around between races?
The boat is 40 feet long and weighs 11,900 pounds with 4,800 pounds of ballast, so you’re going to move this boat on its own bottom or with a professional trucker. It’s equipped with a 30hp Yanmar diesel and saildrive, so it moves along well under power. And remember, even with only a couple of delivery crew you can add water ballast and power right up.
What sails are recommended?
The boat is billed as a five-sail boat. There’s one mainsail and two jibs, one that roller-furls on the headstay and the other that roller-furls on the inner headstay. The boat has an extendable sprit that can fly a Code Zero/gennaker on a roller-furler, or you can use an all-purpose asymmetric spinnaker. For a closer look at all these sails, view the North Sails product page, but it’s worth talking to a North class expert to make sure you match your sails to sailing style and location. Other speciality sails include smaller and flatter spinnakers and spinnaker staysails.
J121 Tuning
What are the keys to rig set-up?
The J121 has wide spreaders with chainplates outboard at the rail. We recommend easing your headstay length enough to rake the mast, inducing prebend to help keep it stable and secure. Use a rod-rigging tension gauge (e.g. Loos RT-11) and the numbers in the table below as a starting point.
The rig is set up for heavy air with 52 on the uppers.
Any tricks to tuning a boat with multiple headstays?
The inner jib is a big upgrade for most people. Now, instead of wrestling to set and douse a heavy air jib, you can raise and furl it anytime on the inner headstay, which has a halyard lock-off. The lower end of the inner headstay has a 3:1 purchase, and before deploying the heavy air jib we grind the daylights out of it—enough to make the forward headstay just start going slack.
What’s involved in setting up and hoisting the mainsail?
The mainsail has luff slides that live on the mast track. Before bending them on for the first time, tension and secure the battens and check that the main halyard purchase has no twists. Be sure the headboard is on the track and that the battens aren’t too tight. Check that the pressure is evenly distributed between the bottom car and the tack point, which is adjustable. You should be able to hoist the sail by hand; don’t use a winch, because you might over-hoist the sail.
With track cars and batten tension set correctly and no twists in the two-part halyard, you should be able to hoist the sail by hand.
What’s involved in adjusting the bobstay tension?
The bobstay on a J121 counters the upward pressure on the pole from the Code Zero or spinnaker, and your goal is to keep the pole projecting forward in alignment with the sheer line of the hull. The adjustment is in the center of the bobstay and can be set at the beginning of the season. Be sure that the pole is all the way out and that you have a mark on the pole control line before adjusting the bobstay tension.
When the pole is extended all the way, there should be a ½ inch between bulkhead and turning block.
J121 Upwind Sailing
What sail combinations do you use upwind on a J121?
One of the exciting things about this boat is that you can use different combinations depending on the situation. Standard upwind configuration is a full main and J1 (the bigger jib). As the wind builds, you might reef the main and keep the big jib going; offshore, you might not reef and use the inner jib instead. In enough wind, of course, you’ll use the inner jib with a reefed main.
The inner jib sets up on the inner forestay. Note the furling line, which should be rigged along the windward side.
Upwind, where does the crew sit?
The goal is to keep your “bow knuckle” in contact with the water. So if you have a full crew of five or six, in light air most should be sitting well forward. At 10 knots, you’ll still have two crew sitting in front of the shrouds. At 14 knots, one crew is forward; at 18 knots, everyone will move back to normal hiking position.
If your weight placement is correct fore and aft, the knuckle will just kiss the water.
If your weight is too far aft, the bow knuckle will always be out of the water.
Upwind on the J121, when do you add water ballast?
As soon as you’re heeling 18 to 20 degrees, start adding water to the tanks to maintain a constant angle of heel. With a full crew, that’s likely to be around 15 knots true wind. Doublehanded, it might be at 12 knots. Don’t forget to add water when you’re cruising or doing a delivery, too. Not only will it reduce heel and improve speed, it can also settle the motion of the boat.
The boat is heeled too much; it's time to add water ballast (or depower).
How do you trim the main and jib upwind?
In light to medium air, center the boom by raising the traveler, and then sheet as hard as you dare to get some rudder angle and heel the boat over 12 to 15 degrees. Don’t head up and slow down; let the foils work and the boat will gain height. Look for the top telltale to be stalling about 25 percent of the time in light air, 50 percent in medium air. When the breeze comes up, keep the traveler high; ease the sheet to add twist when you have trouble reaching the target numbers.
In medium air, the traveler should be raised well to windward to keep the boom on centerline.
For the jib, add three marks on the spreader that line up with the leech for eased, normal, and tight trim. We also recommend marking the deck for the inhauler to set the lead angle between 7 and 12 degrees. Set the angle tightest in flat water and moderate breeze.
The inhauler is set at 8 degrees.
How do you trim the heavy-air jib on the inner headstay?
As mentioned, you need to crank on the inner headstay until it is carrying about three-quarters of the rig load and the forward headstay loosens just a little. The jib sheets lead to the same floating lead as the J1 and you will still trim to the same spreader marks, as well as watching to keep the leech telltales flowing.
What are the key gear changes for sailing upwind?
We’ve developed a playbook for five wind speeds. It goes like this:
Zone 1 (0-8 knots):You’re looking for power; move weight forward, and keep backstay and headstay loose and outhaul eased. Try to get some heel; pull in the mainsheet.
Zone 2 (9-12 knots): Start moving weight to the rail. Pull on backstay, jib halyard, and outhaul. Sail shape should still be deep. Trim the mainsheet hard.
Zone 3 (13-18 knots): Max outhaul, backstay, cunningham, and jib halyard. Find “magic heel angle” (12 to 15 degrees). Crew weight starts moving aft, sail shape becomes flatter. Consider moving jib leads back.
Zone 4 (18-22 knots): Now you need less power. Consider a single reef. All controls should be maxed. Find the “magic heel angle” (12-15 degrees). Sail shape should be really flat. Trim sails so the boat is easy to steer and fast; ease main (if it flogs, open the slot by easing the jib or moving the jib lead back).
Zone 5 (23+ knots): Smaller jib on inner headstay and/or reefed main. Strive for “magic heel angle” (12-15 degrees). Make the boat easy to sail and keep it going fast through the water.
The Magic Heel angle for the J121 is 12-15 degrees.
J121 Reaching and Downwind Sailing
What are the best J121 sail combinations when reaching?
When close reaching in lighter winds, an eased J1 is very efficient because it has leech battens. As you bear off, switch to the Code Zero well before you think it’s time—about 70 to 80 degrees true wind. By easing the tension on the front of the Code Zero and letting it scallop you can sail even higher, but don’t overdo it. Crew should remain forward, in upwind position.
Not all Code Zeros are the same. North’s are a little smaller and not as deep as some other sailmakers. They also have a shorter foot and lower clew with less girth at the top, for a wider range; you can sail them from 70 to 120 degrees apparent before setting the A2 spinnaker.
Learning the crossover from spinnaker to Code Zero is a key to best reaching speeds on the J121.
What are the crossovers between downwind sails?
Learn your sail crossover chart (see below) to determine the correct angles for the two jibs, Code Zero, and A3 and A2 spinnakers—and keep the leech of your main and headsail well-matched.
The main and Code Zero leeches are well-matched, a fast combination.
At the top end of Zone 3 (18 knots) from 90 to 125 degrees true wind angle, sail with a double-slotted Code Zero and inner jib. In winds over 18 knots, you may be able to carry the combination to 135 degrees. If you have one, you can use a spinnaker staysail at 135 degrees and deeper. When it’s really windy, an A4 (small spinnaker) and inner jib can be a very effective double-slot reaching combination.
This team should be switching over to the Code Zero.
Where does the J121 crew sit when sailing downwind?
Under spinnaker in light air, crew weight should be forward and on the leeward rail, similar to upwind sailing. As the breeze comes up to 8 to 10 knots, you’ll sail with three in front of the shrouds to windward. For wind in the low to mid teens, those crew come aft of the shrouds. When power reaching, they will move halfway back to companionway, or even right back to the skipper.
Both upwind and downwind, light air crew position is well forward to keep the bow knuckle touching the water.
Video of power reaching:
https://youtu.be/BUi29Wpw0r8
J121 Maneuvers
How do you set and drop the Code Zero?
Always hoist a Code Zero on the weather side of the headstay. Raise it until the tack is 1 meter above the pole and tie off the halyard, then tension the luff via the 2:1 tack line. The Code Zero should run through a twing and then aft to the primary block. Unfurl when ready.
To drop a Code Zero: Furl the sail and bear away, tensioning the windward sheet to pull the sail to weather of the headstay as you ease halyard. Accordion it onto the foredeck. When dropping the sail while going upwind, you may have to luff up to get the furled sail to weather of the headstay.
How do you furl the Code Zero?
The key to furling this big sail when it’s windy is to ease the sheet far enough to take the pressure off the sail—but not so far that the sail completely luffs. Maintain a little tension to ensure a tight furl.
https://youtu.be/ytJ8iJ-G6Qw
How do you reef the main?
Mainsail reefing is straightforward on the J121. Ease the halyard and take up the tack line until the new tackpoint is snug. Next, trim the reefing line until the clew is snug against the boom and put a sail tie around the loose sail aft. Then raise the halyard enough for proper luff tension.
How do you change from J1 to inner jib?
Hoist the furled inner jib to its halyard lock with the tack eased off one meter. Then tighten the tack until the luff rope is quite tight—with significantly more load than the headstay. Keep the tack line on a winch for further adjustment and deploy the inner jib, then furl the J1. Your furling lines should run along the weather side of the boat.
How do you set the J121 spinnaker?
The key jobs when setting the J121 spinnaker with a crew are as follows: The sail starts in the bag, typically zipped up and tied off to the foredeck. Bear off to hoist, and raise the sail at least halfway before pulling out the tack and pole. The driver should call for the set when the boat is sailing at the right angle—if windy, bear off so it’s well hoisted before it fills. Also, don’t furl the jib(s) until the kite is up and flying, or you may mistakenly furl a lazy sheet or other part of the spinnaker. For shorthanded sailing, use a snuffer system or spinnaker zipper system.
How do you jibe the J121 spinnaker?
We recommend an outside jibe, so the clew travels forward around the luff before sheeting in on the new leeward side. The new sheet must be in the “gybulator” or “sheet catcher” before the jibe begins so it doesn’t accidentally drop below the sprit pole. (The gybulator is mounted about six inches above the tack on the luff of the sail.)
The “gybulator” is located about six inches above the tack and the sheet must be in it for jibing.
https://youtu.be/nZjE3G0vN7U
Any tips on the starting line?
Be careful not to sail too slowly when approaching the starting line. If your speed falls below 2.5 knots, it can take a long time to get back up to speed and you’ll make a lot of leeway until the water starts flowing effectively over the foils again.
How do you tack a J121?
In light air, roll tacking the J121 is important; use all the crew weight you have. When using water ballast, plan ahead and start shifting the water from one side to the other a minute or two ahead of time. The goal is to come onto the new tack with the water ballast already transferred.
How long does it take to fill, move, and empty the J121’s water ballast?
It takes five minutes to fill the windward tank, one minute to transfer it to leeward before a tack, and two minutes to empty the tank.
The water ballast tanks are filled and drained with three control lines.
What are the keys to sailing a J121 well?
Keep your crew weight out of the aft end of the boat.
Plan ahead for tacks so you have time to shift the water ballast.
In most breezes, max out the backstay to improve headstay tension.
What is the coolest thing about sailing J121s?
We think what’s best about the boat is all the different types of sailors it attracts. J/Boats listened to its clients and introduced a boat that people can sail fast with their families or a few friends, either near shore and for long-distance adventuring.
READ MORE
READ MORE
guides
FULL POWER & MIX OF POWER
SAIL POWER: FULL POWER & MIX OF POWER
By Bill Gladstone
This article is derived from the North U Trim Seminar. North U offers seminars, clinics, books, media, online training, and coaching. Visit NorthU.com to Learn More
In our first segment we defined the three sources of sail power: Angle of Attack, Depth, and Twist. Segment two focused on twist and the impact of twist on performance.
In this segment we address how our three sources of power combine to create our total power, how we add and reduce power to match the conditions, and how we can change not just the total power, but the mix of power. Later segments will explore the relationship between the main and jib and also describe how each of our sail controls impacts shape and power.
Optimum Performance
Each sail gets its power from a combination of angle of attack, depth and twist. It is time to explore how these combine and how we can adjust both the total and the mix of power to optimize performance in different wind speeds and sea states.
Total Power, Full Power, Mix of Power
Our first goal is to get to full power – neither overpowered nor underpowered. Full power means the crew are fully hiked, the boat has its designed angle of heel, and the helm is well balanced and easy to steer.
Fig. 301 Our total power is the sum of power from each source: Angle of Attack, Depth, and Twist.Once we are at full power we can fine tune to suit the conditions. Here are a few generalizations to help in finding the best mix of power.
First, understand that we can trade one kind of power for another. We can add power from one source, reduce from another and have the same total but a different mix. For example: Adding depth adds power while adding twist spills power. By adding depth and increasing twist we can get the same total power, but a different mix.
Fig. 302 On the left, trimmed flat with little twist. On the right, a deeper (more power), more twisted (less power) shape. Same total, different mix.
Moderate Air Trim
By moderate air we mean enough wind to get the boat to full power – as described above, this means, the crew fully hiked and the boat sailing at its designed angle of heel, and the helm balanced. On most boats we transition from light air to moderate in 6 to 7 knots of true wind speed. Some boats need more, some less. Once we are at full power we can fine-tune performance by changing the mix of power. Here’s what we mean:
Waves or Chop
In wavy conditions a deeper more twisted shape is preferred. The extra depth provides power to punch through the waves and better acceleration to build speed as each wave slows the boat, while the extra twist provides a wider steering groove and is less prone to stalling. The waves make a narrow course hard to hold, and each wave slows the boat, so we are constantly accelerating.
The downside is a slight compromise in pointing ability compared to smooth water sailing. But remember: you’ll never point if you are slow. Speed First.
Similarly, coming out of a tack our sails are initially trimmed with extra twist to ease flow at a wider angle of attack, and with extra depth for acceleration, with final trim coming only as the boat accelerates to full speed and is brought up to a narrower, high pointing angle of attack.
Smooth Water
In smooth water and that same full power wind speed we trim with less twist – adding power and pointing ability – while sailing with a flatter sail – reducing power and drag. We have the same total power, but a different mix.
The downside to flat sails with little twist is a narrower steering groove and poor acceleration. In smooth water we can sail in a narrower groove, and once we are up to speed we won’t be slowed by waves. It only works if you can sail to it; you won’t point well if you use high pointing trim in unsuitable conditions. You’ll just stall and go slow.
Fig. 303 As conditions vary across the spectrum of smooth to choppy we can fine tune our mix of depth and twist.
Across the Spectrum
We’re rarely in perfectly smooth or ferociously chopping conditions. Mostly we sail in something in between. For best performance we’ll adjust the mix of depth and twist to suit the prevailing conditions while maintaining full power. The differences are nuanced and often the performance advantage is small… but critical. The difference between good and great, between mid-fleet and winning is just a couple percent and is often comprised of several things each contributing fractions of a percent. Never relent. Every little increment matters. It adds up.
Fig. 304. Across the spectrum, from flat with little twist to deep and twisted. We do most of our sailing in the middle, making incremental changes as wind and sea state fluctuate.
Next Time…
In our next segment we’ll look at the role of Angle of Attack in upwind performance and look at de-powering in heavy air and powering-up in light air.
© copyright Bill Gladstone
READ MORE
READ MORE