NORTH SAILS BLOG
Alle
Events
Guides
News
People
Podcast
Sustainability
Tech & Innovation
Travel & Adventure
INTERNATIONAL MOTH TUNING GUIDE
This guide is designed to add additional support information to sailors rigging their International Moth Helix sails for the first time. There are some fundamental differences with the Helix sail, ‘twin-skin’ split batten technology, compared to previous models. The Helix sail offers a large step forward in performance, however, there are some new learnings required when rigging, which once understood, is neither complicated nor time-consuming.
Initial Set-Up
When your sail arrives the following should be included:
1. 7 x Full Length Split Battens
2. 6 x Decksweeper battens – Glass RB
3. 13 x Rocket Adjusters
4. 6 x mast cups. Numbered 1-6
These battens should be cut to length and there should be no requirement to adjust the length of them. Please contact a North Sails representative if you feel the battens need to be adjusted. Any batten length adjustment should be off the back of the batten and not from the split end.
Batten lengths may vary +/-20mm
These parts should be fitted, but if not, take the following steps:
Battens
Step 1: Batten Cups
The battens cups need to be threaded onto the webbing strap found inside the luff tube. The webbing strap prevents the cups from moving in a vertical direction whilst sailing, hence the cups grip onto the strap quite tightly.
Once the cups are threaded onto the webbing strap, pass the strap down the luff tube, ensuring to remove any twists from the strap.
The Cups may need adjusting slightly once you are rigged. Follow the impression of the batten along the batten pocket and aim to keep it aligned or fractionally on the high side of the pocket. The webbing strap may be overlength and can be cut to length – around the height of the boom. There is no requirement to locate the lower end of the strap.
Step 2: Batten insertion
Batten #1
The top batten doesn’t have a mast cup. There are however 2 batten pockets on the luff tube, one on each side. The split batten end needs to pass into each of these pockets. The batten pockets are offset so that each of the split tips can be inserted in turn. Put your hand up inside the luff tube from the zip at batten #2. Pass the tip of the #1 batten into the pockets on each side of the sail. This process can be slightly tricky but easily managed and only has to be done once.
Batten #2 - #7
These battens are to be inserted from the rear end and then the split tip is inserted into the receptacles on the rear face of the cups. There are sacrificial pieces of plastic within these receptacles that are designed to break and distort to add friction to the batten and prevent it from falling out. The batten will need to be pushed firmly into the batten cup receptacle. At batten #7 there is a batten holder on each side of the luff tube. Each half of the batten needs to be passed through these.
Add rocket batten tensioners to all battens.
Step 3: Deck Sweeper Battens
There are 6 x deck sweeper battens that can be fitted and rocket tensioners added.
The diagonal deck sweeper battens are the only battens that need removing for de-rigging and sail rolling.
Rigging
Step 1
Insert the mast into the luff tube, as per all previous models, ensuring to pass the mast above the battens and not through any of the split battens.
Note:
Avoid wrapping the mast tip around the webbing strap
At batten 7 there are batten holders on each side of the luff tube, the mast must pass in front of these.
Once the mast tip reaches batten #2, the uppermost batten cup, ensure to thread this batten cup onto the mast (pushing the mast in front of the cup). Continue to push the tip of the mast into the head of the sail.
Step 2
Shuffle the luff of the sail down the mast until you can see the forestay and spreader fittings.
KEEP ALL BATTEN CUPS OFF THE RIG AT THIS STAGE (except for Batten #2 – cup #1)
Step 3
Continue to rig the sail onto the boat. Attach the clew and boom vang. Some pre-bend will be required to attach the batten cups.
Step 4
Once there is some pre-bend, achieved by some vang load, the next step is to put the batten cups onto the rig. Work from the top down, carefully putting each cup onto the rig. Normally twisting them slightly can help to get them on. Once all the cups are on, slide the luff tube downwards and attach the cunningham.
De-Rigging
Aim to do the above procedure in reverse. Remove cups from the rig before releasing the clew. This de-loads the sail and it's far easier to remove spreaders etc.
Tuning & Race Set-Up
Battens
In general batten tension should increase from top to bottom. Aim for one or two small creases in batten #1, one crease in batten #2, half a crease in batten #3, and no creases in battens #4-7. Luff round and sail camber can be tailored with batten tension in the lower battens. Adjusting batten tension to different wind conditions will produce performance variation as the batten tension will increase camber.
Batten cups
When fully rigged with vang and cunningham loads @ 70% ensure the battens run along the batten pockets and the cups are not sitting too high or too low. Aim to have the batten and cup just high within the batten pocket.
There are a few nuances to this new design, but once understood, rigging time is very similar to previous models.
Please feel free to contact Rob Greenhalgh with any questions.
READ MORE
READ MORE

LIGHTNING TUNING GUIDE
Proper boat speed depends mostly on constant and consistent adjustments to your rig and sails. The following measurements are those we have found to be the fastest settings for your new North Sails.
READ MORE
READ MORE

470 TUNING GUIDE
Quick Tuning Guides:
N14-L18 Mainsail
N13-L12 Mainsail
N13-L16 Mainsail
N12-L9B Mainsail
N10-L5 main
N10-L5(H) main
N9-L5 main
L5-N15 Mainsail
See also: Tips for Adjusting the Bolt Rope on Your 470 Mainsail
READ MORE
READ MORE
SOLO TUNING GUIDE
The Solo is a boat with a relatively simple rig. Once you are on the water there is little adjustment possible. It is essential therefore that you get the right rig settings before launching. When setting up a new boat you need to establish the following:
MAST FOOT POSITION
In the past we suggested two mast foot positions, but in recent years when sailing in a mixed upwind/downwind race track I have found I liked the one setting for all conditions so this is what we would recommend. Measuring from the front edge of the mast foot to the outside edge of the transom should be as close to 3065mm as possible. Please see Fig 1, 1a, 1b showing how to take this measurement.
PLEASE NOTE with this setting the boom will be lower, if you have limited mobility, sail at a venue where you are constantly tacking or on a club course with more offwind than upwind please feel free to move the heel aft to a setting nearer 3052 mm to keep the boom higher, make it easier to tack and bias performance more to downwind. Secondary to this is boats prior to approximately 2008 may struggle to move the heel forward to this measurement due to the bulkhead position.
Fig 1
Fig 1a
Fig 1b
MAST RAKE
This is controlled by forestay tension. Set the forestay so its tight when the back of the mast hits the back of the mast gate, then release the forestay tension by 2 holes on the adjuster, this is the base rake. For those with a mast cutout [please check your mast manufacturer for warranty on this] you can set the average mast rake with a tape measure, should be set at 5940mm measured using a tape measure on the halyard hoisted to your black band and then to the top aft edge of your transom bar. To ensure the hoist of the halyard is at the correct height the tape should read 5030mm when held down the mast to the top of the gooseneck band, this is then at the correct hoist height and can easily be replicated, now you can proceed to measure the rake. See Fig 2 & 2a showing how to do this.
Fig 2
Fig 2a
SHROUD TENSION
Update for P-4/F-4/L-4 designs - These designs are setup best with a slacker rig tune than previous designs. This allows the mast to bend more, both fore/aft and sideways and provides a less critical For these sails we would recommend getting setup with a light-medium/All purpose tension and then easing the shrouds further for strong/overpowered conditions. This crossover between the tensions is a combination of wind strength, sea conditions and helm weight. For example if you are 90kg sailing inland on flat water you will likely 'ease' tension at a windspeed 6-7kts higher than a 76kg sailor sailing in choppy conditions. As a baseline we would suggest 16kts being the crossover to work up or down from.To get to the correct tension firstly you should find your datum, this is done onshore without a sail hoisted. To do this mark your shrouds adjusters at the position where your shrouds just come into tension when the mast touches the front of the mast gate - this is your datum. From this position 'slacken' your shrouds 1 Half of a hole. (see Pic to confirm). This position is now your light-medium/all-purpose shroud tension and the one we would advise using if you are looking for a single all purpose setup. For strong/overpowered conditions we would advise to slacken your shrouds a further 1 half of a hole from your light-medium/AP tension.Please note - for previous generation sails (P-3/F-3/L-3 etc etc) please use the Datum as an all purpose setup. If you are over 90kgs or sail predominantly on flat water then tighten 1 half of a hole from this datum tension.
CENTREBOARD POSITION
Turn the boat on it’s side and drop the board and mark the handle when the leading edge is vertical (LV), relative to the bottom of the case. Then lift the board until the trailing edge is vertical (TV) and mark the handle. Then mark the handle with 20mm spacings to guide when you lift the board further as the breeze builds.
MAST CHOCK
Use 1 x 10mm chock to be used as per the tuning matrix below.
Control
0-5 knots
6-10 knots
11-16 knots
17+ knots
Centreboard
Leading edge vertical
Trailing edge vertical
40mm up from TV mark
40-100mm up from TV mark
Chock
Chock behind mast
Chock in front
Chock in front
Chock in front
Kicker
Slack
In tension to stop boom
Tension to control leech
Max. kicker
Outhaul
50mm depth in foot
100mm depth in foot
50-100mm depth in foot until overpowered then tension progressively
Max. outhaul with crease along foot
Inhaul
15mm from back of mast
10mm from back of mast
5mm from back of mast
0-5mm from back of mast
Traveller
Positioned so that boom end is over inboard edge of sidedeck
Positioned so boom end is between inboard & outboard edge of sidedeck
Positioned so boom end is over gunwhale, until overpowered then vang sheet and keep traveller on centreline
On centreline
Cunningham
Slack
Slack snug to remove larger wrinkles on luff
Tension progressively to depower
Tension to depower
Because Solos are relatively easy to sail a boatspeed advantage is hard to find. The settings that have been used for this tuning guide are based around a Solo sailor weighing 8085kg using a Selden D+ mast and North Sail. However these settings still apply providing you use the correct mast and sail combination for your weight.
The settings are dependent on sea state, weight, mast, sail and fitness. So in a force 3 a 90kg helm would be on full power settings whereas a 75kg helm with the same rig would be on overpowered settings. The overlap between settings can be achieved with a combination of rig, sail and centreboard adjustment. There are different ways to achieve the same result. If for example you are caught out with light/medium settings in strong breeze raise the centreboard further, use more kicker tension (to bend the mast) cunningham and outhaul tension.
Use a combination of mainsheet tension, kicker tension and traveller position to find the best speed upwind. As a general rule start in light winds with the traveller positioned so that the boom end is over the inboard edge of the sidetank and mainsheet tensioned so that all the leech tell tails are flying. As the wind increases use more mainsheet tension and ease the traveller to stop the boom getting too close to the centreline. Kicker tension in light winds should be set just slack so that it controls leech twist out of tacks. As the breeze increases and you have to ease the mainsheet to keep the boat flat use kicker to control the leech profile, and adjust the traveller (usually move inboard) to keep the boom roughly over the outside edge of the quarter. Once fully overpowered use kicker upwind to increase low down mast bend and flatten the mainsail and pull the traveller to the centreline and leave it.
In a Solo body position is extremely important. In very light airs your body weight should be centred on the thwart, but do not move forward of this point however light it is. Once you are sat on the side deck move back so that your front leg is pressed against the thwart. As you become fully hiked move back to 150mm from thwart, and then up to 300mm as the wind increases.
OFFWIND
Use only enough centreboard so that the rudder is neutral when the boat is flat with the following sail settings:
LIGHT AIRS
Leave the outhaul on its upwind setting. The inhaul (if adjustable) should be released so its slack. The kicker should be slack or just in tension to stop the leech opening too much in the gusts.
MEDIUM AIRS
Ease outhaul so that lens foot is fully eased, ease the inhaul until slack. Set the kicker so that the top batten flies approximately 90 degrees to the boat, this allows the leech to open and maximise speed. If planing is a possibility keep the boat as flat as possible and take the mainsheet 2:1 from the boom.
HEAVY AIRS
Only ease the outhaul on tighter reaches if you can use more power. Ease Inhaul until slack. Once on the broader reaches and run ease outhaul to allow a little depth in the foot. Set the kicker as for medium airs or ease to depower on the reaches. This is also very quick on the run to allow running by the lee. By spending time on the water preferably with a tuning partner you will be able to establish the right settings for all conditions. This will allow you to concentrate more of your energies on finding the quickest way round the course.
READ MORE
READ MORE

E SCOW TUNING GUIDE 2022
This tuning guide is for E Scow sailors using the rig with the chainplates at the max aft position with longer spreaders. With this rig, backstays are not required, allowing the skipper to fully concentrate on tactics and boat speed.
BEFORE STEPPING THE MAST
Clean and lubricate turnbuckles, make sure that the top and bottom threaded studs are even in the turnbuckle tube.
Position mast so that base is locked in mast step plate on deck and top end is resting in the boom rest support.
Check all pins, wires, and fittings for wear, and attach upper and lower shrouds.
Pull the forestay down along the top of the mast, pull firmly, and mark the wire with a permanent marker at the top of the mast base casting or where the tube is cut off at the bottom. You will use this mark to measure your mast rake once the mast is in the up position.
Check the spreaders to make sure they are pinned in the forward hole for an all-purpose setting. This puts the spreaders in the aft-most position.
Make sure that all halyards are pulled down and are not fouled.
Using the feeder line that comes up through the mast step, tie this onto the bottom end of the jib halyard and pull the jib halyard through the deck.
Take care not to loose the feeder line through the deck or you will have to re-run through the pulleys inside the backbone.
Using a person on the foredeck pulling on the spinnaker halyard and someone walking up the mast, step the mast and attach the forestay.
After stepping the mast, proper shroud tensions should be obtained.
If you have a new North mainsail with the slug sewn into the sail, remove the screw holding the slug slide in the mast and remove the slug slide.
This slide can be shackled on another sail for use of an older mainsail.
ALL PURPOSE SETTINGS
For base setting of the mast rake, start by measuring up from the top of the deck at the forestay along the forestay wire to the mark on the wire that corresponds to the mark you put on the wire at the bottom of the mast tube. Please refer to the mast rake chart and use the measurement which corresponds to the year your boat was built.
At this point, tighten the upper shrouds (shrouds that go to the forestay) so they measure 37 (560 lbs) on a PT-1 Loos tension gauge. Make sure the uppers are in the aft-most hole in the chainplates and also make sure you tighten each turnbuckle the same amount. If you want to really fine-tune the rig, measure down to the deck at the chainplates using the jib halyard and adjust the intermediates to center the mast athwartship.
Set the lower shrouds at 21 (240 lbs) on the PT-1 gauge and the diamonds at 23 (280 lbs). You will have to work back and forth between shrouds to achieve these base numbers.
Note: If you have a new boat or new shrouds it is important to sail a few times in heavy air to stretch out the rigging before setting permanent marks on the shrouds and the mast rake. Double check the mast rake measurement after tightening shrouds and after sailing in a good breeze.
Rake Setting
The proposed rake settings below are based on the year your E Scow was built.
1998 - 2011
2012 - 2015
2016 or newer
26"
26 1/4"
26 3/8"
Easy Tuning Charts
Note that all recommended turns are from the base settings.
M3 Mainsail / J4 Jib
TWS
6 knots
BASE - 8 knots (2-3 on rail)
10 knots
12 knots
15 knots
18+ knots
Uppers
-
37
+1
+1.5
+2
+3
Lowers
-1
21
+1
+1
+2
+2
Diamonds
-1
23
-
-
+2
+3
Boards
2 holes FWD
1 hole FWD
1 hole FWD
AP
1 hole AFT
2 holes AFT
Outhaul
Smooth
Smooth
Smooth
Smooth
Max
Max
Vang
Loose
Slack Out
Firm
Firm
Max
Max
Cunningham
Loose
Loose
Loose
12" Wrinkles
Smooth
Smooth
Main Traveler
Up 2-6"
Center to up 2"
1/4 to 1/2 to Post
1/2 to Post
3/4 Down or Post
Post
Jib Traveler
Max Up
Max Up
Max Up
Down 2"
Down 3"
Down 4"
Clewboard
2nd Hole From Top
2nd Hole from Top
2nd Hole From Top
3rd Hole From Top
Bottom Hole
Bottom Hole
Tack Height
4"
4"
3.5"
3"
2.5"
2"
MAINSAIL TOP BATTEN - 6-12 knots go to 10180c, >12 knots increase to 10230c
2021 Easy Tuning Charts
Easy Tuning Charts (pre 2022)
Jib Tack Height
Jib tack height at base measured from the deck to the bearing point of the jib tack control line. Mark your control line to ensure you can quickly find your base setting. Adjusting the jib tack in in small increments during a race is a quick way to power-up or de-power the jib and has a more meaningful effect on jib shape than a 1 hole adjustment on the clewboard. See below.
Jib Spreader Mark
18.5"-19" measured from center rivet on front of spreader bracket, alongside the front of spreader.
In most conditions, the jib leech should be at or near this mark. Periodically sight through the mainsail window or from behind the mainsail to check your sheeting is accurate.
RACING YOUR ASYMMETRICAL
We wanted to provide you with some helpful tips so that your learning curve moves upward. Please follow some of these initial tips so that you reach maximum performance right out of the gate. Teamwork is a major factor in this sport. So, work with your team and see what techniques may work for you specifically. The tips provided are a baseline to work from. When setting up your Asymmetrical sheets – be sure to rig them so that you are doing “inside jibes”. The clew passes between the luff of the kite and the forestay. A quick way to ensure this is to lead the tack line over the starboard spinnaker sheet when you rig your sheets. Tack over sheet.
IMPORTANT MAST TUNING AND ASYMMETRICAL TECHNIQUES TO LEARN
As with any masthead spinnaker configuration, the rig is more loaded and will require more attention to rig tuning and some changes in sailing technique.
DIAMOND STAYS
The diamond stays on the mast help to support the mast head spinnaker configuration and the tension on the diamonds is important to ensure that the mast stays pre-bent and in column. It is important to follow the tuning guide recommendations and not stray too far from these numbers. Diamonds that are too loose when it is windy will not support the masthead kite properly and cause the mast to invert. Note: Diamond stays will stretch when they are new and you must check them before and after heavy air races, especially when the rig is new. Diamond stays will also measure differently with different tension on the Intermediates and the lowers.
SPREADERS
Spreaders should always be in the maximum aft setting on the mast to ensure maximum spreader sweep. Note: This is the fast setting for all wind conditions, and this is true for the aft chainplate boats as well as the forward chainplate boats. The upper spreaders are set from the factory with approximately a 6-1/4” sweep when measuring from the back of the mast to a straight line from tip to tip where the wire passes through the tip. Sweeping the spreaders forward will make the top of the mainsail fuller, sweeping them aft will flatten the top of the mainsail.
SIDESTAY TENSION
With the forward chainplate rigs it is important to start to put some tension on the uppers once the breeze is over 10 knots. 400 lbs. On the uppers is necessary to insure that the mast stays prebent when sailing downwind. We recommend sailing with the uppers closer to 600 lbs once the breeze is over 15knots. This is the same for the aft chainplate rigs. With the aft chainplate rigs we rarely go below 600 lbs on the upper sidestay tension.
MAINSHEET TECHNIQUES
It is important with the Asymmetrical to sail at slightly hotter or higher angles than with the symmetrical kites to achieve the greatest performance. This, along with the higher speeds you are achieving will bring the apparent wind angle forward and require the mainsail to be trimmed at a tighter angle. Also, more vang can be carried since you are sailing at hotter angles with more load on the mainsail. Because you are sailing at hotter angles and the A sails are so easy to jibe you should not ease the mainsail out too far on the jibes. The maximum the sheet should ever be eased is about 10’ measuring from the aft corner of the boat to the boom. This technique along with keeping some vang on will help maintain a positive bend in the mast and regardless of backstay tension will help ensure that the mast does not do an inverted bend.
RECIPE FOR MAST DAMAGE
Crew weight should never exceed 675lbs. on an E Scow. The target weight for 4 people sailing in heavy wind is 630-650lbs. Sailing heavier will dramatically increase loads on the boat and rigging and amplifies mistakes made with tuning and mainsail handling. Jibing in heavy air with the vang loose and the mainsail eased out too far can be a recipe for mast problems. This is the single most important thing you need to concentrate on when sailing the A sail configuration. When you go into a jibe do not slow the boat down, go from high-speed mode right into the jibe. I equate this to a high-speed windsurfing jibe. If the diamonds are too loose and the uppers are too loose this will also compound the situation and cause the mast to invert and could cause failure. As with any powered-up masthead configuration you have to learn the techniques to ensure that you are safely performing the maneuvers. Once you understand the mechanics of the rig you will realize how much fun the A sails are and how much easier they are to sail. With the proper mechanics of boat handling and rig tuning, the rigs are very durable and will stand up to a lot of wind. It is very important to stay within the recommended rig settings. Do not overload the shroud tension or the crew weight as this places too much compression load on the mast and boat and can cause failures.
Downwind Asymmetrical Techniques
SETTING THE ASYMMETRICAL
Pull the bow sprit all the way out – Important – You cannot pull the bowsprit out until you break the plane of the windward mark. Only pull bow sprit out prior to hoisting without kite launcher and one pull tack line system.
Mid crew opens the bag and prepares for the kite to exit the cockpit. Only if you don’t have a kite launcher.
Make sure to keep the boat flat when in the hoisting process as this helps keep the spinnaker out of the water. Not as important with kite launcher.
Mid Crew pulls the spinnaker halyard all the way up - Tip – Make a permanent mark on the halyard in the “full up” position so you pull to that point every time.
With kite launcher on hoist countdown, jib crew pulls windward jib sheet in through ratchet and cleats to windward to clear kite launcher hole.
After the halyard is ¼ of the way hoisted, Jib Crew now pulls the tack of the asymmetrical all the way out and then immediately uncleats the jib sheet and properly trims jib.
Helmsperson Tip – on the set it is very important to help your crew out by bearing away a bit on the hoist. This allows the kite to go all the way up with ease. It is important to also make sure the mainsail is not let out too far. The halyard and head of the kite can get hung up behind the spreader delaying the hoist. Keep an eye on these things.
Once the halyard is up your mid crew should communicate “made”. The helmsperson should freshen (head up) right away so that the kite blows away from the rig and then fills.
Limit your mistakes on the set – do not sail too high on the set – this makes it harder to pull the halyard up and the kite will fill early making it harder on the crew. With practice, you can push this limit higher.
Limit your mistakes on the set.
Practice your timing on all of these things and know when you can push the envelope for the ultimate set!
THINGS TO THINK ABOUT AND PRACTICE
When sailing downwind with the asymmetrical we sail with our boards all the way down. In varying conditions, you may want to experiment with pulling your boards up some. This could be especially good in moderate winds and wavy conditions. Practice this technique and find out what is fast for your team. When in doubt though – keep the boards all the way down.
The angle of heel will not vary from the symmetrical kite setup.
It is very important to keep your lines clean and drop coiled. You need to drop coil your spinnaker sheets after every jibe so that the sheet runs free through this maneuver.
Compass – it is very important to watch your compass angles downwind while staying in the freshest breeze on the course. These boats will be going very fast. Angles and wind really make the difference. Watch your compass as much if not more than you do going upwind.
Downwind Sailing Angles – this will vary some. Many think that you have to sail hot and fast in all conditions with this setup. This is not the case. Here is a brief guideline to go by.
WINDS 0 - 8 KNOTS
A higher angle is required so that the boat builds apparent wind. With this speed, you can begin to sail low. As soon as the boat slows even slightly or the boat begins to flatten in angle of heel – you need to head right back up and fire up the speed again. This requires constant attention and focus. One key factor in this condition is mainsheet trim. As your apparent wind moves forward you need to keep your mainsheet trimmed a lot more. Make sure your mainsail is not luffing. You will be amazed as to how the boat reacts to a tighter mainsheet and how much the boat likes to have the mainsheet worked downwind. Practice this. In this wind range, you want to practice float jibes where you bear away slowly and ease the kite out and start pulling it around so it floats around the bow.
WINDS 9-12 KNOT
You can experiment with sailing a lower or deeper angle in these conditions. As the breeze hits and the boat heels, begin to drive the boat down and sail deeper. Work your mainsheet. As you sail deeper the main will need to be eased slightly, but not nearly as far as would for a symmetrical sail.
WINDS 13 - 15 KNOT
This is where it is really fun! Rock and Roll time! Crews should all be on the high side in their hiking straps. The mainsail will need to be trimmed in – almost all the way at times – as your apparent wind is way forward. The Jib Crew will need to work the jib and also the vang. It will feel like you are sailing at a higher angle due to the speed build-up. You really need to get the boat up and rolling – do not sail low or keep people in the boat – put them on the rail and go for a fast ride! The key is the mainsheet, keep the main trimmed. Do not ease the main much through your jibe either! Keep the sail in! In this wind condition you want to perform Mexican jibes, the skipper turns right into the jibe, you trim the sheet tight, strap the foot of the kite, let it back slightly onto the rig on the new windward side of the boat and as the main is coming across you blow the sheet off and trim the new sheet on quickly.
ASYMMETRICAL TAKEDOWNS
The easiest takedowns are the Windward takedown or the Mexican take-down. The leeward takedown is your third option.
WINDWARD TAKEDOWN
Head the boat virtually dead downwind.
Middle crew begins to pull the windward spin sheet around and then the Jib crew releases the tack line shortly after that. You can release the bow sprit line shortly after. With the kite launcher, mid crew counts down 3-2-1 as they start to pull on the kite retrieval line, jib crew uncleats halyard on 0 and then tack line, tailing as they drop to keep the kite out of trouble. All sheets have to run smoothly to keep the kite coming in freely.
Middle Crew - Pull the windward sheet aggressively through the ratchet - all the way back so that the clew reaches the ratchet block. The sail will have inverted. Only if you have no kite launcher.
Middle Crew - Call for the halyard once you have the sail in hand. See #2 for kite launcher.
Helmsperson - Before the halyard begins to drop be sure to steer up slightly so that the sail blows onto the deck of the boat. If you are dead downwind or sailing by the lee the kite will blow out away from the boat and go into the water. This is not good. It is very important that the helmsperson helps out the crew by steering up.
The Middle Crew stuffs the sail into the bag and prepares for the rounding. Only if you don’t have a kite launcher.
MEXICAN TAKEDOWN
This takedown is effective when approaching the leeward mark on starboard tack and you need to jibe to go around the mark. As you reach a 3 boat length circle from the leeward mark you prepare to go into action. The key is that you need to be at about 150 degrees to true wind as you complete your jibe and you sail on port tack to the mark ( as you jibe you need to have the ability to head up on port jibe slightly so that the asymmetrical stays on the deck of the boat. If you come out of the jibe dead downwind the spinnaker will fall right into the water – again, the helmsperson needs to do their job to make the takedown easy and effective). So, your relation to the leeward mark is critical – you want to exit the jibe and begin to reach toward the leeward mark.
You enter the three boat length circle on starboard tack.
Helmsperson calls for a Mexican.
Middle Crew - Be sure to drop the windward board before entering the jibe.
Begin the jibe – the Middle Crew needs to trim the sheet hard so that the clew goes to the ratchet on the port side of the boat. This brings the clew and the foot of the sail to within reach for the takedown.
The helmsperson turns the boat and enters the jibe. As the boom goes across he yells for the halyard release. The Jib Crew needs to release the halyard and the mid crew will already be taking in the retrieval line.
The helmsperson needs to head up so that the sail gets “pressed” into the rig on the port side. The key is to head up so that the sail falls onto the deck and into the rig keeping the sail away from the water.
The crew needs to be on the high side – on this port jibe as you approach the leeward mark – very important if it is windy as the boat will accelerate once you begin to reach to the mark.
The tack line and bowsprit line are the last two items to be released. The Middle Crew needs to stuff the sail into the bag and hike hard as the boat rounds the mark. Refer to #2 on windward takedown for jib crew steps.
Middle or jib crew pulls the board up on the port side as soon as possible or before the leeward mark.
LEEWARD TAKEDOWN
The key here is that the helmsman heads down for an easy takedown.
Release the tack line and trim the spinnaker sheet in.
Release the halyard slowly or with friction for the first 8 feet so that the halyard does not blow out and get hooked on the leech of the mainsail.
Middle Crew stuffs the kite into the bag.
Final release is the bowsprit line which can occur shortly after the release of the tack line.
Takedown with kite launcher:
Helm bears away, mid crew starts retrieval in counting down, 3-2-1 halyard is released, then tack. Flatten boat as much as possible to all crew to windward. Speed on the retrieval line is the name of the game.
SET UP
It is important to follow the North Sails Tuning Guide – I-1 Rig. Follow the amount of rig tension suggested for the varying conditions.
SPECIAL CONSIDERATIONS
The angle of heel is very important on an E Scow. Upwind in up to 10 knots, go for a maximum heel, but never let the water get up on the leeward deck. In more wind, sail with the bilge board vertical in the water. Don’t let the boat heel too much when sailing in a chop: it might feel good, but it is not fast. Just make sure that the bilge board is vertical, or that the boat is just a little flatter. When sailing in a lot of chop, be sure to have a very full jib, power up the main by keeping the rake forward, Cunningham off all the way and the outhaul pulled just until the vertical wrinkles disappear. An E Scow travels at very high speeds for a sailboat, and is very maneuverable even though the rudders are only 10” X 16”. Still, it is important for the crew to be in tune with the skipper to help steer the boat. When a big puff hits, the bow has a tendency to blow to leeward, so the jib crew must be prepared to ease the sheet to prevent this. The most important thing to do when tacking an E Scow is to lower the new board at the right time. As the boat is turning through the tack, wait until the bow is just past head to wind to lower the board: if you do this too soon, it just creates extra drag and slows the boat down. Don’t worry about raising the windward board until the boat is up to speed on the new tack. We like to ease the main slightly and then trim it in to heel the boat as we come up into the wind, and then everybody rolls the boat together. In light to medium winds, keep the jib trimmed in until the boat is head to wind and let the windbreak it across. When it starts to get windy it isn’t necessary to roll the boat, but ease the jib sooner so the bow can come up into the wind easier.
TACTICAL CONSIDERATIONS
As far as tactical considerations go, at the start just remember that E Scows accelerate quickly, so it’s important to trim in before the boats around you or you might get rolled right away. If you have the room to leeward, simply put the boat on a tight reach with 15 seconds to go, get it up to speed by the time you hit the line, and make sure you can sail over the boat to leeward. E Scows don’t seem to create much of a wind shadow, so don’t be afraid to sail in someone’s bad air if you think it’s the right way to go, since the gains in a windshift can outweigh the loss of boat speed. These boats sail so fast that you are never out of the race. If you find yourself behind, several good wind shifts can move you right through the fleet. The important thing to remember is to keep the pedal down and never give up. All these generalizations are norms and averages that have proven fast over many years. Some experimentation on your part may be necessary to fine-tune your particular rig and sailing style. Good luck!
READ MORE
READ MORE

E SCOW TUNING GUIDE
This tuning guide is for E Scow sailors using the rig with the chainplates at the max aft position with longer spreaders. With this rig, backstays are not required, allowing the skipper to fully concentrate on tactics and boat speed.
BEFORE STEPPING THE MAST
Clean and lubricate turnbuckles, make sure that the top and bottom threaded studs are even in the turnbuckle tube.
Position mast so that base is locked in mast step plate on deck and top end is resting in the boom rest support.
Check all pins, wires, and fittings for wear, and attach upper and lower shrouds.
Pull the forestay down along the top of the mast, pull firmly, and mark the wire with a permanent marker at the top of the mast base casting or where the tube is cut off at the bottom. You will use this mark to measure your mast rake once the mast is in the up position.
Check the spreaders to make sure they are pinned in the forward hole for an all-purpose setting. This puts the spreaders in the aft-most position.
Make sure that all halyards are pulled down and are not fouled.
Using the feeder line that comes up through the mast step, tie this onto the bottom end of the jib halyard and pull the jib halyard through the deck. Take care not to loose the feeder line through the deck or you will have to re-run through the pulleys inside the backbone.
Using a person on the foredeck pulling on the spinnaker halyard and someone walking up the mast, step the mast and attach the forestay.
After stepping the mast, proper shroud tensions should be obtained. If you have a new North mainsail with the slug sewn into the sail, remove the screw holding the slug slide in the mast and remove the slug slide. This slide can be shackled on another sail for use of an older mainsail.
ALL PURPOSE SETTINGS
For base setting of the mast rake, start by measuring up from the top of the deck at the forestay along the forestay wire to the mark on the wire that corresponds to the mark you put on the wire at the bottom of the mast tube. Please refer to the mast rake chart and use the measurement which corresponds to the year your boat was built.
At this point, tighten the upper shrouds (shrouds that go to the forestay) so they measure 37 (560 lbs) on a PT-1 Loos tension gauge. Make sure the uppers are in the aft-most hole in the chainplates and also make sure you tighten each turnbuckle the same amount. If you want to really fine-tune the rig, measure down to the deck at the chainplates using the jib halyard and adjust the intermediates to center the mast athwartship.
Set the lower shrouds at 21 (240 lbs) on the PT-1 gauge and the diamonds at 23 (280 lbs). You will have to work back and forth between shrouds to achieve these base numbers.
Note: If you have a new boat or new shrouds it is important to sail a few times in heavy air to stretch out the rigging before setting permanent marks on the shrouds and the mast rake. Double check the mast rake measurement after tightening shrouds and after sailing in a good breeze.
Rake Setting
The proposed rake settings below are based on the year your E Scow was built.
1998 – 2011
2012 – 2015
2016 or newer
26″
26 1/4″
26 3/8″
Easy Tuning Charts
Note that all recommended turns are from the base settings.
M3 Mainsail / J4 Jib
TWS
6 knots
BASE – 8 knots(2-3 on rail)
10 knots
12 knots
15 knots
18+ knots
Uppers
–
37
+1
+1.5
+2
+3
Lowers
-1
21
+1
+1
+2
+2
Diamonds
-1
23
–
–
+2
+3
Boards
2 holes FWD
1 hole FWD
1 hole FWD
AP
1 hole AFT
2 holes AFT
Outhaul
Smooth
Smooth
Smooth
Smooth
Max
Max
Vang
Loose
Slack Out
Firm
Firm
Max
Max
Cunningham
Loose
Loose
Loose
12″ Wrinkles
Smooth
Smooth
Main Traveler
Up 2-6″
Center to up 2″
1/4 to 1/2 to Post
1/2 to Post
3/4 Down or Post
Post
Jib Traveler
Max Up
Max Up
Max Up
Down 2″
Down 3″
Down 4″
Clewboard
2nd Hole From Top
2nd Hole from Top
2nd Hole From Top
3rd Hole From Top
Bottom Hole
Bottom Hole
Tack Height
4″
4″
3.5″
3″
2.5″
2″
MAINSAIL TOP BATTEN – 6-12 knots go to 10180c, >12 knots increase to 10230c
2021 Easy Tuning Charts
Easy Tuning Charts (pre 2022)
Jib Tack Height
Jib tack height at base measured from the deck to the bearing point of the jib tack control line. Mark your control line to ensure you can quickly find your base setting. Adjusting the jib tack in in small increments during a race is a quick way to power-up or de-power the jib and has a more meaningful effect on jib shape than a 1 hole adjustment on the clewboard. See below.
Jib Spreader Mark
18.5″-19″ measured from center rivet on front of spreader bracket, alongside the front of spreader.
In most conditions, the jib leech should be at or near this mark. Periodically sight through the mainsail window or from behind the mainsail to check your sheeting is accurate.
RACING YOUR ASYMMETRICAL
We wanted to provide you with some helpful tips so that your learning curve moves upward. Please follow some of these initial tips so that you reach maximum performance right out of the gate. Teamwork is a major factor in this sport. So, work with your team and see what techniques may work for you specifically. The tips provided are a baseline to work from.
When setting up your Asymmetrical sheets – be sure to rig them so that you are doing “inside jibes”. The clew passes between the luff of the kite and the forestay. A quick way to ensure this is to lead the tack line over the starboard spinnaker sheet when you rig your sheets. Tack over sheet.
IMPORTANT MAST TUNING AND ASYMMETRICAL TECHNIQUES TO LEARN
As with any masthead spinnaker configuration, the rig is more loaded and will require more attention to rig tuning and some changes in sailing technique.
DIAMOND STAYS
The diamond stays on the mast help to support the mast head spinnaker configuration and the tension on the diamonds is important to ensure that the mast stays pre-bent and in column. It is important to follow the tuning guide recommendations and not stray too far from these numbers. Diamonds that are too loose when it is windy will not support the masthead kite properly and cause the mast to invert.
Note: Diamond stays will stretch when they are new and you must check them before and after heavy air races, especially when the rig is new. Diamond stays will also measure differently with different tension on the Intermediates and the lowers.
SPREADERS
Spreaders should always be in the maximum aft setting on the mast to ensure maximum spreader sweep. Note: This is the fast setting for all wind conditions, and this is true for the aft chainplate boats as well as the forward chainplate boats.
The upper spreaders are set from the factory with approximately a 6-1/4” sweep when measuring from the back of the mast to a straight line from tip to tip where the wire passes through the tip. Sweeping the spreaders forward will make the top of the mainsail fuller, sweeping them aft will flatten the top of the mainsail.
SIDESTAY TENSION
With the forward chainplate rigs it is important to start to put some tension on the uppers once the breeze is over 10 knots. 400 lbs. On the uppers is necessary to insure that the mast stays prebent when sailing downwind. We recommend sailing with the uppers closer to 600 lbs once the breeze is over 15knots. This is the same for the aft chainplate rigs. With the aft chainplate rigs we rarely go below 600 lbs on the upper sidestay tension.
MAINSHEET TECHNIQUES
It is important with the Asymmetrical to sail at slightly hotter or higher angles than with the symmetrical kites to achieve the greatest performance. This, along with the higher speeds you are achieving will bring the apparent wind angle forward and require the mainsail to be trimmed at a tighter angle. Also, more vang can be carried since you are sailing at hotter angles with more load on the mainsail. Because you are sailing at hotter angles and the A sails are so easy to jibe you should not ease the mainsail out too far on the jibes. The maximum the sheet should ever be eased is about 10’ measuring from the aft corner of the boat to the boom. This technique along with keeping some vang on will help maintain a positive bend in the mast and regardless of backstay tension will help ensure that the mast does not do an inverted bend.
RECIPE FOR MAST DAMAGE
Crew weight should never exceed 675lbs. on an E Scow. The target weight for 4 people sailing in heavy wind is 630-650lbs. Sailing heavier will dramatically increase loads on the boat and rigging and amplifies mistakes made with tuning and mainsail handling.
Jibing in heavy air with the vang loose and the mainsail eased out too far can be a recipe for mast problems. This is the single most important thing you need to concentrate on when sailing the A sail configuration. When you go into a jibe do not slow the boat down, go from high-speed mode right into the jibe. I equate this to a high-speed windsurfing jibe. If the diamonds are too loose and the uppers are too loose this will also compound the situation and cause the mast to invert and could cause failure.
As with any powered-up masthead configuration you have to learn the techniques to ensure that you are safely performing the maneuvers. Once you understand the mechanics of the rig you will realize how much fun the A sails are and how much easier they are to sail. With the proper mechanics of boat handling and rig tuning, the rigs are very durable and will stand up to a lot of wind. It is very important to stay within the recommended rig settings. Do not overload the shroud tension or the crew weight as this places too much compression load on the mast and boat and can cause failures.
Downwind Asymmetrical Techniques
SETTING THE ASYMMETRICAL
Pull the bow sprit all the way out – Important – You cannot pull the bowsprit out until you break the plane of the windward mark. Only pull bow sprit out prior to hoisting without kite launcher and one pull tack line system.
Mid crew opens the bag and prepares for the kite to exit the cockpit. Only if you don’t have a kite launcher.
Make sure to keep the boat flat when in the hoisting process as this helps keep the spinnaker out of the water. Not as important with kite launcher.
Mid Crew pulls the spinnaker halyard all the way up – Tip – Make a permanent mark on the halyard in the “full up” position so you pull to that point every time.
With kite launcher on hoist countdown, jib crew pulls windward jib sheet in through ratchet and cleats to windward to clear kite launcher hole.
After the halyard is ¼ of the way hoisted, Jib Crew now pulls the tack of the asymmetrical all the way out and then immediately uncleats the jib sheet and properly trims jib.
Helmsperson Tip – on the set it is very important to help your crew out by bearing away a bit on the hoist. This allows the kite to go all the way up with ease. It is important to also make sure the mainsail is not let out too far. The halyard and head of the kite can get hung up behind the spreader delaying the hoist. Keep an eye on these things.
Once the halyard is up your mid crew should communicate “made”. The helmsperson should freshen (head up) right away so that the kite blows away from the rig and then fills.
Limit your mistakes on the set – do not sail too high on the set – this makes it harder to pull the halyard up and the kite will fill early making it harder on the crew. With practice, you can push this limit higher.
Limit your mistakes on the set.
Practice your timing on all of these things and know when you can push the envelope for the ultimate set!
THINGS TO THINK ABOUT AND PRACTICE
When sailing downwind with the asymmetrical we sail with our boards all the way down. In varying conditions, you may want to experiment with pulling your boards up some. This could be especially good in moderate winds and wavy conditions. Practice this technique and find out what is fast for your team. When in doubt though – keep the boards all the way down.
The angle of heel will not vary from the symmetrical kite setup.
It is very important to keep your lines clean and drop coiled. You need to drop coil your spinnaker sheets after every jibe so that the sheet runs free through this maneuver.
Compass – it is very important to watch your compass angles downwind while staying in the freshest breeze on the course. These boats will be going very fast. Angles and wind really make the difference. Watch your compass as much if not more than you do going upwind.
Downwind Sailing Angles – this will vary some. Many think that you have to sail hot and fast in all conditions with this setup. This is not the case. Here is a brief guideline to go by.
WINDS 0 – 8 KNOTS
A higher angle is required so that the boat builds apparent wind. With this speed, you can begin to sail low. As soon as the boat slows even slightly or the boat begins to flatten in angle of heel – you need to head right back up and fire up the speed again. This requires constant attention and focus. One key factor in this condition is mainsheet trim. As your apparent wind moves forward you need to keep your mainsheet trimmed a lot more. Make sure your mainsail is not luffing. You will be amazed as to how the boat reacts to a tighter mainsheet and how much the boat likes to have the mainsheet worked downwind. Practice this. In this wind range, you want to practice float jibes where you bear away slowly and ease the kite out and start pulling it around so it floats around the bow.
WINDS 9-12 KNOT
You can experiment with sailing a lower or deeper angle in these conditions. As the breeze hits and the boat heels, begin to drive the boat down and sail deeper. Work your mainsheet. As you sail deeper the main will need to be eased slightly, but not nearly as far as would for a symmetrical sail.
WINDS 13 – 15 KNOT
This is where it is really fun! Rock and Roll time! Crews should all be on the high side in their hiking straps. The mainsail will need to be trimmed in – almost all the way at times – as your apparent wind is way forward. The Jib Crew will need to work the jib and also the vang. It will feel like you are sailing at a higher angle due to the speed build-up. You really need to get the boat up and rolling – do not sail low or keep people in the boat – put them on the rail and go for a fast ride! The key is the mainsheet, keep the main trimmed. Do not ease the main much through your jibe either! Keep the sail in! In this wind condition you want to perform Mexican jibes, the skipper turns right into the jibe, you trim the sheet tight, strap the foot of the kite, let it back slightly onto the rig on the new windward side of the boat and as the main is coming across you blow the sheet off and trim the new sheet on quickly.
ASYMMETRICAL TAKEDOWNS
The easiest takedowns are the Windward takedown or the Mexican take-down. The leeward takedown is your third option.
WINDWARD TAKEDOWN
Head the boat virtually dead downwind.
Middle crew begins to pull the windward spin sheet around and then the Jib crew releases the tack line shortly after that. You can release the bow sprit line shortly after. With the kite launcher, mid crew counts down 3-2-1 as they start to pull on the kite retrieval line, jib crew uncleats halyard on 0 and then tack line, tailing as they drop to keep the kite out of trouble. All sheets have to run smoothly to keep the kite coming in freely.
Middle Crew – Pull the windward sheet aggressively through the ratchet – all the way back so that the clew reaches the ratchet block. The sail will have inverted. Only if you have no kite launcher.
Middle Crew – Call for the halyard once you have the sail in hand. See #2 for kite launcher.
Helmsperson – Before the halyard begins to drop be sure to steer up slightly so that the sail blows onto the deck of the boat. If you are dead downwind or sailing by the lee the kite will blow out away from the boat and go into the water. This is not good. It is very important that the helmsperson helps out the crew by steering up.
The Middle Crew stuffs the sail into the bag and prepares for the rounding. Only if you don’t have a kite launcher.
MEXICAN TAKEDOWN
This takedown is effective when approaching the leeward mark on starboard tack and you need to jibe to go around the mark. As you reach a 3 boat length circle from the leeward mark you prepare to go into action. The key is that you need to be at about 150 degrees to true wind as you complete your jibe and you sail on port tack to the mark ( as you jibe you need to have the ability to head up on port jibe slightly so that the asymmetrical stays on the deck of the boat. If you come out of the jibe dead downwind the spinnaker will fall right into the water – again, the helmsperson needs to do their job to make the takedown easy and effective). So, your relation to the leeward mark is critical – you want to exit the jibe and begin to reach toward the leeward mark.
You enter the three boat length circle on starboard tack.
Helmsperson calls for a Mexican.
Middle Crew – Be sure to drop the windward board before entering the jibe.
Begin the jibe – the Middle Crew needs to trim the sheet hard so that the clew goes to the ratchet on the port side of the boat. This brings the clew and the foot of the sail to within reach for the takedown.
The helmsperson turns the boat and enters the jibe. As the boom goes across he yells for the halyard release. The Jib Crew needs to release the halyard and the mid crew will already be taking in the retrieval line.
The helmsperson needs to head up so that the sail gets “pressed” into the rig on the port side. The key is to head up so that the sail falls onto the deck and into the rig keeping the sail away from the water.
The crew needs to be on the high side – on this port jibe as you approach the leeward mark – very important if it is windy as the boat will accelerate once you begin to reach to the mark.
The tack line and bowsprit line are the last two items to be released. The Middle Crew needs to stuff the sail into the bag and hike hard as the boat rounds the mark. Refer to #2 on windward takedown for jib crew steps.
Middle or jib crew pulls the board up on the port side as soon as possible or before the leeward mark.
LEEWARD TAKEDOWN
The key here is that the helmsman heads down for an easy takedown.
Release the tack line and trim the spinnaker sheet in.
Release the halyard slowly or with friction for the first 8 feet so that the halyard does not blow out and get hooked on the leech of the mainsail.
Middle Crew stuffs the kite into the bag.
Final release is the bowsprit line which can occur shortly after the release of the tack line.
Takedown with kite launcher: Helm bears away, mid crew starts retrieval in counting down, 3-2-1 halyard is released, then tack. Flatten boat as much as possible to all crew to windward. Speed on the retrieval line is the name of the game.
SET UP
It is important to follow the North Sails Tuning Guide – I-1 Rig. Follow the amount of rig tension suggested for the varying conditions.
SPECIAL CONSIDERATIONS
The angle of heel is very important on an E Scow. Upwind in up to 10 knots, go for a maximum heel, but never let the water get up on the leeward deck. In more wind, sail with the bilge board vertical in the water. Don’t let the boat heel too much when sailing in a chop: it might feel good, but it is not fast. Just make sure that the bilge board is vertical, or that the boat is just a little flatter. When sailing in a lot of chop, be sure to have a very full jib, power up the main by keeping the rake forward, Cunningham off all the way and the outhaul pulled just until the vertical wrinkles disappear.
An E Scow travels at very high speeds for a sailboat, and is very maneuverable even though the rudders are only 10” X 16”. Still, it is important for the crew to be in tune with the skipper to help steer the boat. When a big puff hits, the bow has a tendency to blow to leeward, so the jib crew must be prepared to ease the sheet to prevent this. The most important thing to do when tacking an E Scow is to lower the new board at the right time. As the boat is turning through the tack, wait until the bow is just past head to wind to lower the board: if you do this too soon, it just creates extra drag and slows the boat down. Don’t worry about raising the windward board until the boat is up to speed on the new tack. We like to ease the main slightly and then trim it in to heel the boat as we come up into the wind, and then everybody rolls the boat together. In light to medium winds, keep the jib trimmed in until the boat is head to wind and let the windbreak it across. When it starts to get windy it isn’t necessary to roll the boat, but ease the jib sooner so the bow can come up into the wind easier.
TACTICAL CONSIDERATIONS
As far as tactical considerations go, at the start just remember that E Scows accelerate quickly, so it’s important to trim in before the boats around you or you might get rolled right away. If you have the room to leeward, simply put the boat on a tight reach with 15 seconds to go, get it up to speed by the time you hit the line, and make sure you can sail over the boat to leeward. E Scows don’t seem to create much of a wind shadow, so don’t be afraid to sail in someone’s bad air if you think it’s the right way to go, since the gains in a windshift can outweigh the loss of boat speed. These boats sail so fast that you are never out of the race. If you find yourself behind, several good wind shifts can move you right through the fleet. The important thing to remember is to keep the pedal down and never give up.
All these generalizations are norms and averages that have proven fast over many years. Some experimentation on your part may be necessary to fine-tune your particular rig and sailing style. Good luck!
READ MORE
READ MORE

YOUNG 88 TUNING GUIDE
Young 88 Quick Reference Chart
True Wind Speed (knots)
Cap Tension (Loos)
Lower Tension (Loos)
0-8
13
Slack
9-12 (Base)
17
7
13-18
21
13
19+
24
19
True Wind Speed (knots)
Mast Step
Chocks*
0-8
Aft 15 mm
10-20 mm behind
9-12 (Base)
Base 5370 mm
Neutral (Float)
13-18
Fwd 5 mm
10 mm front
19+
Fwd 10 mm
10 mm front
*Chocks: Measures from Neutral. Neutral is floating position of mast ad deck with slack out of forestay NOTES:
Dock Rig Measurement Position: measure rig with chocks taken out and slack out of forestay by pulling on backstay.
Base Mast Rake - Top of mainsail track to top of boom: 11.140 m; to deck: 11.950 m; to transom: 14 m
Mainsail Track at Hounds Height to transom - 11.380
Mainsail Track at spreader height: 7.785 cm
Arc measured from underside of bottom mast band on forestay
Young 88 Playbook
MORNING
Prior to Dock Out
Bow
Check spinnakers are packed
Mast
Run Sheets etc
Pit
Interior chief, check essentials are onboard, food/water
Floater/Brace
Run sheets etc. Bail boat out etc
Main
Check batten tensions
Helm
Check weather, tide, noticeboard, team briefing prior to dock out
Jib/Spin Trim
Check correct Sails are onboard before you leave the dock
Pre-Start Warm-Up
Bow
Set up spinnaker and pole on correct side. Get line transit.
Mast
Help Bow with set up.
Pit
Check Headsail halyard tension with trimmer.
Floater/Brace
Practice calling breeze, looking up the course.
Main
Check settings for first beat (outhaul, cunningham, etc)
Helm
Check in with the Committee boat. Go through course with team. Practice runs at the line, lay lines etc. Look up the course to plan your first beat.
Jib/Spin Trim
Select Headsail and Spinnaker to plug in.
PRE-START
Light Air
Bow
On bow calling time and distance.
Mast
Weight on rail where required.
Pit
Calling time every 10 seconds from 3 minutes down.
Floater/Brace
Looking at wind up the course. Tactical input.
Main
Mainsail trim, set traveler for the final approach.
Helm
Steering, work on final approach getting a good lane.
Jib/Spin Trim
Trimming and relay if there are boats to look out for.
Heavy Air
Bow
Weight up where possible, only on bow for final approach at line to call time and distance.
Mast
Weight on rail where required.
Pit
Calling time every 10 seconds from 3 minutes down.
Floater/Brace
Looking at wind up the course. Tactical input.
Main
Mainsail trim, set traveler for final approach.
Helm
Steering, work on final approach getting a good lane.
Jib/Spin Trim
Trimming and relay if there are boats to look out for.
UPWIND
Light Air
Bow
Weight on rail where required. Relay obstacles like weed.
Mast
Weight on rail where required. Lean in and out for lulls/puffs.
Pit
Weight on rail where required. Lean in and out for lulls/puffs. Make sure Headsail Halyard is left on Winch.
Floater/Brace
Calling breeze for the Helm/Trim team.
Main
Main trim, work with the helm to keep the boat balanced and fast. Traveler up.
Helm
Steering, looking at Headsail Woolies etc.
Jib/Spin Trim
Headsail trim, work with the helm to keep the boat balanced and fast, full power. Check Luff tension.
Heavy Air
Bow
Weight out. Relay obstacles like weeds.
Mast
Weight out.
Pit
Weight out. Make sure Headsail Halyard is left on Winch.
Floater/Brace
Calling breeze for the Helm/Trim team.
Main
Main trim, work for the helm to keep the boat balanced and fast. Traveler down in puffs.
Helm
Steering, looking at Headsail Woolies, etc.
Jib/Spin Trim
Headsail trim, work with the helm to keep the boat balanced and fast, de-power (car aft) if needed.
TACK
Light Air
Bow
Cross boat around mast, skirt headsail if need be.
Mast
Cross boat under boom.
Pit
Cross boat through companionway.
Floater/Brace
Cross boat through companionway.
Main
Traveler up on new side ASAP. Speed build, then final trim.
Helm
Call "Standby to Tack," followed by "Tacking in 3,2,1..."
Jib/Spin Trim
Cut and tail, speed build out of tack, final trim.
Heavy Air
Bow
Cross boat around mat, skirt headsail if need be.
Mast
Cross boat under boom.
Pit
Cross boat through companionway.
Floater/Brace
Cross boat through companionway.
Main
Ease a little mainsheet going into the tack. Sort traveler, speed build, back to final trim.
Helm
Call “Standby to Tack”, followed by “Tacking in 3,2,1….”. Be very loud so Bow team can hear.
Jib/Spin Trim
Cut and tail, speed build out of tack, final trim. Indicate if Headsail Skirt is required.
TOP MARK
Light Air
Bow
Pole up on final approach. Get ease in Windward Spin/Jib sheets. Drop Headsail after rounding.
Mast
Weight on rail. Bounce topper if needed. Hoist Spinnaker once Helmsman calls it.
Pit
Topper Up, Headsail halyard off winch ready to drop. Tail Spinnaker Halyard to Full Hoist with clutch CLOSED, Drop Headsail ASAP.
Floater/Brace
Weight on rail. Move to Brace if needed.
Main
Ensure Mainsheet is free to run, ease cunningham, outhaul at a suitable time.
Helm
Steering around mark. Call “Ready to hoist”, “Hoisting in 3,2,1…”.
Jib/Spin Trim
Ease Headsail and lock off for Hoist. Set Spin/Brace up. Sheet/Brace on. Trim.
Heavy Air
Bow
Pole up on final approach. Get ease in Windward Spin/Jib sheets.
Mast
Weight on rail. Bounce topper if needed. Hoist Spinnaker once Helmsman calls it.
Pit
Topper Up, Headsail halyard off winch ready to drop. Tail Spinnaker Halyard to Full Hoist with clutch CLOSED, Drop Headsail ASAP.
Floater/Brace
Move to Brace for hoist. Brace on and Trim.
Main
Ensure Mainsheet is free to run, ease cunningham, outhaul at a suitable time.
Helm
Steering around mark. Call “Ready to hoist”, “Hoisting in 3,2,1…”. Be loud!
Jib/Spin Trim
Ease Headsail and lock off for Hoist. Set Spin/Brace up. Sheet/Brace on. Trim.
STRAIGHT LINE DOWNWIND
Light Air
Bow
Weight in front of mast. Holding downhaul.
Mast
Weight to leeward holding out boom. Call wind.
Pit
Weight forward where needed.
Floater/Brace
Weight forward where needed if Spin Trim can do own Brace.
Main
Set Traveler, Main trim is crucial when sailing angles.
Helm
Concentrate on driving smoothly. Work with Trimmers.
Jib/Spin Trim
Be dynamic with Spin Trim, call pole forward/ aft where needed. Talk helm about pressure in spinnaker.
Heavy Air
Bow
Weight behind mast. Hold downhaul if you can.
Mast
Weight aft where needed. Call wind.
Pit
Weight aft where needed. Can stand in companionway hatch.
Floater/Brace
Trimming brace. Pole forward if needed to stop boat rounding out.
Main
Main eased. Look out for other boats, wind, etc.
Helm
Keep the boat on its feet, work with trimmers.
Jib/Spin Trim
Be dynamic with Spin Trim, call pole forward/ aft where needed. Talk to helm about pressure in spinnaker
GYBE
Light Air
Bow
Wait for Gybe Call, Trip both pole ends, clip new Brace in, push pole forward to clew as you push out and onto mast.
Mast
Human pole on new side. Hold shrouds for balance.
Pit
Weight across or in companionway. May need to ease more Downhaul for Gybe.
Floater/Brace
Grind Brace aft as you go into Gybe to help rotate the spinnaker.
Main
Pull Leeward Tweaker on for Gybe. Release Tweaker on Spinnaker sheet after Gybe.
Helm
Call “Standby for Gybe”, “Gybing in 3,2,1…”. Steer the boat smoothly. Only Gybe when Spinnaker is set!
Jib/Spin Trim
Keep Spinnaker Set throughout the Gybe!
Heavy Air
Bow
Wait for Gybe Call, Trip both pole ends, clip new Brace in, push pole forward to clew as you push out and onto mast.
Mast
Human pole on new side. Hold shrouds for balance.
Pit
Weight in companionway. May need to ease more Downhaul for Gybe, then pull back on once set.
Floater/Brace
Grind Brace aft as you go into Gybe to help rotate the spinnaker.
Main
Make sure tweakers are on for Gybe!
Helm
Call “Standby for Gybe”, “Gybing in 3,2,1…”. Only Gybe when Spinnaker is set! Be very careful about your exit angle, not too high or too low!
Jib/Spin Trim
Keep Spinnaker Set throughout the Gybe!
DROPS
Windward Drop
Bow
Wait for Jib Up and Pole off Call. Pole off and stowed between Jib Car and Cabin Windows Leeward side. Make sure Lazy Jib Sheet is behind the Hatch. Open Hatch ready for Drop. Human Pole will hand you the Clew for the Drop. Close Hatch and double check sheets are clear, then relay to the back of the boat “Clear for a Tack”.
Mast
Hoist Headsail once call is made, then shift to Human Pole as the Pole comes off. Hand Windward Clew to Bow person for Drop.
Pit
Tail Headsail Halyard, leave on winch and get to the correct setting for the Trimmer. Gently ease Topper as pole goes to Deck. Spin Halyard should already be run. Control the Spinnaker Drop for Bow team.
Floater/Brace
Ease Brace for Bow Team.
Main
Trimming Main. Get set up for Upwind – Outhaul, Cunningham etc.
Helm
Angle for Drop is critical! Cannot be reaching, you must be low downwind! Call “Ready to Drop”, “Dropping in 3,2,1…”.
Jib/Spin Trim
Release Spin Sheet and set up working Headsail sheet. Trim on Headsail for Drop. Final trim around Mark, then set up for a Tack.
Leeward Drop
Bow
Wait for Jib Up and Pole off Call. Pole off and stowed between Jib Car and Cabin Windows. Make sure Lazy Jib Sheet is behind the Hatch. Open Hatch ready for Drop. Reach under Headsail and grab Leeward Sheet to Drop. . Close Hatch and double check sheets are clear, then relay to the back of the boat “Clear for a Tack”.
Mast
Hoist Headsail once call is made, then shift to Human Pole as the Pole comes off. Help Bow person drop Spinnaker if needed.
Pit
Tail Headsail Halyard, leave on winch and get to the correct setting for the Trimmer. Gently ease Topper as pole goes to Deck. Spin Halyard should already be run. Control the Spinnaker Drop for Bow team.
Floater/Brace
Ease Brace for Bow Team. If Pole is on for the Drop, ‘smoke’ the brace out all the way off the winch!
Main
Trimming Main. Get set up for Upwind – Outhaul, Cunningham etc.
Helm
Angle not as critical, but make it as easy for the team. Call “Ready to Drop”, “Dropping in 3,2,1…”.
Jib/Spin Trim
Release Spin Sheet and set up working Headsail sheet. Trim on Headsail for Drop. Final trim around Mark, then set up for a Tack.
POST RACE
After Races
Bow
Rig check, area check, pack Spinnakers.
Mast
Area check, pack Spinnakers, flake sails.
Pit
Area check, Clean out interior. Check Water for following day.
Floater/Brace
Bail boat, help with Sails, get beers for team.
Main
Check Mainsail for chafe, Batten damage etc.
Helm
Check sheets etc are all in before turning engine on. Check noticeboard for protests, amendments etc. Team Debrief, Plan for next Race Day.
Jib/Spin Trim
Check Headsails as they are getting flaked up for chafe, Batten Damage etc.
A note about repairs/damage:
Deal with it right away, do not leave for the morning!
Take ownership of all your areas.
Race hard & have fun!
READ MORE
READ MORE
OPTIMIST TUNING GUIDE
V-Series Important Settings for Key Performance
Power your new North Sails Optimist V-Series mainsail for speed following the recommendations on this quick tuning guide.
BASE SETTINGS
Sail ties can be adjusted in the range of 1-5mm in light wind and heavy wind to have comfortable depth and shape.
LIGHT WIND: Smaller space at the middle so that leech becomes easier open.
HEAVY WIND: Smaller space at the middle so that you can make the shape comfortably flat enough to reduce the power.
Sail Ties:
Top: 2mm
Middle: 2mm
Bottom: 2mm
* Parallel to the mast.
Distance of space distribution to be made from top to the bottom.
Adjustment is required only for suitable sail shape (depth) for each condition and to be done only when needed.These are sometimes required depending on mast stiffness and sailor’s weight, but only when if needed.
BASIC TRIM
Wind Range
0-8 knots
8-12 knots
12-16 knots
Mast Rake
2780 – 2800 mm
2770 – 2790 mm
2770 – 2780 mm
Sprit
Wrinkles
Some Wrinkles
A Few Wrinkles
Vang
No tension in upwind
Light tension in upwind
Tension
Prebender
2 turns /Some Slack at Luff
2 turns /Some Slack at Luff
No Wrinkle at Luff
Center Board
Max
Max
Max
Wind Range
16-24 knots
25+ knots
Mast Rake
2750 – 2760mm
2790 ±10mm
Sprit
Wrinkles
Wrinkles
Vang
Lots of tension
Cleat with main sheet trimming harder
Prebender
Tension on Luff
Tension on Luff
Center Board
0-50 mm up
30-70 mm up
OUTHAUL CONTROL – VERY IMPORTANT FOR KEY PERFORMANCE!
You have to pay attention to the outhaul to adjust it properly according to the conditions and sailors weight.
You need to find the best position that fits your weight, mast rake( boom position), sea status, weather helm feeling for each condition.
Playing outhaul in the range of 20mm at the boom end.
Ease it maximum in 10-14knots and clew end has to be located 30-40mm away from the boom end.
FLAT WATER – Trim 10mm more than the normal position.
LIGHT / VERY STRONG WIND – Bottom to be flattened comfortably.
READ MORE
READ MORE

FAREAST 28R TUNING GUIDE
Rig Tuning Guide
All turns from base.
TWS Knots
Forestay
V1
D1
D2
0-5
-5
-3
-1
-1
5-10
-3
-1
0
0
10-14
BASE
BASE
BASE
BASE
14-18
+5
+2
+1
+1
28-22
+10
+3
+1
+2
22+
+10
+4
+3
+2
BASE TUNING - PT-2
V1
30
D1
25
D2
7
BASE Swing
1853 mm
Using the jib halyard, pull the halyard taught against the mast at the level of the top BAS (black band). Swing the halyard to the forestay and mark the forestay at this height. Measure from the mark down to the top of the stainless steel forestay fitting. This measurement is 1853mm for base setting.
READ MORE
READ MORE

OK DINGHY TUNING GUIDE
North Sails expert Charlie Cumbley provides a detailed run-through on how to get the most out of your OK Dinghy sail. This guide will help to get your mast set up correctly for a North sail, looking at mast rake and mast position at deck level. For each of the settings, there will be a suggested range to suit different conditions, sailing fitness levels, and styles. Please use this as a guide; it’s not gospel as everyone will have a slightly different idea on how the boat should feel. By measuring these positions and getting within these ranges, you will be able to be competitive and also accurately reproduce your settings. As we learn more about the OK Dinghy or any other One Design class, new information regarding setup, tuning, and trimming techniques will be updated on the class page.
MAST POSITION AT DECK
The position of the mast at deck level will have a major bearing on how much rudder angle or weather helm your setup will produce. For any given mast rake, you can move the mast forward or aft in the boat by moving both the mast heel and deck adjusters the same amount. By moving the mast forward, you move the center of effort of the sail plan forward which will reduce the amount of rudder angle and feel. Likewise, moving it back will increase that rudder angle and feel. This position will vary depending on the boat type, foil shapes, sail shape, and conditions you are sailing in. As a rule of thumb, if you generally sail on flat water and/or light airs, you will want to move the sail plan back in the boat as this increases helm and will help you achieve a ‘high mode’ when sailing upwind. Conversely, if you are sailing in choppy/rough conditions and/or stronger winds, then you will prefer to reduce the amount of helm and rudder angle to allow for a faster lower mode upwind. As a result of this, the deck position often varies from boat to boat and depends on a sailor's preferred way of sailing. For an Ovington with a North Sail, Charlie's all-purpose measurement is 3270mm. Move the rig back 15mm to 3255mm for a flat water/light airs venue.
We recommend you measure this deck position as shown in the pictures below; measured from the aft edge of the deck ring to the aft edge of the transom.
MAST RAKE
The most traditional way to set up mast rake is to simply hoist a tape measure up on the main halyard to the top band. To make sure you are as accurate as possible each time, once hoisted, measure down the mast to the top edge of the bottom band by the gooseneck. The tape should read 5400mm. Use the tape to measure to the top of the transom - the most popular range varies from 6100mm to 6200mm. This range depends on wind conditions, sea state, and mast stiffness. In theory, you would be looking for a more upright mast in ‘max power’ conditions and flatter water, but this will depend on your own body weight and hiking fitness. In the lighter airs, you would generally opt for a more raked aft setting to reduce leech tension and increase weather helm. We would advise a setting in the middle of these for the windy setting. Once you get overpowered from your max power setting, dropping the mast rake back a little will help the sail twist open and depower as well as allow for a faster, lower upwind mode which will be needed in these windier/rougher conditions. The downside with measuring the mast rake in this manner is it does not allow for the variation in mast bend, in particular the fore/aft tip deflection. For example, if you have a mast with an f/a tip deflection of 480mm (measured in the normal manner with 10kg) and you set up the mast rake with a measurement of 6150mm, for any given upwind sheeting position (i.e with the boom end ‘1 booms depth’ from the deck), you will have more leech tension than if you were using a mast with an f/a tip deflection of 540mm. It's this leech tension that is a critical factor for your upwind performance, so we recommend an alternative method for measuring mast rake which is used extensively in the Finn class. This method is shown below.
HOW TO MEASURE LEECH TENSION
Rather than measuring your mast in a straight line ‘tip of mast to transom’ as described earlier in the guide, this system measures what tension would be put through the leech of the sail. This allows you to get more accurate settings and go afloat with a good idea of how open your leech will fly (leech twist). It will also allow you to interchange different masts and set the leech profile to the same setting no matter how different your masts may be. You can use any of the different spring/digital gauges currently on the market; Persola Spring Balance, Devoti digital strain gauge both work perfectly well. We have used the Persola spring balance in this guide.
1 - Attach tension gauge and long tape measure to mainsail halyard. Hoist halyard until the tape measures 5400mm when pulled taught down the mast to the top edge of the bottom mast band. Pull some tension onto the gauge at this point and remeasure this hoist once the halyard has bed in.
2 - Attach tension gauge onto the outhaul.
3 - Tie the traveler out to the side deck, the furthest it can be from the centreline (so the boom is positioned on the edge of the gunwale when pulled to the deck in stage 4).
4 - With the mainsheet, sheet the boom to the deck (NOTE: Always use the same side of the boat for measuring tensions. Always measure with boom end on side of the boat).
5 - Take measuring tape and measure to the inner edge of the boom black band. Adjust the outhaul so that the tape reads 5425mm when held taught.
6 - Read the numbers on the gauge to see what the mast is set up at - this is your leech tension.
Quick Tuning Table
Helm Weight
<6 knots - Superlight
5-10 knots - Light/Medium
All Purpose
>18 knots - Strong
>95kg
75lbs/34kg
79lbs/35.8kg
84lbs/38kg
82lbs/37.2kg
85-95kg
72lb/32.6kg
76lbs/34.5kg
82lbs/37.2kg
80lbs/36.3kg
75-85kg
72lb/32.6kg
75lbs/34kg
80lbs/36.3kg
77lbs/34.9kg
To adjust the tension, you can either move the chocks at deck level or move the foot of the mast (approximately 1mm chock at deck is equal to 1lb/0.5kg leech tension). Always re-check the tension after changes. This system also helps when trialing mast position fore/aft in the boat to maintain consistent leech tension. This guide will help maximize the performance of your North sail. If you have any queries, visit the OK Dinghy class page to contact any of the class experts. Check out the videos below for a detailed tuning run-through with Charlie. Happy sailing!
READ MORE
READ MORE

BENETEAU FIRST 18 SE & SEASCAPE 18 TUNING GUIDE
Beneteau First 18 SE & Seascape 18 Quick Tuning Guide.
QUICK TUNING NOTES
TWS
0-4
4-8
8-12
12-16
18+
Mast Rake
8,64m
Shrouds Tension
Loos Tension Gauge 91 Model A
34
36 Base Setting
38-40
42-44
45-46
Shroud Turnbuckles
(Full Turns)
-1
0
+1 to +2
+3 to +4
+5 to +6
JIB
Cunningham
Light
Light/Medium
Medium
Medium/Tight
Tight
Clew
(Older option)
Upper
Upper
Upper
Upper
Upper
Traveler
(New option)
Middle
Middle
Middle
Middle
Middle
Twist
Medium
Minimum
Minimum/Medium
Medium
Medium
Cross Sheeting
No
No
No
No
No
MAINSAIL
A-Frame (distance - blocks)
5-10 cm
1-3 cm
1-3 cm
3 cm
Play in puffs
Outhaul (mid-foot from boom)
8-10 cm
8-10 cm
5-8 cm
Tight
Tight
Vang (Kicker)
Snug
Snug
Medium
Hard
Hard
Cunningham
No
Light
Light/Medium
Medium/Max
Max
Twist
Medium
Minimum
Minimum
Minimum/Medium
Lots
Keel Position
88° - 85°
85°
85°
85°
85°
Downwind
(App. Wind Angle)
85° - 100° Speed
90° - 130° Speed & Soaking
110° - 140° Speed & Soaking
120° - 150° Speed & Soaking
100° - 130° Speed & Soaking
Seascape 18 Speed Guide
UPWIND
TWS
BS
VMG
HEEL
AWA
AWS
TWA
TACK
6
3.9
2.9
9°
25°
9.3
42
90
8
4.7
3.5
10°
25°
12
40
86
10
5.1
4.0
12°
25°
14.4
38
84
12
5.2
4.2
15°
25°
16.5
36
80
14
5.3
4.3
16°
26°
18.5
36
75
16
5.3
4.3
16°
27°
20.6
35
75
20
5.4
4.4
18°
28°
24.6
35
75
DOWNWIND
TWS
BS
VMG
HEEL
AWA
AWS
TWA
JIBE
6
3.9
3.2
5°
109°
3.5
147
85
8
4.8
4.1
5°
115°
4.7
148
80
10
5.4
4.7
6°
122°
6
150
70
12
5.8
5.0
6°
128°
7.5
150
65
14
6.2
5.4
6°
130°
9.1
150
65
16
7.6
6.1
7°
118°
11
143
75
20
12.1
8.8
10°
100°
14
137
80
READ MORE
READ MORE
PHANTOM TUNING GUIDE
Phantom sailing can be made as simple or as technical as you want to make it, this is one of the main reasons for its success as a class.
Onshore Setup
Due to the adjustments available in a modern Phantom the onshore setup is really only a base on which to develop your own tuning notes.
SPREADER LENGTH
This is measured from the outer tip to the side wall of the mast = 420mm.
If you are under 85kg you can shorten the spreaders to 412mm, likewise if you are heavier than 99kg then you can lengthen them to 425mm. This adds more support to the middle of the mast, essentially stiffening the mast section.
SPREADER ANGLE
This is measured with a batten or straight edge across the aft side of the shrouds, the distance from this batten to the back of the mast is the spreader angle, this should be 145mm.
MAST FOOT POSITION
The mast foot is measured from the aft edge of transom bar to the aft edge of the mast = 3280mm.
RIG TENSION
Rig tension is actually one of the least important settings due to the fact that the Phantom is such a powerful boat that you are easing forestay to depower in relatively low wind speeds so the rig tension is actually only used for light conditions of under 6kts (dependent on helm weight).
One of the main reasons for measuring rig tension is to have a constant measurement for setting up the mast rake. Therefore I set the rig up with 300lbs of rig tension using a rig tension gauge on the shrouds.
The rake should then be as follows:
Helm Weight < 91kgs – Rake 21’7Helm Weight 92 – 100kgs – Rake 21’10Helm Weight > 100kgs – Rake 22′
Sailing Set-up
(Adjustable Lowers)I have added the lowers to sailing setup because they are key factors to setting up the sail shape once afloat. In the light airs (sub hiking) they should be slack, this allows the lower mast to bend with normal mainsheet and kicker tension, in turn this takes out a little of the excess shape from the luff of the sail. This is required because the wind doesn’t have enough energy to flow around deep sail shapes so it’s best to limit it’s effort and flatten the lower part of the sail.
As the wind increases and kicker tension is added the lowers are then tightened, this is so it acts as a brace against TOO much lower mast bend due to the kicker. Less lowers tension is needed on flat water where a flatter luff entry helps, than in rough sea conditions where a fuller luff helps to make the boat more forgiving and easier to steer fast.
FORESTAY
The forestay is the first control to ease once the breeze increases into a ‘hiking’ breeze, this helps to bend the rig and flatten the sail, although you may lose a little pointing ability, however the speed you gain from raking the rig will outweigh this, don’t be afraid to see the leeward shroud swinging wildly in the wind! This is very much an individual preference so find settings you like and use a calibration strip on the deck or the forestay adjusters to make easy reference marks ( IMPORTANT: remember when you are max rake in windy conditions to pull on the forestay downwind and prior to tacks so you can get under the boom!)
OUTHAUL
The outhaul should be used in conjunction with the lowers, so in very light airs flatten the foot so there is just 50-60mm gap between the sail and the boom at max. depth. Gradually ease this as the wind increases to a maximum of 150mm gap when looking for max. power, and then pull on the outhaul until you have a crease running along the foot when you are looking for max. depower mode.
KICKER
The key control for most singlehanders it is doubly important in the Phantom due to it’s large roach mainsail, don’t be afraid to keep pulling it on as long as the top tell tail is flying 50% of the time. Sub hiking conditions you should mainly be using mainsheet to control the leech tension with the kicker adjusted to hold this tension whenever you ease the mainsheet, then as the breeze increases the kicker should be tensioned to keep a firm leech and aid pointing. Continue to pull on more and more as the wind builds as its much quicker to sail with the mainsheet eased (boom out beyond the quarter) and a lot of kicker than the reverse of boom near the centreline with an open leech.
CENTREBOARD
In sub hiking conditions under 5 knots you can have the board right down, but as you rake the mast you will need to raise the centreboard to maintain the balance, as soon as you feel you have too much weather helm raise the board some more, you will be surprised at how little board you need to maintain height once you are flat out hiking especially when needing to steer a lot in choppy conditions.
DOWNWIND
When reaching pull on the forestay so the leeward shroud is under some tension, this helps to power up the rig, ease the outhaul too , raise the board two-thirds, and as soon as you are close to planing move your weight back and go for it! The same applies on the run where sailing by the lee can be very quick as long as you ease enough kicker to twist the head of the sail, beware this is very twitchy in anything above a moderate breeze! The Phantom rewards hard work downwind so keeping the boat flat and constantly trimming and steering for any waves will pay dividends.
Good Sailing!
READ MORE
READ MORE

HARBOR 20 TUNING GUIDE
Thank you for choosing North Sails for your Harbor 20. We hope using this tuning guide will help you get the most from your new North Sails. Our goal is to give you a rig set up that is fast in all conditions and easy to adjust. Some relatively minor modifications are necessary to the standard Harbor 20 layout in order to get the most from your boat and sails.
General
Shroud Adjusters
It is important to have the proper shroud set up for effective rig tuning. Notice the picture above, the keeper allows you to make adjustments with the shroud locking mechanism so you can make adjustments to the rig based off the conditions.
The keeper and third hands will also prevent the shrouds from spinning off while sailing. These can be purchased in a variety of different rig shops.
Adjustable Backstay
In order to properly control the shape of the jib and mainsail it is a big help to have a easily adjustable and fairly powerful backstay. Making sure your backstay is running smoothly will allow you to de-power your sail in moderate wind conditions.
Mast Tuning
Before Sailing
First loosen shrouds until they are making 5” circles. From there tension the upper shrouds until they read 20 on the loose gage. From there fill your bucket half full of water and untie your stern from the dock so your boat is head to wind. Attach the bucket to the main halyard and let your boom sit on the cushions in the cockpit. Hang the bucket over the starboard side of the boat, and cleat the main halyard so the bucket handle sits flush with the bottom of the cap shroud. Then, without uncleating the main halyard, take the bucket and hang it over the port side of the boat. If the bucket handle is hitting the same part of the cap shroud on both sides, this means your mast is in the middle of the boat. If the handle is above the mark on the port side that means your mast is to starboard. If it is below the mark then the mast is leaning to port. Adjust the shroud to get the mast in the middle of the boat.
**Note: it is important that the boat is faced into the wind. Likewise it is important that just one person is in the boat during this exercise, and that person sits in the same spot on both the port and starboard side. Do the exercise multiple times before making adjustments.**
After getting the mast in the middle of the boat, tension the lower shrouds to 10 on the loose gage. Sight the mast to make sure it is straight.
Now you should be ready to race! You should also sight the mast on both starboard and port to ensure the mast is symmetric side to side while under sail.
Sail Trim
Light Air (0-8 knots)
MAIN
Outhaul should be tensioned so their is about 3.5” between the boom and the foot of the sail.
Traveler should be centered. Never let your traveler go to leeward in any situations. There are folks in the fleet who actually screw their traveler to the deck so there is zero chance of it moving.
JIB
Tension jib halyard so that there is a hint of wrinkles in the luff. Be careful not to over tension. Adjust jib lead dependent on the jib. If top telltales luff first, move the lead up on the clew board. If bottom telltales luff first, move the lead down on the clew board.
Backstay should be adjusted so you have about 1.5” of forestay sag at base setting.
Moderate Air
MAIN
Pull on the outhaul until there is 1.5” between the foot and the boom. Tension mainsheet so top telltale flies 70% of time; top batten will be parallel to the boom. This helps to generate power. Tension main halyard/ cunningham to just remove horizontal wrinkles in luff. Use the main sheet to tension the headstay along with shroud adjustments. If you are easing main sheet, you are loosing headstay tension. Pull on backstay to help with headstay tension and to flatten the sails.
JIB
Trim sheet so sail is 2-3” from end of spreader. Tension backstay to medium setting. This will straighten headstay and slightly flatten sail Ideally you want zero sag in the headstay.
Heavy Air
MAIN
Outhaul out to band – max tight. Tension halyard or cunningham hard to keep draft forward. Tension lower shrouds to keep mast from bending too much. Backstay on very tight. Top batten should be outside of parallel. Tension the vang tight enough so that the boom does not go up when the mainsheet is eased. This will allows you to “vang sheet” to keep boat on its feet. Remember, flat is fast. Play the mainsheet aggressively in the puffs to keep the boat flat.
JIB
Tighten halyard quite tight to keep draft forward. Trim sail so it is 3-4” off end of spreader. Tighten backstay very tight to make headstay as straight as possible and flatten sail.
*Please note that the above trim settings should be taken as starting points only. These are meant to show the range of settings from light to heavy air. We have found it useful to keep a logbook every time we go sailing to note fast settings or ideas.
Harbor 20 Quick Tuning Chart – California
UPPERS
LOWERS
WIND SPEEDKnots
UPPERS(PT1)
LOWERS(PT1)
Steps
Turns from base*
Steps
Turns from base*
VANG
OUTHAUL
JIB LEAD
< 6
-4
-2
– 2
-4
– 2
-2
0
3”
Lower
6-8
-2
-1
– 2
-2
– 1
-1
0
2.5”
Lower
8-10
20
10
BASE
BASE
BASE
BASE
Snug
2”
Neutral
10-13
2
1
2
2
1
1
Snug
2”
Neutral
13-16
4
3
2
4
2
3
Tight
1”
Neutral
16 – 19
5
4
1
5
1
4
Tight
Max
Upper
19-22
6
5
1
6
1
5
Tight
Max
Upper
22+
6
6
1
6
1
6
Tight
Max
Upper
* The number of turns is an estimate and could be different from boat to boat. It is important to check your settings, and the number of turns between the settings, before going out on the water.
Harbor 20 Quick Tuning Chart – Chesapeake Bay
UPPERS
LOWERS
WIND SPEEDKnots
UPPERS(PT1)
LOWERS(PT1)
Steps
Turns from base*
Steps
Turns from base*
VANG
OUTHAUL
JIB LEAD
< 6
-2
-1
– 1
-2
– 1
-1
0
3”
Lower
6-8
14
10
BASE
BASE
BASE
BASE
Snug
2.5”+
Lower
8-10
2
1
2
2
1
BASE
Snug
2”
Neutral
10-13
4
2
3
4
2
2
Snug
2”
Neutral
13-16
6
4
3
5
3
4
Tight
1”
Neutral
16 – 19
7
5
2
6
2
5
Tight
Max
Upper
19-22
8
6
2
7
2
6
Tight
Max
Upper
22+
8
7
2
7
2
7
Tight
Max
Upper
* The number of turns is an estimate and could be different from boat to boat. It is important to check your settings, and the number of turns between the settings, before going out on the water.
READ MORE
READ MORE

LARK TUNING GUIDE
Mast: C section
Mast Foot: 2700mm (From aft transom to aft face of the mast foot)Spreader Length: 395mm (From the outside of the shroud perpendicular to the bearing surface of the mast track)Spreader Deflection: 155mm (From the centre of the straight line drawn from tips of the spreaders to mast)
Mast: Kappa section
Mast Foot: 2700mm (From aft transom to aft face of the mast foot)Spreader Length: 380mm (From the outside of the shroud perpendicular to the bearing surface of the mast track)Spreader Deflection: 145mm (From the centre of the straight line drawn from tips of the spreaders to mast)
Wind Speed
Light 1-8 knots
Moderate 9-15 knots
16+ Knots
Sea State
Flat
Choppy
Flat
Choppy
Flat
Choppy
Mast Rake (Ft/Inches)
21″ 11″
21′ 9″
21′ 7″
Rig tension (lbs)
330
297
264
Mast Ram
Pull forward to flatten the main
Pull back to keep the mast straight as kicker is applied
Pull back to ease over bending
Cunningham
None
Take out minor creases
Lower the cunningham block further by 30mm
Outhaul
Hard
Ease 20mm
Ease 20mm
Hard
Kicker
Take up slack
Keep top tell-tale flying 90%
Hard
Centreboard
Leading edge vertically down
Raise 1-2’’
Raise 3-4’’
Jib Fairleads
The position of the fairleads affects the foot and leech tensions; pulling the fairleads forward is the same as pulling the barber haulers on. Moving them back in the boat increases the foot tension and allows the top half of the jib to twist open (see the top tell-tale break before the lower ones). Moving them forward has theopposite effects of opening the foot slightly, and closes the leech.
Light Winds (1-8 knots)
The pulley for jib sheeting should be set so if you follow the line of the jib sheet it bisects the clew at roughly 45 degrees. The general rule for light air sailing is to keep the flow of air moving through slot (leech of the jib to the luff of the main). Aim to have the higher tell-tales lifting before the lower ones as this shows the direction of flow is more biased to the top of the leech (twist)
Moderate winds (9-15 knots)
As the breeze starts to build you should be aiming for max power. Here you will be able to move the fairlead forward to close the slot to help stop losing power at the head of the jib. Again, sheet the jib aiming to get the higher tell-tales lifting before the lower ones.
Heavy winds (16 knots+)
The jib sheeting should be moved forward again to help close the leech. If the luff of the main starts to turn inside out the slot is being stalled, you may need to ease the sheet and move the fairleads back to help open and keep the flow of air exiting the sails as quick as possible.
Spinnaker Trim
The spinnaker should be flying so the two clews (two bottom corners) are level, then ease the leeward sheet so the luff (sail edge nearest the wind) just starts to flicker back on itself. A handy tip is the tie the halyard to the head of the kite so there is 2 inch gap from the knot to the edge of the sail, this helps the kite fly freely.
This is purely a tuning guide and has been prepared to help you get the most out of your North Sails as quickly as possible. Some of these numbers will differ from boat to boat. Feel free to modify and experiment in small steps to find what suits you best. If you find settings that really work well, mark these clearly and please keep us informed.
READ MORE
READ MORE

BB-10 TUNING GUIDE
INTRODUKTION
Formålet med denne tuning guide er at give vores BB-10 meter kunder nogle retningslinjer i, hvordan man får størst mulig udbytte af sine nye North Sejl. Tuning guiden er udarbejdet af Theis Palm.Følg vejledningen så nøjagtigt som muligt. Det er dog altid en god idé at eksperimentere på sin egen båd, da mandskabets vægt, bådens balance, riggens beskaffenhed samt lokale forhold også kan have indflydelse på det absolut optimale trim.
MASTETRIM
1. Salingshornenes længde og vinkel er vigtig for storsejlets facon, da disse er med til at kontrollere mastens krumning og dermed også forstagets spænding. Længden af salingshornene måles fra siden af masten til wiren der er placeret i salingshornet, målet er 86 cm, målet tages i midten af salingshornet. Salingshornenes vinkel måles ved at binde en tynd snor fra det ene overvant til det andet og her efter måles afstanden fra snoren og ned til bagkanten af masten skal være 12 cm. Ved samme lejlighed afsættes et tapemærker på 76 cm målt fra siden af masten. Dette mærker bruges senere til trim af fokken.
2. Herefter holdes forstaget og overvanterne ind langs masten og strækkes så meget som muligt. Der afsættes et mærke på wirerne, ud for overkanten af det sorte ved bomfæste. Dette mærke er nu udgangspunkt for mastens hældning.
3. Forstaget placeres i det forreste af de fem huller i skinnen på fordækket.
4. Kontroller at afstanden fra overkanten af det sorte mærke ved bomfæste til dæk målt på siden af masten er 64 cm. Differencen skal korrigeres på det mål på forstaget som følger.
5. Mastens hældning bestemmes således, afstanden fra det afsatte mærke på forstaget til dækket målt parallelt med forstaget til dækket er 1,39 m.
6. Kontroller nu – når den korrekte mastehældning er konstateret – at masten hviler på hele sin trædeflade på mastens fod. I modsat fald vil rig trykket blive ukonstant og forstaget hermed uroligt.
7. Mærkerne på overvanterne bruges til at kontrollere at masten står lige i båden ved at måle fra mærke til dæk i begge sider. Dette er mere præcist end at måle fra mastetoppen.
8. Riggens spænding er svær at definere, da ikke alle er i besiddelse af den samme rigmåler.Til denne vejledning har vi anvendt en Loose Gauge type PT-2 M, hvor vi har følgende mål.
Overvant
Undervant
Let
0-2 m/sek.
27
23
Mellem
3-9 m/sek.
31
28
Hård
10+ m/sek.
4
34
9. Når undervant spændingen er sat, kontrolleres om masten står lige. Tallene på undervanter er kun en guideline, som er erfaringer fra vores egen båd. Det er vigtigt at masten står lige op til 10 m/sek. Herefter strammes undervanterne til masten falder 5-10 cm til læ ved fokke godset alt eftermandskabets vægt.
10. Strutten sætte meget let, masten skal krumme i en jævn kurve fra mastetop til fod.
STORSEJL
TRIM AF STORSEJLStorskødet er meget kritisk og små justeringer har stor betydning for højde og fart. Skøder man hårdt, lukker agterliget mere og giver større rorpres, men til gengæld mere højde. Dette trim kan anvendes i mellemluft på fladt vand, så længe man kan hænge båden ned. I let vind slækkes skødet således at ticklers ved den øverste sejlpind flyver ret bagud. I hård vind skødes godt hjem og hækstaget hales indtil båden igen bliver let på roret uden at man mister højde. I forholdsvis store bølger skal sejlet twiste mere, for at få så stort et styreområde til vinden som overhovedet muligt, samtidigt giver det også bedre fart og hermed også højde. Som tommelfingerregel trimmes den bagerste halvdel på den øverste sejlpind parallelt med bommen i stort set alle vindstyrker.
UDHAL PÅ BOMUdhalet er en anden vigtig trimfaktor. I let vind (0-2 m/sek.) skal sejlet være 4 cm fra sort mærke. I mellemvind (2-5 m/sek.) 2 cm fra sort mærke og over 5 m/sek. hales helt ud på mærke.
CUNNINGHAMUndlad helt at bruge cunningham i let vind. I mellem vind hales kun så meget at rynkerne langs forliget forsvinder. Når vinden er over 7 m/sek. hales der hårdt for at medvirke til at åbne kappen og holde faconen fremme i sejlet.
LØJGANGENJustering af løjgangen påvirker rorpresset væsentligt og bruges alt efter mandskabets vægt. Løjgangsvognen justeres således at bommen, så længe som overhovedet muligt, er på centerlinien af båden, altså til luv (dette for at bevare så stor vindkanal mellem storsejl og genua/fok som overhovedet muligt og for, at kunne sejle maximal højde). Når vinden så frisker og hækstaget er halet maximalt køres løjgangen til læ indtil båden er i balance og let på roret.
HÆKSTAGETHækstaget har to funktioner: at kontrollere dybden i storsejlet og hvor meget forstaget falder mod læ. Det vil sige, at et strammere hækstag betyder et fladere og mere åbent storsejl, mindre forstags fald og hermed også fladere genua/fok. Vi har mærket vores hækstag op for hver 3 cm, så vi hurtigt kan komme tilbage til et godt trim og have båden veltrimmet lige efter mærke rundningerne.
BOMNEDHALBrug aldrig bomnedhalet på kryds. Bomnedhalet bruges på følgende måde: hal til den bagerste halvdel af den øverste sejlpind står parallelt med bommen, både på halv vind og læns, under alle vind forhold.
GENUA/FOK
SKØDEPUNKTSkødevognens placering er kritisk for forsejlenes trim. Som udgangspunkt måles 4,90 m. fra pinboldt i forstag til centrum af skødeblokken til genuaen og 3,10 m til fokken. Forsejlene skal luffe jævnt langs forliget, det vil sige, at ticklers skal stå ens både i top og bund.
SKØDESPÆNDINGGenuaen halse til den står 3 cm fra enden af sallingshornene i alle vindstyrker, underliget er helt inde ved overvant fæste i over 3 m/sek og 1 cm fra under 3 m/sek.Fokken hales til den lige røre salingshornet og akkurat bliver stram langs underlig mærkrt på salingshornet bruges som reference.
FALD SPÆNDINGStræk aldrig faldet for hårdt, da faconen ellers kommer for langt frem. Stræk kun lige så folderne ved løjerterne forsvinder. I let vind må der gerne være små folder ved løjerterne, idet faconen i fokken derved flyttes lidt bagud og dybden øges en smule, dette giver det bedste profil.
SPILER
Spilerstagens fæste på masten bør sidde i en højde af 1,60 m. over ruffet. Stage justeres således, at den står vandret. Derved opnås den størst effektive længde af spilerstagen og det størst mulige projicerede areal til vinden. Vores spiler er designet hertil. I let vind justeres stagehøjden således, at skødebarmene på spileren flyver lige højt, for at få den bedste indfaldsvinkel på det luv sidelig, samtidig med at det læ sidelig er maximalt åbent.På skæring i hård luft må spilerstagen under ingen omstændigheder komme nærmere til forstaget end 50 cm for at forhindre båden kommer ud af kontrol og skærer op.
READ MORE
READ MORE

KNARR TUNING GUIDE
Download – Knarr Trimguide (Danish)
The purpose of this tuning-guide is to give our clients in the Knarr class some guidelines on how to get the most out of their North Sails. This tuning-guide was compiled by Henrik Søderlund and Theis Palm.
Always experiment and try finding your own trim using these guidelines. The weight of the crew, the balance of the boat together with specific local wind and sea conditions all have influence on the fastest and final trim.
MAST TRIM
Before stepping the mast in the boat, some very important measurements have to be checked to follow this tuning-guide correctly:
Lead the upper shrouds and forestay along the mast, the upper have to be out of the spreader tips. Pull them as hard as you can and put a mark on all three wires at the top at the black near the gooseneck on the mast. These three marks are now used to check if the mast is centered in the boat, and to check the mast rake.
Place the mast foot the following way. First measure 1.21 meter from the bow and place the forestay here. Move the foot of the mast aft, until you measure 2,00 meter from the forestay position (this is the maximum J measure to the class rules) block the mast on the backside. Leave 20 mm free space on the front side of the mast.The mast foot adjusts the following way: In light winds (0-8 Knots) the mast should be relative hard on the aft edge and pressed 10 mm aft along the mast foot rail for the mast to bend smoothly, and make the forestay loos. In winds above 8 knots move the mast foot back to basic position.
Set the mast rake. Pull the permanent backstay until the forestay stays straight. Then measure the distance from the black mark on the forestay to the deck (along the forestay) the distance is 1,13 meter. Control the distance from the deck to the upper black band at the gooseneck measured on the backside of the mast, the measurement is 80 cm. If there is a difference it should be adjusted on the forestay measurement.
The upper shrouds proper position is located measuring perpendicularly from the center of the mast to the attachment point on the shroud base.
The marks on the upper shrouds (from step 1) are now used to verify that the mast is vertical. This is best done by measure from the mark on the upper shrouds to where the turnbuckles enter the deck – the distance should be the same on both sides. It is very important, that the mast is straight from side to side and not being distorted at deck level.
The lower shrouds are placed 35 cm behind the upper shrouds according to the class rules.
All rig tension measurements we used a Loose Gauge PT-2. The upper shrouds should read 11 as a base setting. In 9 – 15 knots tighten 1½ turn and from 16 knots and up, another 1½ turn.
The lower shrouds are tensioned, so that the mast is completely straight in the boat. The lowers is tighten in the same time as the upper shrouds. In general the rig is very slack to get the mast as fare forward as possible on the downwind leg.
The jumpers are adjusted by pulling the permanent backstay. Then look up along the sail track and check that the jumpers are equally tight on both sides. If this is not the case, they should be adjusted till the mast is completely straight. When the mast is relaxed it will bend slightly forward.
SAIL TRIM
Mainsail Trim
The mainsheet is critical in setting the shape of the sail and small adjustments can have a big effect on speed and pointing. If the mainsheet is sheeted tight, the leech will close and put more pressure on the rudder – on the other hand pointing ability is improved. This can be used in medium winds and flat water, where the boat can be kept flat by hiking. In light winds the mainsheet is eased so that the top tell-tale flies straight. In heavy winds, sheet tight and pull the backstay until the rudder feels light again (but without losing pointing). In large waves, let the leech twist a little more to have a wider steering angle. This increases speed, and therefore pointing, at the same time. As a thumb rule the top batten is trimmed parallel to the boom in almost all wind strengths.
OUTHAULThe outhaul is also an important factor when trimming as it controls the draft in the bottom of the sail. In very light winds (0-5 knots) the sail should be 2 cm from the mark. In medium winds (5-12 knots) about 1 cm from the mark and in more wind than this pull the sail all the way to the mark.
CUNNINGHAMDo not set the cunningham in light winds. In medium winds set the cunningham so that the wrinkles along the luff disappear. When the wind exceeds 15 knots pulled it hard to open the leech and keep the draft forward in the sail.
TRAVELLERAlways to windward in any condition
BACKSTAYThe backstay has two functions: To control draft in the mainsail and to control forestay sag. When the backstay is tightened, the mainsail flattens, the leech opens, and there is less forestay sag and therefore, a jib with less draft. It is a good idea to put marks on the backstay, e.g., every 5 cm, to facilitate finding the right trim after mark roundings, etc.
KICKINGSTRAP/BOOM VANGThe kickingstrap is used when sailing upwind in strong wind and also downwind. Upwind, the kickingstrap push on the mast and opens the leech in the bottom part of the mainsail and keeps the boom down when easing in the gusts. Never use the kickingstrap upwind in less than 18 knots and use caution. Remember always to ease the kickingstrap for downwind sailing when bearing off, otherwise the boom might break. Downwind the kickingstrap is trimmed so that the top batten is parallel to the boom – on all sailing angles and in all conditions.
Jib Trim
North Sails jibs are made for sheeting points both on deck and cabin top. However, we recommend sheeting from the cabin top to make the jib-leech twist more freely and thus allowing the gap between main and jib to be as wide as possible. Furthermore, the control of the jib is improved (particularly in heavy winds) because of the shorter distance from clew to block. The jib-lead track is placed with its center 48 cm (fig2A) from the boat’s centerline.
When sheeting from the cabin top, we recommend using a swivel block on the deck, so that the jib sheet does not create an overwrap on the winch.
SHEETING POINTThe position of the jib lead is crucial for the jib trim. As a reference point measure 2.68 m from the pin in the forestay to the centre of the block (if the lead is on the cabin top). The jib shall luff evenly, i.e. tell-tales must fly at the same time in top and bottom.
JIB SHEETAs a general rule sheet the jib so that the middle batten is parallel to the centerline in most conditions, but in light winds (0-5 knots) leave 2-3 degrees of twist. If the sea is lumpy, move the jib lead 2 – 3 “holes” forward to get more draft and power in the jib (the middle batten shall still be parallel to the boat’s centerline). In heavy winds move the lead 1 – 2 “holes” back without letting the foot of the sail become tight and flutter.
HALYARD TENSIONNever pull the halyard too tight. This will cause the draft of the jib to move too far forward. Pull it until the wrinkles in the luff disappear. In light wind the best shape is obtained when leaving small wrinkles in the luff.
Good luck on the water!
READ MORE
READ MORE
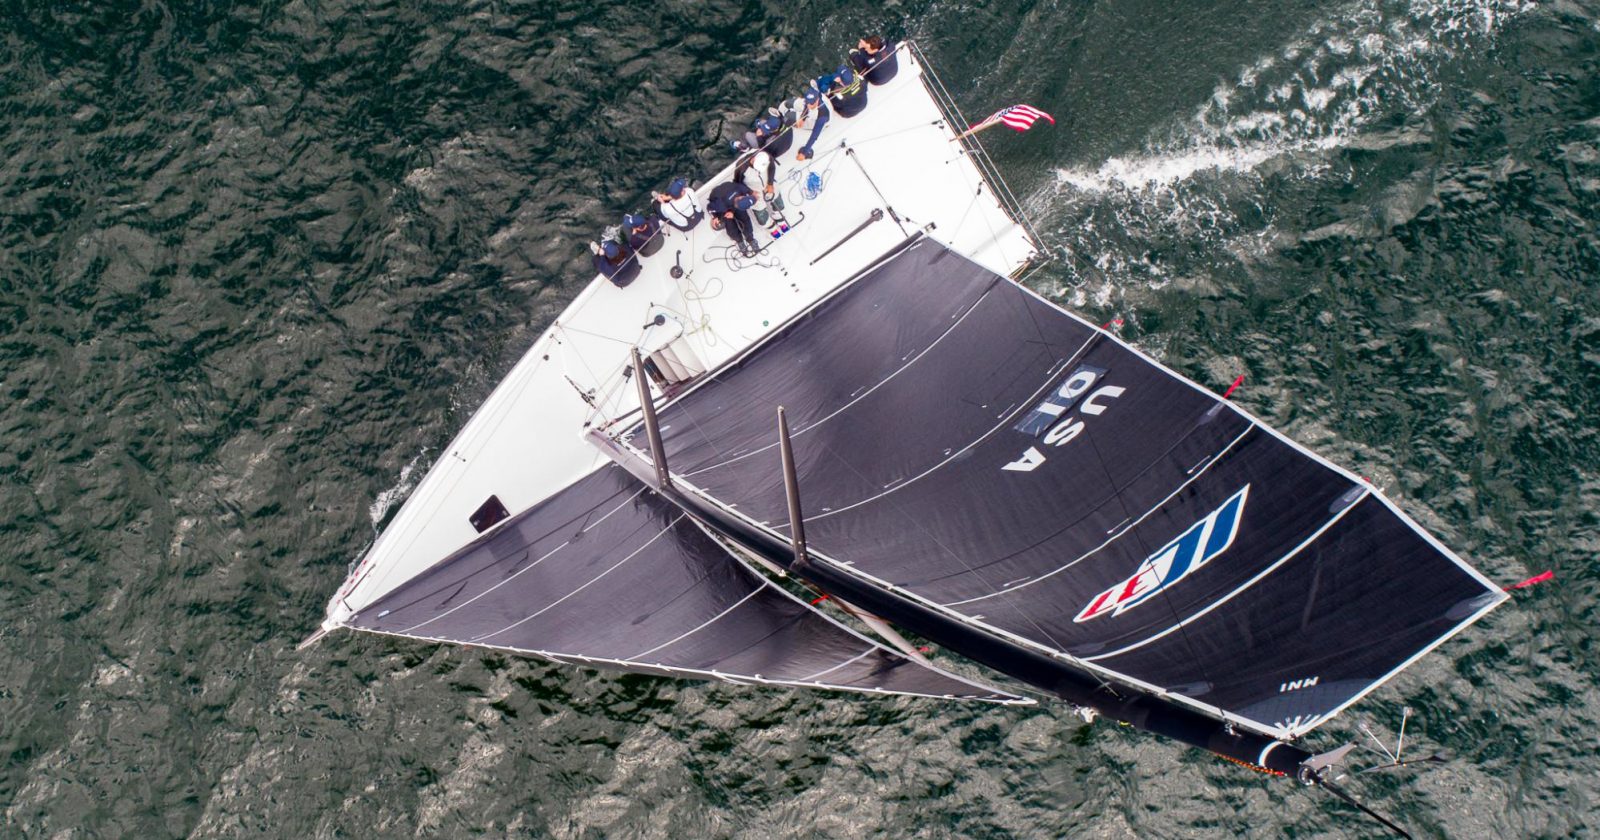
IC37 TUNING GUIDE
Also available: IC37 SAILING GUIDE
Mast Shims
The IC37 was designed to have simple tuning adjustments in order to minimize boat-to-boat variation and highlight the sailors’ performance. Therefore, the only allowable rig tune adjustment is the shim height beneath the base of the mast, which affects the shroud tension. This system replaces the traditional process of independently adjusting turnbuckles at the base of each shroud. Each boat is supplied with one shim of each of the following sizes: 20mm, 10mm, 5mm, 3mm, and 2mm. The 20mm shim is removable for the sole purpose of stepping and un-stepping the rig; it should always be in place while sailing in any condition. Beyond that, you may add any individual shim or combination of shims you see fit. The table below shows our suggested shim height for each respective wind range.
WIND SPEED (knots)
SHIM HEIGHT (mm)
0-6
22
6-10
28
10-14
35
14+
40
Rigging Tensions (On Full Shims)
DESIGNATION
LOOS RT11 GAUGE
LOOS RT10 GAUGE
V1
39
-
D1
-
20
D2
-
15
Headstay
20
-
Battens
Before putting up your IC37 North Sails, it is important to properly tension all battens to get the desired sail shape. For the mainsail, we recommend tensioning the leech battens to only just remove the wrinkles from the batten pocket. The full battens should be slightly tighter, causing the batten pocket cloth to be completely smooth, but not creating wrinkles parallel to the pocket.
The jib comes with two top batten options. This allows the trimmer to match the flying characteristics to varying breeze strengths. The light batten is flexible, which allows more shape in the head of the sail when the breeze is light. In comparison, the heavy batten is more rigid to reduce shape in the head and help induce twist in the sail.
Crew Weight
Crew positioning is very important on the IC 37. Moving weight fore and aft as the wind speed and angle change is crucial to performance. As the breeze picks up, weight should be shifted progressively further aft. This increases righting moment, as more of the crew weight reaches maximum beam. As a result, the sails can be trimmed harder and the boat can be sailed flatter and faster than it would with weight too far forward. As the breeze lightens, be sure that the crew is active with moving forward. When weight is too far aft, the transom will produce a gurgling sound as it displaces too much water.
Jib Trim
The IC37 is equipped with four main controls to manipulate the jib trim – halyard tension, athwartship lead position, vertical lead position, and sheet tension. Using these four controls together can produce the wide range of shape in the jib required to perform well in all wind conditions.
Jib Halyard Tension
Halyard tension controls the entry angle, as well as upper leech profile. A good base setting is just enough tension to remove any wrinkles coming off the luff hanks, with the goal of getting the sail to be smooth, but not tight. The amount of tension required to achieve this will change with the breeze. If over tightened, the luff will become flat and unresponsive, and may have vertical wrinkles running from tack to head. We suggest using a number scale with a mark on the deck for consistent tension when hoisting the jib around a turning mark.
Athwartship Lead Position
A track system oriented athwartship controls the jib’s angle of attack. A tighter angle of attack allows the boat to sail at a closer angle to the wind, but when the car too far inboard, the wind coming off the jib will be negatively interfering with the main shape. For the best relationship between the main and the jib, the area between the two sails, the ‘slot,’ should be as even as possible. The best way to tell if your slot is set up well, is to look at the angle of the leech telltales of the jib. The top telltale should be flying at an angle that matches the entry angle of the mainsail.
Vertical Lead Position
The jib lead can be raised or lowered to adjust the leech profile. This control replaces the traditional fore/aft lead adjustment. A lower jib lead will result in a tighter overall leech profile and a deeper foot, the equivalent of moving the traditional lead forward. Easing the lead up will flatten the foot and induce more twist in the leech. This is the key control to achieving a vertically even slot.
Jib Hobble
The jib hobble system is used when sailing downwind with both the spinnaker and jib up. The hobble is meant to caddy the jib from gybe to gybe with no adjustment required. A good base setting is to have the jib trimmed enough that the lowest luff telltales are flowing and the top of the jib not luffing. However, it is better to have the sail slightly under trimmed than over trimmed. If the jib is eased enough that it can wrap around the forestay, it will need to be trimmed just prior to the gybe, then released back to its original setting. The hobble is trimmed using a single line lead through a cleat in the center of the boat.
Downwind Modes
The IC 37 (as well as many other one design classes) races with only one asymmetric spinnaker, which limits the variability in VMG angles when sailing downwind. However, there are still many different modes of sailing downwind. In light air, we suggest dropping the jib to allow the spinnaker to maintain as much flow as possible. While keeping the jib fully onboard as it drops is always preferable, the luff hanks allow the jib to be dropped quickly without going overboard when the situation requires. While having the jib down does allow a lower mode to be sailed, the boat still does not like to sail directly downwind. When the breeze permits leaving the jib up, you must transition your mode to one with a tighter wind angle. This should only be done in planing conditions.
Runner Load
Trimming the running backstays, or ‘runners,’ is one of the most important controls for upwind speed. Grinding on more runner tension will make the headstay tighter, flatten the main by bending the mast, and open the main leech. This depowers the sail enough to let the boat stay under control at higher wind speeds.
Reefing
After all the mast shims have been put in, the next step to depowering the boat is to reef the sails. The first sail to reef is the jib, which usually happens around 18-20 knots of true wind speed. When reefing the jib, the best practice is to drop the sail onto the deck, roll the foot from the bottom up, close the zipper with all excess cloth fully enclosed, then re-hoist the sail. The main reef will be added once the average true wind speed is around 23-25 knots. Having the runners and mainsheet completely eased when putting the reef in the main is important and will avoid undue stress on the main halyard components.
Note overbend wrinkles
The crew member trimming the runner should be looking for these wrinkles to appear in the main to know when the maximum load is achieved and should not pull more runner on beyond that point.
Polar Boat Speed
UPWIND
TWS
VS
TWA
HEEL
6
6.06
44.6
11.5
8
6.44
38.9
16.0
10
6.71
36.9
18.6
12
6.91
35.9
20.4
14
7.05
35.5
21.3
16
7.14
35.4
23.0
18
7.21
35.6
24.4
20
7.30
36.3
25.0
DOWNWIND
TWS
VS
TWA
HEEL
6
6.08
143
-2.1
8
7.21
147
-1.5
10
8.30
146
0.4
12
9.54
144
4.2
14
11.21
141
11.5
16
12.79
143
14.4
18
14.11
145
13.3
20
15.10
147
11.3
READ MORE
READ MORE

MC 38 TUNING GUIDE
Congratulations on the purchase of North Sails for your McConaghy 38 . The MC38 is a new and exciting class which North Sails are proud to be associated with. The following information will allow you to set up your rig to our recommended base settings and allow you to be competitive from the first time you hoist the sails.We recommended you keep an accurate log of all rig changes you do with notes about the conditions on the day. This is the best way to refer your setup to past sailing days and will ultimately allow you to develop your own settings that work with the way you and your team sail your boat and your local conditions.The McConaghy 38 is a new class and developments are happening quickly as more and more sailors experience the boat. Please check with your local North Sails rep representative about the latest tuning developments and tips.
In order to complete this guide you will need the following tools;
30 meter tape measure
Retractable metal tape
Wet notes book
Bosuns chair
Rig adjustment tools
Straight edge
Marker pen
6-7 crew
1. Confirm the “J” measure
The mast chocks are factory fitted onto the mast cannot be altered in the mast gate at all however it is worth checking the position to ensure it is correct as this has a big influence on the masts pre bend. Measure from the front face of mast along the deck to the intersection of the forestay and sheer. Put a straight edge across the jib tack trough to get the sheer and measure to the center line of the forestay. This measure should = 4600mm
2. Confirm Mast butt position
Using the retractable metal tape measure from the aft face of the mast below deck straight across to the forward most keel bolt. This measure should be = 450 mm
3. Confirm the rake
Take a halyard and attach a heavy weight such as a bucket of water to it. Position the halyard so when it is lying against the mast the bucket of water is suspended off the deck. Mark the halyard at the top of the gooseneck band and then swing your halyard with bucket attached out to the forestay marking the forestay equal with your halyard mark. Take your metal tape and measure from this forestay mark down to the intersection of forestay and sheer . Use your straight edge across the jib tack trough to determine the sheer position. This measure should = 2240mm
4. Set the mast jack height
Check that the mast is all the way down on the mast jack and resting on the collar at the base. With all shrouds eased off so that they are slack pump the mast jack up so that the mast chocks which are bonded to the mast are flush with the deck. You may have to remove the neoprene cover to see. This is now your max jack up position. Measure from the top of the collar on the ram to the mast base. This is how much travel you have in the ram.
Note. Ensure there is wax/lubricant around the mast collar to reduce friction which may influence jack pressure
5. Step the V1 shrouds
Ease the jack all the way down then wind the V1 shrouds on 5 turns. Pump the jack up to your max jack height and check the pressure. You are aiming for a measure of 2000 psi. Keep winding on the V1’s evenly until this is achieved.
6. Check the mast is in the center
Take your 30m tape and attach it to the jib halyard. Hoist the halyard so it is in the lock and then measure down to the intersection of cap shroud and deck on both sides. If the mast is not in center adjust the X1’s accordingly.
7. Tension the D1 & D2 shrouds
Ease the mast down and adjust the D1’s until the jack reads 2350 psi. Once this is achieved adjust the D2’s until the jack reads 2600si. this is your max jack pressure. Sight up the mast to ensure it is straight sideways. If not adjust D1/D2’s accordingly
Note. All jack readings are based upon the Enerpac P392 jack
8. Jib leech trim marks
Mark the spreaders port and starboard with white tape parallel to the centerline of the boat. From the center of the mast measure along the front edge of the spreader and mark with tape.Upper spreader =540mmLower spreader = 840mm
9. Go sailing
Go sailing in about 10kts + . You need enough wind to have a full crew on the rail and hiking. To finish your tune ensure you are max jack pressure with the ram at max up position. Sight the rig looking up the aft face and check on each tack. The mast should be straight side to side. If not adjust D’s accordingly.
READ MORE
READ MORE

P CLASS TUNING GUIDE
Thank you for choosing a North Sails P Class Sail.
Your North Sails P Class sail has been designed to be easy to use and fast in a full range of conditions. If you look after your sail and set it up correctly, it will give you good boat speed for all conditions.
We have done a lot of work to develop a full range of sails to suit all mast types and the size and weight of the skippers. Some of our base designs have the option of two luff curves depending on which type of spar you are using so if you are ordering a sail be sure to specify which type of mast you have. The difference between the curves is small so either luff curve will work well but for optimum performance it is best to have the correct luff curve for your spar.
P Class Sail Care
Your Sail is made from a fabric called Contender 2.6oz Polykote. This is a very high tech cloth in the way that it has been woven together. Do the best you can to make sure that the sail does not get unnecessarily creased. Creases are sail killers and are the primary reason for sails not lasting as long as they should. The worst time for getting creases is during hoisting and lowering your sail as the sail catches on sidestays and other fittings.
– Always roll your sail and keep it in its bag when not in use.
– Ideally remove the battens after use. If you don’t want to do this, then release the battens from the pocket elastic and roll the sail parallel to the pockets. If you are rolling onto a tube, tie the clew first and roll the sail a couple of turns before attaching the tack. This will allow you to roll the sail parallel to the batten pockets on the tube.
– Wash the salt from the sail every 3-6 weeks depending on how often it gets wet. Do this on a light day by hosing the sail while rigged, and leaving to dry.
Setting Up
HOIST
Make sure the sail is right up to the top black band when hoisted.
TACK
Sails are fitted with a tack strap and an eyelet so you can have a choice of how you wish to set the tack of your sail up. Remember you aren’t allowed to adjust this while racing. When you have your sail hoisted and fitted along the boom, adjust the strap or whatever method you are using to fix this area in place, so that the tack area is smooth. The idea of this area is that the strap around the mast takes the outhaul load and the cunningham takes any up / down load. You may wish to have a separate piece of rope (or shockcord) tied loosely around the gooseneck area just to prevent the tack riding up the mast when the cunningham is released.
FOOT
Check that the black band is in exactly the right position on the boom, as you will need every millimeter of outhaul in the breeze. For really heavy conditions when the tack setting up smoothly is less important as you will be using quite a bit of cunningham load, you may want to use the strap to pull the tack forward toward the mast and give you more outhaul travel.
BATTENS
Your sail will come with a 2 top battens and four shorter battens. The four lower battens are interchangeable and are numbered 1 to 4. 1 is the softest and 4 the stiffest. We suggest using (from bottom to top) 3, 2, 1 for light to moderate airs and 4,3,2 for heavier airs. Use the lighter top batten up to 15-18 knots and then begin using the stiffer one. While these options will give you a full range of performance, we don’t want to discourage you from trying other options. Experiment yourself. To test batten stiffness, use a set of kitchen scales and holding the batten vertically, push down. You will see that after a while the scale doesn’t change any more- even if you push harder. This is the ‘stiffness’ of the batten. You can write this on each batten along with it’s draft position as a reference if you are testing various options.
E.g. one batten might have 0.75kg @ 45% on it and another 0.75kg @ 50%
Once you are used to looking at the shape of your sail and the feel of it over a range of conditions, try experimenting with different batten options and see what happens.
Remember….. The stiff end of the batten is the back. Bendy end forward!!!
OUTHAUL
Hopefully you will have an outhaul fitted to your boat. Make sure that this works. There is no point having all the fancy bits, if when you let off the outhaul, nothing moves!. We suggest 4:1 purchase inside the boom, so you can make small repeatable adjustments. Make sure you have a system of marks so you can repeat you fast settings from upwind to downwind- or when the breeze changes.
Don’t ease the foot too much. If you are getting vertical wrinkles off the boom, then you have gone too far.
As a basic rule, easing the outhaul will help you point higher- but may make you a little slower sometimes. Tightening the foot will help the boat go forward easier, but over- tightening may hurt you height or power.
Use the other boats around you as a guide as to what you should try. While training, try a few variations so you get the feel for how the outhaul really affects your performance.
RAKE
The correct rake for your weight and the conditions is one of the primary factors in good performance. Because there is a variation in the hulls, there is no correct rake to suit all boats so we cannot provide a standard rake to work from in this guide. There is a correct rake for your individual boat and you should have a record of this and of the rakes you try. At the back of this tuning guide is a formula for working out the correct mast. Another way to find a starting rake is to level your hull alongside a top boat with a skipper of similar weight. Then sight the masts and set your mast up to the same angle. Measure this from a mark permanently etched on your mast to a mark on the stern. This is your rake. Generally as you get bigger and better you will be able to increase that measurement. ie. rake it further forward. Note: we now measure up the mast 2.8m, and then back to the center of the transom to aft deck join.
Remember – you don’t learn if you don’t try so use the rakes suggested as a starting point, and try experimenting with different rakes. Keep a good record of what works and what doesn’t. You may find that you come up with something that works better than what we suggest.
Use our suggested rake as a point to start from!!!
SAIL SHAPE
Your sail comes with 3 camber stripes. It is a good idea to glance up at your sail occasionally especially when you are going fast- (or really slow) to see what your rig looks like and therefore be able to eventually memorise these shapes and settings. The concept of the sail is that it is very easy to trim. To do this it is made with a very open leech. This means that you don’t have to be so careful not to over-sheet in the light, and should be able to sail with a more constant sheet tension through the range. Compared to other sails you have used, you may find you need to use a little more sheet tension with your North sail.
RIG TENSION
Tight v’s loose. I prefer a firm rig. The tension should be so that by pulling forward on the mast you can just do up a shackle on the forestay. Any tighter than this is unnecessary. My reasoning is purely practical.
There are pro’s and con’s for the 2 extremes. If you have a loose rig, it will give you more optimal fore and aft rake upwind and downwind, whereas a tight rig can’t move. However a loose rig also means it falls away sideways which isn’t desirable. I think that this is why the 2 styles ultimately perform equally. Of course what the top skipper is using will always appear fastest!!- but look carefully at what else he/she is doing.
My practical reasoning is simple. A loose rig is more susceptible to wear and therefore failure. The movement also makes it more prone to shackles etc working their way loose. If you are a methodical type of person and check your gear often, then by all means go for a loose rig if you believe it to be the way to go.
Remember: The class rules say that you can’t change anything on the masts. Don’t drill any holes, change any fittings or do any painting without contacting the manufacturer to make sure it is allowed.
BOOMS
A small amount of boom bend is desirable. This should be mostly in the back part of the boom and should be in unison with the mast. As a gust hits, the boom should help the lower leech flick open and flatten just the same way the top of the mast works. For heavier skippers, it may be impractical to find a boom section which is stiff and strong enough for everyday sailing and which also bends as desired. For skippers under 55kg, we recommend the triangular extruded section. For heavier skippers the StarlingF4 section is better.
VANG
Your vang is there to control leech tension once you run out of width on your traveler. If the breeze is light and you aren’t having to ease the main in gusts, then you don’t need any vang. In these conditions you should have it just eased, so that it isn’t taking any load. However, you don’t really want it too loose or else it will take too long to pull on should the breeze increase. In the lighter breezes you are quite often sheeting quite loosely, so make sure there is no tension on the vang. As soon as you find yourself easing the main in the gusts, you should have vang on. This should mean that as you ease the main in the gust, the boom moves outwards only- not upwards. This is a similar motion as in a keelboat, where the mainsheet is cleated and the traveller is moved in and out in the gusts. Remember vang bends the mast and flattens the sail a lot, so if you are hunting for power, make sure you don’t have too much vang on. Be sure your rig and fittings are strong enough, so that you aren’t afraid to use a lot of vang when the wind increases. Reaching is similar in trim to upwind. In the light you will have to be careful not to close the leech too much, however as the breeze increases, you will need to slowly increase the amount of vang to keep the leech under control and keep powered up. Again too much vang will bend the mast too much and lose power.
Downwind you will need less tension than you have had upwind or on the reach. Ease vang as you go around the mark. If you can imagine looking along the boom, the ‘twist’ or amount the leech opens, should be nearly the same on all points of sail, in all conditions.
For this reason it is a good idea to get used to looking up at how open the top batten is and try to adjust the vang to keep it looking the same as the wind changes.
CUNNINGHAM
Cunningham does two things. It moves the shape forward in the sail, and then as you use more, it bends the top of the mast and opens the leech in the head. Use very little cunningham until you are very overpowered. You may want to use up to 25mm or so to remove wrinkles. (the sail is cut about 25mm longer than the mast to add extra depth downwind) When you are over powered start using more and more. When it is really windy, pull on as much as you can.
CENTREBOARD
Your centerboard is another very important control to how the boat sails. The rake and positioning of the centerboard changes the balance of the boat and makes it easier or harder to sail.
Test this in moderate conditions to learn for yourself how important it is. You should feel a big difference in how heavy the helm is if you test the extremes of board forward and then board aft in your case. Basically the further forward and further down the board is, the more power you will have. You may even try raking it forward a little in the light. As the breeze increases you will begin getting overpowered and the helm will start getting heavier. A heavy helm is slow, as you are holding the rudder against the water flow and creating drag just like a big brake. Therefore as it starts getting noticeably heavier, it is time to start moving the board back. Firstly do this by raking the board. Leave the top at the front of the case, and let the bottom move as far aft as possible. You will probably find it faster if you begin doing this a little earlier in choppy conditions. As it gets windier still, you can begin moving the whole board aft in the case, until you are hard up against the back of the case. If you are still overpowered, you can now start lifting the board. Don’t be afraid to sail around with 150mm of board up if it is windy. This will allow the boat to sail flatter, especially through the gusts, and to move faster through the water. Be aware to begin putting it down again if it lightens, or else you will find yourself not pointing.
RUDDER
The rudder is one of the more important items to get right in the P Class. This is because of the angle it is on and how heavy this makes the helm. A heavy helm is slow, so anything you can do to help this is good. Make sure your rudder is as vertical as possible within the rules. Ask the measurer to check it, and watch carefully to see if there is any way you can rake it further forward- even another 5mm is very important.
P Class Mast Rake Formula and Mast Bend Measurement
INSTRUCTIONS
Mast Rakes
We don’t give fixed mast rake numbers in our tuning guide. This is because hulls vary so much that the current way of measuring the rake is only accurate to around 30mm!! We have come up with the following method which will eliminate the hull variable, and hopefully create a standard metric rake system.
1) Measure up 2.8m from the deck and mark the back of the mast -(not the back of the track)- this is the new rake measuring point.
2) Measure up 100mm from the deck on the back face of the mast. Measure from this point to the stern and mark the stern point. The distance is ‘deck’ in the formula.
3) Calculate the correct rake for your hull using the Fctr that corresponds closest to your body weight. Use the table or graph below to get the correct factor (Fctr) for your weight. Use metres in the formula.
Formula = The square root of (7.29 + deck + (Fctr x deck))
READ MORE
READ MORE


STREAKER TUNING GUIDE
Streakers are relatively easy boats to set up. There are 3 dimensions which position the mast for the correct rake and
give you a repeatable setting. See the below points to guide you through our Streaker Tuning Guide.
1. This set up is best done on a windless day.
2. Find the ‘Transom datum point’ on your Streaker as shown.
3. Set the boat level.
4. Initially put the mast in the boat, don’t bother attaching shrouds or forestay at this stage. The back of the mast should be touching the aft edge of the deck mast gate.
5. Measure the distance from back of mast at the heel along the hull centreline, over the top of the board- case and aft tank to the Transom datum point. Dimension ‘A’ should be 2885mm +/- 5mm.
6. Adjust the pins/stops on the mast step track as required to get dimension ‘A’.
7. You can now attach the forestay. Do not tension, just enough to take out the slack. The mast should still be touching the aft edge of the mast gate.
8. Hoist your tape measure on the main halyard to the top of the mast. Measure back down the mast to the top of the bottom black sail band. Adjust and cleat the halyard so Dimension ‘B’ is 5095mm and cleat the halyard.
9. With the halyard cleated still as in 8, swing the tape to the transom and measure Dimension ‘C’, top of mast to Transom datum point. 6130mm +/- 20mm. Be careful not to bend the mast when pulling the tape taught.
10. You may have to adjust Dimension ‘A’ to achieve the desired rake of 6130mm but within 40mm of this rake is acceptable. These setting should cover all Streakers, Butler and Beer/Rooster FRP boats and Wood/Composite boats. All Streaker’s will vary slightly with regard to the height of False Floor, height of deck and position of the mast gate. These variables will affect the given rake from one Streaker to another. So you may have to adjust to suit your type of Streaker. The type of mast for these settings, Selden Lambda / Superspar Rigel there is no difference.
Streaker Shroud and Forestay Tension
We recommend you use the multi-stay adjusters by Allen Bros. for both shrouds and forestay. Once you are happy with the mast rake you can then attach the shrouds.
Streaker Superspar Rigel
Take the slack out of the Shroud and put the shroud pin into the stay adjuster that you alone can get the pin in easily. (Don’t apply tension or push the mast sideways to get in a certain hole).
Streaker Selden Lambda
Same as the Rigel but then let the shroud even slacker (up) by one full hole. Assuming that your shrouds are the same length, you may find on some Streakers that the shrouds do not go in the same hole in the shroud adjusters. It is not the rig that is at fault but the hull, which may be as much as 10mm higher on one side to the other. The forestay is set in the same way, pull to take out the slack and put the pin into the hole that is easiest. These shroud and forestay settings are good for most conditions, except you may want to ease the forestay by half a hole in a blow. Check measure the rake Dimension ‘C’ once the shrouds and forestay have been connected.
READ MORE
READ MORE

PLATU 25 TUNING GUIDE
Introduction
The purpose of this Platu 25 tuning guide is to give our clients in the Platu 25 class some guidelines on how to get the most out of their North Sails.
Follow the guidelines, but always experiment and try finding your own trim. The weight of the crew, the balance of the boat, the stiffness of the mast together with specific local wind and sea conditions all have influence on the fastest and final trim.
Rig set-up
The North Sails TB-2 Main and LM-4 Jib are “state of the art” sails which did very well throughout the 1999 season. The main is quite powerful and needs some “prebend” (i.e. mastbend in non sailing conditions) in rig set-up. The pre-bend should be something like 50 mm. The best way to check this is tie the main halyard at the gooseneck, pull the halyard very tight and check the distance between the halyard and the back of the mast. This should be 50mm or close to that.
The uppershrouds must be very tight and as tight as possible in hvy. air conditions in order to tension the headstay. In lighter air you should slacken the upper shrouds at least 3 360 degree turns in order to get some headstay sag to make the front of the LM-4 jib as full as possible. In heavy air you should use the GH-2 jib (which is a bit smaller and Flatter as the LM-4 and better in a breeze).
The lowershrouds should be adjusted according to the pre-bend as described before. The mast should not bend more as 130-150 mm’s. Check the intermediates (shroud from the lower spreader to the upper spreader) in all settings (tight and less tight) so the mast is straight up untill the hounds (this is where the forestay comes into the mast). Some sideways mastbend must be accepted, because this cannot be influenced by any adjustment.
Mainsail Trim
Never pull the backstay. Sheeting the mainsheet does all you need to flatten the mainsail sufficiently. Adjust the foot of the sail (along the boom) enough the reduce the helm (pressure). Never pull the mainsail very flat on the boom, specially not when the waves are choppy and short. The boat needs enough “drive” to power through the waves, since it is very short and starts “hobby-horsing” i.e. bow up&down quite easy. Traveller should be played all the time in every gust, so the boat is feathered and not heeling, because that is really slow. If the traveller is not enough, ease the mainsheet a bit to keep the boat on its feet.
The cunningham should be used with care, never pull too much, it moves the draft (deepest point of the main) too far forward. Pull enough to remove some wrinkles, BUT NOT ALL WRINKLES !!Try to accelerate, and NOT to heel!! The boats are very sensitive, and must be sailed with a lot of concentration and dedication, specially from the mainsail trimmer.
Keep the crew on the rail ALL the time. Use 400 Kgs of crew weight which is allowed since 1999.
Jib Trim
First thing you have to do is make marks at the upper spreader. Make a mark every 5 cmtrs. from the outboard end going towards the mast.
The last mark should be at 25 cmtrs. NEVER sheet the sail harder as to this last (most inboard) mark, so this mark should be a bit fatter or another colour, so it’s easy to see through the window in the main. The lead (trackposition of the jib) should be very close to the most forward end of this track. This makes the jib look a bit crazy, but believe me, that’s fast. The barberhauler MUST be pulled INBOARD all the time. In smooth water (no waves) up to 10 cmtrs. In waves no more as 5 cmtrs. Look at your boatspeed, and work the jib barberhauler, just as you must do with the mainsail traveller. More wind -> outboard, less wind ->inboard.
The best way to do this is lead the barberhauler across the boat. This means the barberhauler from starboard is led to the port cleat, and vice versa. That way you can adjust the barberhauler without leaving the rail, remember, the crew must hike HARD!
Length of Headstay
In light air you should use the longest headstay possible in order to create more weather helm.Remember to adjust the shrouds as described above. In heavy air go 1 hole shorter on the adjuster, and again, adjust the shrouds.
Tips & Tricks
Put a device on the bow of the boat which prevents the spinnaker sheet from falling in the water. You will drive over the spinnaker sheet, and that’s slow, and difficult to get back on the boat as long as the boat moves forward.Put a sailbatten on the top of the mast to prevent the mainsail leech from hooking behind the backstay. This is nasty, especially gybing in light air, which must be done frequently.
Crew weight & position
Move forward with 3 crew in light air, at least around the mast. This must be done with less boatspeed as 3 knots. Above 3 knots move backwards, but not a lot. Above 6 knots the crew can be in “normal” position.Wind angles downwind (Spinnaker)
The Platu 25 is very sensitive to apparent wind speed. Smaller wind angles make the boat go a lot faster. My experience is to keep the wind angles as small as 95 to 100 degrees in light air.
Look at the boat speed, and check the win dspeed at all times. More wind, steer deeper (more downwind), less wind, steer higher (closer to the wind). Keep concentrated downwind, you can gain a lot of distance, but you can also loose a lot of distance.
Check the truewind angle. If neccesary gybe as soon as the wind shifts in your favour i.e. the app. windangle is getting greater. Talk with the crew trimming the spinnaker, let him decide if there is “pressure” or “less pressure”. He feels most, having the sheet in his hands.Running in more breeze “work” the boat. Point the bow of the boat down the waves at all possible times and “rock” the boat, i.e. pull hard on the mainsheet and pull hard on both spinnakersheets. Your crew must be very tired after this leg. If not, they did not “work” enough!
Good luck on the water!
READ MORE
READ MORE

MERLIN ROCKET TUNING GUIDE
Introduction
These are the current settings for the North Sail range of Merlin Rocket sails. This information will give the ability to pre-bend the mast when required and control the rig over the full range of conditions. With the ability of the modern Merlin to be able to make almost infinite adjustment whilst afloat this tuning guide will walk through setting up the standing rigging and then the control of the rig whilst sailing.
Spreader settings
The settings shown below for the Jackson/Chipstow mast are also a good starting point for all other masts. The focus being around 38mm of pre-bend, see below.
MERLIN ROCKET JACKSON/CHIPSTOW MAST
• Mast track to shroud wire – 365mm
• Tip of track to straight edge between shrouds – 140mm
• Shroud to shroud – 677mm
MERLIN ROCKET SELDEN SKINNY MAST
• Mast track to shroud wire – 365mm
• Tip of track to straight edge between shrouds – 137mm
• Shroud to shroud – 685mm
Standing Rigging Assumptions
The ‘jib hook’ position is crucial to maximize your mast rake.
• Jib halyard hook at ‘most upright’ setting – Shrouds and lowers loose, just able to get jib halyard onto hook (this is another crucial element, the shrouds should be adjusted so that there is only just enough slack to place the jib halyard on the hook)
.• Set the bow of the boat to perpendicular.
• The mast should now be perpendicular. Adjust the jib strop/halyard until this is achieved and this should be done before proceeding further.
Base Settings
Apply some rig tension 200kg (28-29 on Loose gauge PT-1) which equates to helm and crew sitting on the side deck and snugging up the leeward shroud plus a little bit.With the lowers fully released this should give you about 38mm of pre-bend at the spreaders. To measure this, the main halyard should be tied to the gooseneck and touching the mast at that point.
Note: Be careful that you don’t pull it so tight as to bend the mast further!Once this has been achieved pull on the lowers until the mast just starts to invert. The lowers need to have sufficient range to go from this base setting to totally free.Make a careful note of jib, shroud and lower settings. These are essential to enable easy replication when on the water.Apply more rig tension and possibly lowers as the wind increases to keep the leeward shroud snugged up. Rake when the top batten starts to invert or when the boom is off the centre line more than 50% of the time.
Fig. 1: shows the rig without lowers. You can see the little gauge at the spreaders which is used to measure the pre-bend, the thicker cloth ends 25mm from the mast track therefore 38mm pre-bend.
Fig 2: shows the slight inversion in the lower section (deck to spreaders) and the pre-bend reduces to 15 mm.
Basic principles
Why do we want all of this adjustment? The fundamental is to match the luff round to the mast bend and optimise the two. It also means that we can adjust the shape of the rig to maximize performance for the given conditions, flat mainsail in calm and windy, full in mid range to power up.
Good luck on the water!
READ MORE
READ MORE

INTERNATIONAL FOLKBOAT TUNING GUIDE
Introduction
North Sails tuning guide is written to help you get the best performance from your International Folkboat sails. The measurements and settings included in this guide are the ones that we have found to be the fastest settings for the IF-Boat. Since crew, wind and sailing conditions vary, you may find slightly different settings are better for you. However, by following these instructions, you can be confident that you are well set up to win at any level. We believe this guide will make your sailing experience simpler, more successful and most of all more fun.
The tuning guide was written by Björn Österberg at North Sails One Design.
Preparation
This chapter explains rig tuning and the trim control systems required to be able to get full potential from your North Sails. Always consult the Class Rules while working with your boat and equipment.
MAST RAKE
The IF-Boat has relatively little helm and is, unlike most boats, even more neutral when heeled. To get enough helm for good pointing ability upwind the mast is raked aft. The length of the headstay determines the amount of rake. We recommend a total headstay length of 8400mm. You will most likely need to add one or two toggles to the original headstay to bring it up to this length. A popular alternative is to get a new headstay without turnbuckle made to the total length of 8400mm.
While measuring the rig you can also check other measurements including J-measurement an spinnaker pole length to make sure they are on maximum and according to the class rule.
RIG TENSION
IF-boats are typically 20 –30 years old and therefore checking points that effects rig tension can be worth while. The cabin top underneath the mast step and the hull around the chainplates are the most critical areas. A ”knee”, which strengthens the hull and deck at the chainplates, is allowed. This procedure is described in the class rules.
The settings for rig tension and prebend should me taken with no load on the backstay. Using a tension gauge helps finding and repeating a desired rig trim. We use the Loos Tension Gauge mod. B rig. The base setting is 22 (220kg) headstay tension. To achieve that the values for the upper and lower shrouds are 37 and 20. In certain conditions, when the boat needs a lot of power, a looser rig set-up with a headstay tension of 18, can be worth trying. A looser headstay adds power to the genoa, making it easier to build and maintain botspped.
PREBEND
The tension of the lowers affects two things. Adding tension to the lowers increases tension in the forstay. It also affects the amount of prebend in the mast. The amount of prebend determines the amount of camber in the mainsail. Your North manisail is designed to a prebend of 20 mm. Setting your rig with a greater prebend will flatten your mainsail. Setting the mast with less prebend, a straight mast, will add more power to the mainsail.
SPREADER SWEEP
According to the class rule the spreaders has to be able to move for and aft in the spreader brackets. Reducing the aft movement of the spreaders creates a better support for the mast. Using a string, tie the shrouds to pull the spreaders back as far as they will go. Then measure 280 mm from the string to the aft face of the mast to get the recommended sweep.
TRIM DECALS
Your sail is delivered with 4 small and 6 large trim decals. The small decals can be used for outhaul and other small range adjustments. We use the large decals for genoa halyard, genoa cunningham, genoa- and main tracks. Cutting the decals into “loose” numbers allows you to match the numbers to positions on genoa track.
MAINSHEET TRAVELER
The main traveler has to be easy adjustable. A low friction traveler car with a 2:1 purchase will ensure that adjustments can be made even in heavy conditions.
OUTHAUL
With eased outhaul the elliptical foot panel gives the mainsail a deep and smooth shape. When tensioned for upwind sailing the lower half of the mainsail is flattened. The purchase of the outhaul should be at least 6:1. The tailing end can either stop underneath the boom (as shown) or be lead to the cabin top.
CUNNINGHAM
Cunningham adjustment affects draft position. With loose cunningham the draft will be further aft. When the cunningham is tensioned the draft will move forward and open the leech of the mainsail. A 3:1 purchase lead back to a cleat on the cabin top ensures easy adjustment.
VANG
We use the vang mainly to adjust mainsail twist on downwind legs. The vang can also be used to help the mast bend in the lower sections on a heavy air beat. Using a tight vang while manoeuvring in the pre-start will make the boat accelerate faster. An 8:1 purchase with an easy to reach cleat is recommended.
BACKSTAY
The backstay is the key to balance and speed in medium and heavy air. It has to be easy adjustable even when the crew is hiking from the windward side of the cockpit. The backstay can either be lead to both sides of the cockpit or to a center cleat with the line lead underneath the hatch (as shown). We recommend minimum 16:1 purchase.
INNER GENOA TRACKS
The genoa has a flat leech section that allows us to sheet the genoa on an inner track in all conditions. The position of the track is 100 to 150 mm inboard of the standard track. The aft end of the track is 600 mm forward of the cut-out in the gunwale. The track is 500 mm long. Because of the low clew of the genoa it is important to have the spacing of the trim positions tight enough. Drilling an extra hole between factory holes, bringing the spacing down to about 50 mm will do the job.
GENOA SHEET WINCHES
Sheeting the genoa from winches on the cabin top gives the trimmer a better position. Further forward and facing in to the slot between genoa and main it is easier to get the right genoa trim. With low handle winches, such as Andersen, the handle can be left in the winch while tacking.
GENOA HALYARD
Put a mark on the genoa halyard in front of the cleat. A “North Sails Trim Decal” underneath the mark helps keeping track of the hoist. Adjusting luff tension can be done with either halyard tension or a genoa cunningham.
The cunningham alternative has the advantage of not affecting the head of the sail and therefore leaving the sheeting position unaffected. It is easy to underestimate the force in the cunningham and use a too stretchy rope. We use a 6mm spectra core with a 6:1 purchase arrangement on the aft starbord side of the cabin. Since the tack of the genoa is about 200 mm above deck it is important to keep the sail forward towards the forstay. If this is not done properly the sheet tension will pull the tack of the genoa aft, causing a wrinkle from the firs luff hank. If you use a rigging screw at the lower end of the forstay, just tie a 4mm spectra loop twice around the rigging screw and the trough the tack ring. If you are using a cunningham you might want to put a thin aluminium pipe around the rigging screw to reduce friction. Having a full-length forstay use the extra luff hank right close to the tack ring.
TWEEKERS
Tweekers (twing lines) serve many purposes: they keep the after guy out of the way of the crew on reaches. They reduce the need a forguy and keep the spinnaker more stable in manoeuvres making it easier for the bowman. We put the tweeker blocks at the forward end of the standard genoa tracks where the boat is at maximum width.Sailtrim
The IF sails well unreefed even in heavy air. Using the jib in winds above 18 knots will make both manoeuvres and keeping boatspeed easier. Because the centre of effort moves forward with the jib, pointing is the critical thing with the jib. The confident crew will therefore use the genoa in all windstrenghs because of the importance of good pointing, especially in bigger fleets. We recommend using the inner genoa track in all conditions.
A good way to move quickly up the learning curve is to mark all trim control lines and positions. This will enable you to copy a trim you have found fast in the past, giving you confidence in boatspeed and allowing you to concentrate more fully on tactics.
MAINSAIL
In very light air the mainsail should be trimmed with an open leech to allow the wind flow to follow the sail. The traveler is kept about 300 mm to windward of the centerline with the sheet tensioned to position the boom about 200 mm to leeward of the centerling. Check that the top telltales flow to make sure the leech has enough twist.
Keeping the crew weight to leeward in these conditiond helps opening the leeches of the sails. The outhaul is set at #3 on the small trim decal on the boom. When the breeze builds to about 6 knots the sail can take more sheeting while still maintaing good windflow. The traveler is dropped to about 100 mm to windward and the sheet is pulled to centre the boom. In light air when the mast is straight the cunningham should be slack and small horisontal “sped wrinkles” should bee seen in the luff of the sail.
LIGHT AIR
In the 6 to 12 knots wind range the mainsail can be sheeted tight, letting the top telltale stall at about 50% of the time. A closed leech puts priority on pointing whereas a more open leech gives extra speed. In choppy conditions it pays to ease a few inches in the sheet after tacking to help acceleration. When the boat is up to speed the sheet is pulled tight and the focus is back on pointing. At 10 knots you can start flattening the main by pulling the slack out of the backstay and tightening the outhaul.
MEDIUM AIR
In about 14 knots of wind the boat will start to heel with the trim described above. The solution is to tighten the backstay. This will depower the main and twist its upper part. The boom can still be held on the centreline to match the overlap of the genoa. To keep the draft position in the middle when bending the mast you need to pull the cunningham. A new sail needs only little cunningham tension whereas an older sail requires relatively more luff tension.
HEAVY AIR
In winds above 16 knots the mainsail is depowerd and used mainly for controlling helm. Controlling the power with backstay works well in steady wind conditions. In gusty conditions this method is too slow and we have to work the traveler instead. Make sure the boat is well-balanced in heavy seas. With the right trim the boat should flow naturally through the waves. If the boat feels “sluggish” it can be a sign that the main is giving too much power. With the right, open-leech, trim the boat will be easy to steer and accelerate quickly after big waves.
GENOA
To get the right clew height you need to set the tack about 150 to 200 mm above deck. Regardless if you use cunningham or not, it is important to make sure the tack does not move aft with increased sheet tension. If you use a rigging screw at the lower end of the forstay, tie a 4mm spectra loop twice around the rigging screw and the trough the tack ring. With a full-length forstay use the extra luff hank right close to the tack ring. The best reference for genoa trim is the distance between the leech and the spreader tip. The following measurements refer to spreaders with reduced sweep (as described earlier). For standard sweept spreaders add 50 mm to the measurements below.
LIGHT AND MEDIUM AIR
The right genoa lead for light and medium wind is set when the luff of the genoa breaks evenly from top to bottom. If the top luff breaks earlier the lead is too far aft. In light air the luff should be tensioned so that a few wrinkles remain. Under 6 knots the distance between the leech and spreader tip is 100 mm. When the breeze builds to 8 knots the luff is tightened to remove wrinkles and the genoa is sheeted to 20-30 mm from the spreader tip. In flat water the sail can be sheeted all the way in to the spreader. With tighter sheeting the car has to be moved aft about 50 mm to ensure an even break in the luff.
HEAVY AIR
As with the mainsail the genoa should be flattened and twisted in heavy air. The luff is tensioned and the lead is moved another 50 – 100 mm aft. The upper part of the luff will now break earlier than the bottom part. The foot of the sail is sheeted tight around the chainplates and the leech is further away from the spreader. In 14 knots the distance is 100 mm. With winds above 20 knots the lead is moved further aft and the distance from leech to spreader is 250 mm. This allows the mainsail traveler to be dropped without closing the slot too much. The harmony between main and genoa is important. An adjustment in the genoa is normally followed by a matching adjustment in the main. In stronger winds the amount of backwind in the main will give a hint about the relative trim of the sails. Compared to other boats the IF can be sailed very close to the wind (with a considerable break in the genoa luff) in strong breeze and flat water.
DOWNWIND TRIM
Because we no longer sail reaching legs this part only describes downwind (VMG) sailing. The rule-of-thumb for spinnaker trim is to keep both clews on the same height and the spinnaker boom in right angle to the apparent wind. In light winds this will mean a lower boom and for heavy air the boom can be carried higher. If the spinnaker boom is on an adjustable track on the mast, keep the boom horizontal to get maximum effect. The afterguy (brace) should be set with a tight tweeker. The exception is when the boat is sailed on very deep angles where the tweeker should be eased 500 mm to avoid a sharp bend at the tweeker block.
The spinnaker sheet is eased just to get a slight curl in the luff of the spinnaker. In light airs sailing higher angles even on downwind legs can use the effect of the apparent wind. The angle determines by the spinnaker sheet pressure. Communication between spinnaker trimmer and helmsman is the key. When the pressure builds the trimmer tells the helmsman to bear off and when pressure drops the trimmer tells the helmsman to luff up.
In winds above 10 knots the main is eased all the way to the shrouds. In lighter winds when steering higher angles she main is sheeted tighter to provide a slot between spinnaker and main. To give the mainsail powerful and even camber, make sure the outhaul is eased to #5 and the cunningham and backstay is slack. The vang should be tensioned just enough to keep the top batten parallel with the boom.
Spinnaker sailing is easier if you get rid of the genoa. Roll the genoa parallel to the headstay. Start with the clew and roll the sail vertical behind the headstay. Have a 500 mm rope and tie it around the sail and headstay. When the genoa is not furled make sure the genoa sheet is loose. An overtrimmed genoa will create turbulent air for the spinnaker, making it unstable and hard to trim.Crew WorkThe IF is normally raced with 3 persons. It is not possible to describe the “perfect” crew organisation for all boats. The knowledge, experience and the ambitions of the crew should determine who does what. The idea with the following chart is to present a proposal and an inspiration to make your own chart for your boat. By making a chart you have to think and talk trough the crew work. By assigning a job description to each position, a new crew member can be easily integrated into your boat handling team.
In organising the crew of your boat your goals should be to:· Involve all crew members in each manoeuvre· Avoid having crew members cross paths with each other· Talk about and decide tactical matters to involve the whole crew
SPINNAKER HANDLING
We hoist and retrieve the spinnaker trough the fordeck hatch. We like this method because the spinnaker has a shorter distance to get from stored to set, especially at gybe sets. With the traditional way of hoisting from the cabin hatch the spinnaker has to be led past the boom, vang and shrouds before getting in position. Another advantage is to have the bowman work from a position around the mast. This will make the cockpit less crowded and keep the crew weight well forward.A short description:
To allow the spinnaker to be hoisted from the mast, exit the spinnaker halyard 2000 mm above deck on starboard side. Mount a cleat 400 mm underneath the exit. The forward closing fittings of the fordeck hatch can be removed while racing. The hatch is heavy enough to keep the water out even in rough conditions.
Store the spinnaker in the fordeck hatch. Have the head and clews sticking out a few inches. The halyard is led forward to the forstay to keep it out of the way of the genoa. Use the gunwhale fairlead or a hook mounted close to the headstay.
READ MORE
READ MORE

A CLASS CATAMARAN TUNING GUIDE
MAST
UPWIND
DOWNWIND
WIND SPEED (Knots)
SPREADER RAKE
PREBEND
CUNNIGHAM
BATTENS (Top 4 battens)
MAST ROTATION
CUNNIGHAM
MAST ROTATION
TRAVELER (off the center line if foiling)
5-8
42 mm
20 mm
OFF
Light
45-50 degrees
OFF
80 degrees if foiling
180 mm
8 - 12
56 mm
27 mm
15 - 40%
Light Medium (10+ kts)
35-45 degrees
10 - 25%
70 degrees
220 mm
12 - 16
60 mm
32 mm
100%
Medium
25 - 30 degrees
60 - 75%
65 degrees
300 - 400 mm
16 - 20
75 mm
38 mm
100%
MediumHeavy (18+ kts)
20 - 25 degrees
80%
80 degrees
500 mm
20 - 24
90 mm
42 mm
100%
Heavy
20 - 25 degrees
80%
80 degrees
500 mm (Hang on!)
For best performance, a lighter skipper will slide the settings up the range one, and a heavier skipper will stay down the range one setting. (70kg is light; 90kg is heavy.) The Mainsheet should be tensioned enough to have an even twist profile from top to bottom, and all tell tails should fly evenly.
READ MORE
READ MORE

FLYING FIFTEEN TUNING GUIDE
FLYING FIFTEEN TUNING GUIDE FR-3/FR-5 MAINSAIL & NXG-3 JIB
WIND SPEED (knots)
0 - 4
5 - 8
9 - 12
13 - 16
17 - 22+
Sea State
Flat <---> Choppy
Flat <---> Choppy
All Sea States
All Sea States
All Sea States
Mast Rake
24'11 (7595mm)
24'10 (7570mm)
24'10 (7570mm)
24'9 (7545mm)
24'8 (7520mm)
Rig Tension
180 kg <---> 160 kg
160 kg <---> 140 kg
160 kg
160 kg
180 kg
Kicker Tension
Slack (set for downwind)
Just snug
Tension until 2nd tell tail on the leech stalls 10% of the time
Increase tension bit by bit as the wind increases
30-50%
Ram
Pull fwd 30mm <---> Pull fwd 20mm
Pull fwd 15mm <---> Pull fwd 10mm
Neutral position
Neutral position
Ease fwd 5mm
Outhaul
Ease 10mm from max <---> Ease 20mm from max
Ease 20mm from max
Ease 10mm from max
Max outhaul
Max outhaul
Cunningham
None (see notes)
None (see notes)
None (see notes)
Removing all wrinkles on the luff
Increasing to max tension
Jib Inhauling
None (see notes)
50% <---> 25%
25-50%
None
None
Jib Luff Tension
Soft, slight wrinkles on luff
Soft, slight wrinkles on luff
Just removing wrinkles
No wrinkles
Firm
Notes:
Spreader Length:
420mm-430mm based on overall crew weight, heavy teams should use 430mm, lighter teams 420mm, (if under 23stone then reduce to 410mm)
Spreader Angle:
FR-3 mainsail use 175mm, for FR-5 mainsail use 185mm
Ram:
The Neutral position is set on the dock using 24'10 rake and 350lbs of rig tension, this should produce around 20-25mm of pre bend, Mark this position at deck, this is the zero point or Neutral. Move the ram from this position the amount in the guide.
Cunningham:
Our mainsails use a rubber luff rope which is slightly elasticated which helps to release tension when the cunningham is eased, it does mean it can create larger wrinkles off the luff so its best to lightly snug the cunningham in the lighter winds to remove the larger of these wrinkles without affecting sail shape.
Jib Inhauling:
With the newer higher aspect jibs there is the option to sheet the sail closer to the centreline, there are too many different sheeting setups to give a measurement figure but if you try using the max you think you could inhaul for a short spell, 30 seconds off a start line for example, this is 100% inhaul, use the % guide figure as a ball park to how much you can use in regular sailing in the longer term. I.e 8 kts in flat water would be the likely most effective inhauling condition using 50% of max. You need to ensure the boom is on or even slightly over the centreline to make this work as effectively as possible.
READ MORE
READ MORE


FARR 3.7 TUNING GUIDE
Mast Rake
Use Bruce Farr’s mast rake diagram as a starting point. Most top boats have recently had the centre of their mast set 60 -80mm (2 or so inches) aft of the intersection point of the tapes. When your boat is going well, use a stick to measure your forestay lashing so that you can set it at the same place every time, or experiment knowing what your rake actually is. 4mm on a forestay changes the rake quite a bit (check it out and see). Use a measuring stick - don’t try to experiment by the power of your biceps when setting up the mast. The writer’s experience is that even though in principle everything should be equal, the forestay sets mast rake, while the tightness of sidestays affects rig tension before it seriously affects mast rake. Sailing upwind, it is definitely the forestay that remains tight, and upwind is where the rake matters most. Don’t be afraid to vary your mast rake according to wind conditions, fresh or salt water. (Forward on fresh water, unless it is choppy). Raking your mast too far aft, or forward, will lose you upwind pointing ability. If your rake is too far aft in strong breeze you will capsize a lot. Some skippers believe that as soon as you are in big waves or chop, having your mast raked forward will make your boat bunt into the waves and go slow upwind. If you rake it correctly aft, the bow will lift nicely through the waves without you having to move back in the boat while trapezing.
Rudder
Class Restrictions give you total freedom for your rudder design. Some believe that when you are planing at high speed off wind, the distance between the centreboard and rudder determines how sharply you will turn with whatever minor movement you make on the tiller. If you want to survive more easily in 20 knots plus, (downwind, of course) hang your rudder blade at least 6 inches aft of the transom and have both your rudder gudgeons and your rudder blade raked at the same angle as your centreboard. A thick, rounded leading edge should help reduce your rudder’s tendency to cavitate (suck air right down, make spray, and stop steering.) At high speed, you will not have very good control of your boat if there is a lot of play in your rudder gudgeons. At high speed (ie, off-wind in a blow) the boat is controllable only through ultra-quick use of the tiller and very quick shifting of body-weight - and both controls must be precise. Don’t be afraid of some swims in the learning stages. You’ll know you’ve made it when you’re with the guys who don’t swim. (If you aren’t willing to enjoy the odd massive wipe-out, maybe you should stick to sailing Optimists!) Unless something major is wrong with your board or rudder blade, 90% of your boat speed will stem from your rig (mast rake, mast bend, and sail shape), assuming your hull and body are down to weight.
READ MORE
READ MORE

EUROPE TUNING GUIDE
Introduction
First we would like to congratulate you for choosing North Sails Europe Class sails. Here we will present the basic set up and some guidelines on how to get the most out of your North Sail.
Follow the guidelines, but always experiment and try finding your own trim. The weight of the crew, the balance of the boat, the stiffness of the mast together with specific local wind and sea conditions will all influence the fastest and final trim.
Upwind Trim
Even though the Europe is not as physical as the Laser or Finn you will still need to hike to get the maximum performance out of your sail when sailing upwind. If your sails are trimmed perfectly and you are just sitting on the side enjoying the scenery, you will be slow. So remember to take care with your self-preparations. It is always a good idea to use trim scales on your boat so that it is easier to get a reference point.
One of the most important trim functions on the Europe is the mast rake. We have found that 5440cm is a good base position to start from.
0-5 KNOTS
In less than 5 knots, when hiking is not required, concentration and setup are crucial. In light wind conditions we find that raking back the mast approx. 2cm from base position gives the boat more feel and will help you control the leech easier. Play the mainsheet so that the top tell tail stalls 20% of the time. To keep the leech loose in light conditions is very important. The traveller should be adjusted so that the end of the boom is at mid tank. In light air the outhaul should be 6cm forward of the black band and the inhaul should be loose, 3cm back from the aft edge of the mast. The cunningham is kept loose.
5-10 KNOTS
As wind velocity increases, your primary concern is leech tension and traveller position. At around 5 knots of wind the mast can still be raked back 2cm from base position to help you control the leech. As wind velocity increases, from 6 knots of wind, the mast should be raked forward to base position. As you slowly tighten your leech by pulling the mainsheet you should at the same time work with the traveller. The end of the boom should be around mid tank to transom corner depending on the conditions. The top tell tail should stall 30% of the time. From around 9 knots of wind the end of the boom will hit the deck and the top tell tail will probably fly all the time. When the boom hits the deck you can no longer control the leech tension with the mainsheet. Rake forward the mast 1-2cm from base position to help you get the proper leech tension. The outhaul trim depends a lot on the sea state. In flat water conditions the outhaul should be approx. 6cm from the black band and in choppy conditions approx 10cm from the band. With the inhaul trim it is the opposite way. In flat water it is kept loose, 3cm from the mast, and in choppy conditions it will be tightened. The cunningham is kept loose.
10-15 KNOTS
In 10 knots of wind the Europe is fully powered. Mast rake will be from base position to 1-2cm forward. The boom should be touching the deck at all times. The traveller position should be so that the end of the boom is from 3cm from the inside corner to the transom corner. Remember to play the traveller in puffs to help you balance the boat. The outhaul trim follows the same ground rule as in 5-10 knots but should be kept tighter, 4-9cm from the band. The inhaul should be tightened. As wind velocity increases to around 14 knots you will also start to need to use the cunningham. A good starting point is to start smoothing out the wrinkles along the mast. From around 14 knots of wind you can also lift the centreboard, approx. 10cm, to help balance the boat.
15-20 KNOTS
At this stage it is really time to start de-powering the Europe. To keep the boat well balanced is the main focus. At around 15 knots of wind the mast rake will still be from base position to 1-2 cm forward. As wind velocity increases, to around 20 knots, use base position. The mainsheet should be kept tight with the boom touching the deck at all times. The traveller position should be so that the end of the boom is from the transom corner to some cm outside corner. The outhaul should now be from approx. 4cm from the band to maximum tension. The inhaul should be tightened even more to maximum tension. The cunningham should also be tightened, smoothing out all the wrinkles along the mast. The centreboard can be lifted approx. 20cm.
20-25 KNOTS
As we have said before a well balanced boat is the key to success on the race course. It’s all about de-powering. Mast rake should be in the base position to 1-3cm back. The mainsheet should be kept tight but can be played in the puffs. The traveller position should be so that the end of the boom is outside the transom corner at all times. The outhaul and inhaul should be at maximum tension. The cunningham should be kept tight to maximum tension. The centreboard can be lifted even higher, almost to deck level as the wind velocity increases.
Downwind Sailing
Downwind sailing is an art in itself. Many sailors like to compare it to, for example dancing and they are in many ways right. It takes many hours on the water to really master the art of downwind sailing so be prepared to do some hard work out there. Here we will present some guidelines for helping you to reach that medal winning downwind speed.
When approaching the weather mark try to adjust all the sail controls before you reach the mark so that you can concentrate on surfing that first wave instead of messing with your lines. Release the cunningham and inhaul. How much you release the outhaul depends on the wind velocity, you still have to get around that mark in one piece. In higher wind speeds you can also preset the vang. The vang should be set so that the top batten is 2-3° open relative to the boom.
Play the mainsheet directly from the boom (1:1) until it feels like you are going to be pulled out of the boat, from that point it is not longer effective. Remember that steering always comes first, before pumping and rocking the boat. With too much power in your arm you can no longer concentrate on finding the right way through the waves but are instead just wrestling with your mainsheet which is not fast. At this point switch to 2:1, it then becomes more manageable and safer. As the wind velocity increases even more, pull the mainsheet directly from the ratchet. When surfing, always concentrate on finding your way through the waves. Don’t be greedy and stay too long on each wave. Instead you should use the top speed gained on each wave to try catching the next one. You should always aim to surf from one wave to the next continuously.
Good luck on the water!
READ MORE
READ MORE

ENTERPRISE TUNING GUIDE
This tuning guide has been prepared to help you get the most out of your North Sails as quickly as possible. It is meant as a starting point only, as we cannot cover all options and techniques. Feel free to modify and experiment in small steps to find what suits you best. If you find a settings that really work well, please keep us informed.
Mast Preparation
Ensure all sheaves are free running and the rigging is clean prior to stepping the mast.
SPREADERS
Spreader Angle: Measure from spreader tip to tip.
Super Spar M2 Sleaved – 780 mmProctor D+ – 760 mm
Spreader Length: Measure from spreader tip to wall of mast.
Super Spar M2 Sleaved – 410mm
Proctor D+ – 410mm
Rig Tension / Mast Rake
Rig tension is measured on the shrouds with a 3mm wire gauge. Mast rake is measured from top of mast to the centre of the transom. For sailing in all conditions the rig should be set up with Jib hoisted and tension fully on:
Rig Tension: 400lbsMast Rake: 6470mm
This should make the mast straight with no Mainsail hoisted.
Mainsail
Ensure the Mainsail is fully hoisted – halyards do stretch.
Battens
Battens should be left in the sail at all times and whilst not afloat, the sail should be rolled down the leech, parallel to the battens.
Cunningham
This is used to position draft in the sail. Do not use any Cunningham until you become overpowered in heavy airs, then pull Cunningham on progressively harder as the breeze increases. This will move the draft of the sail forward in the top and de-power the upper leech.
Outhaul
Beating: In light and heavy airs the foot of the sail should be pulled tight. In medium airs, ease approximately 12mm.
Running: Keep the foot tight in all conditions.
Reaching: Ease fully in medium conditions, in light airs ease 25mm and in heavy airs pull out tight.
Jib
To find Jib lead position, follow the sheeting angle through the Jib clew. This should divide the Jib luff approximately in half. When sailing upwind in a Force 3, all the tell tales should break together. In medium/heavy airs, the Jib should be sheeted hard to maximise pointing ability.
In lighter conditions the Jib sheet needs to be eased approximately 12mm to keep the top of the leech open. Once a fairlead position has been found, use it in all conditions with very heavy airs, then move back 25mm. This will flatten the base of the Jib and open the leech, keeping the boat driving and on her feet.
Good luck on the water!
READ MORE
READ MORE

CONTENDER TUNING GUIDE
Basic Setup
Rake – 21ft 2inSpreader length – 430mmSpreader Angle – 100 -110mm (track to line straight between wires at tip)Prebend – 20 – 25mm (with the lowers slack)Lowers Tension until the mast is straightShroud Tension 26-28 on a Loos gauge
Centreboard Position Upwind
GUIDE SETTINGS
0 – 8 knots – Vertical9 – 12 knots – Up 5-8cm (from vertical)13 -18 knots – Up 10-15cm19 -25 knots – Up 20-25cm
It is almost impossible to change your mast rake on the water but because the top mast is long and the lower mast is controlled by the lowers, as you pull on the kicker the mast tip moves back in much the same way as it does when you increase mast rake. This creates weather helm so to balance the helm the centreboard angle should be adjusted. This becomes the key to speed through the wind range. The exact positions will vary depending on your weight and height as well as the stiffness of your mast and the seastate, but the principle is that as the wind increases raise the board enough to keep the helm balanced and the boat driving forward as opposed to luffing and stalling in the gusts. If you raise the board too far the boat will feel easy to sail but you will be unable to point. There is always some tolerance when searching for the optimum board angle, so if you want to point high and you are prepared to sacrifice a little speed lower the board a little, if you want to go low and fast raise it.
Good luck on the water!
READ MORE
READ MORE

B14 TUNING GUIDE
This Tuning Guide has been prepared to help you get the best out of your North Sails. This is meant as a starting point, feel free to modify and experiment in small steps to find what suits you best. If you find a Setting or Settings that really works, please keep us informed.
Mast Position
The aim of the B14 settings is to keep the lower ¼ of the mast as straight as possible. To achieve this you will need to move the mast foot as far forward as is possible, and use a small chock in front of the mast at the mast gate. The size of the chock will vary and you will need to set this by looking up the mast when it is tensioned and checking it is straight.
On The Water Tuning
Because the rig is very simple, there are not a lot of changes you can make while you are on the water. There are your normal sail controls, the jib tack height and the centre board.
CUNNINGHAM
As you start to become overpowered start to pull on the cunningham a little, as the breeze increases progressively pull on more.
JIB TACK HEIGHT
The jib tack height is the only control for the sheeting angle of the sail. Lowering the tack will increase the twist of the sail. If the conditions change you can alter the tack height between races, lowering the sail if the breeze increases and raising it if the breeze drops.
CENTRE BOARD
As with the jib, the centre board can only really be adjusted between races. If you feel the boat ‘tripping up’ over the board in breezy conditions raise it up.As a guide:15-20kts: 150mm (6”)20kts+: 300mm (12”)
Notes
Tensions are found with Loos PT1-m rig tension gauge.The spreaders are measured from a straight line between the shrouds to the back of the mast track, without rig tension. The holes are a bit of a course adjustment so you might not be able to exactly match these figures. If in doubt go slightly further forward on the lowers and slightly further back on the uppers, if possible try to keep the 2 sets of spreaders in line or the upper set slightly aft.
Good luck on the water!
READ MORE
READ MORE
H-BOAT TUNING GUIDE
Introduction
The purpose of this tuning-guide is to give our clients in the H-Boat class some guidelines on how to get the most out of their North Sails. The tuning guide is made by Steffen Stegger, Lars Christiansen and Theis Palm.
Follow the guidelines, but always experiment and try finding your own trim. The weight of the crew, the balance of the boat, the stiffness of the mast together with specific local wind and sea conditions all have influence on the fastest and final trim.
Mast Trim
Before stepping the mast in the boat, some very important measurements have to be made to follow this tuning guide.
1. The length and angle of the spreaders are important to the shape of the main, they help to control the bend of the mast and thereby the tension of the forestay. The length of the spreaders is measured from the side of the mast to where the shroud passes the spreader, the measurement is 81 cm measured along the middle of the spreader. The spreader angel is measured by fixing a fine line between the two top shrouds, measure from the line to the aft side of the mast, the measurement is 19 cm. Next make two tape marks on the spreaders at respectively 44 and 54 cm from the side of the mast. These are used to trim the jib.
2. Lead the upper shrouds and forestay along the mast, the upper have to be out of the spreader tips. Pull them as hard as you can and put a mark on all three wires at the height of the black mark at the gooseneck. These three marks are now used to check if the mast is straight from side to side in the boat, and to check the mast rake. The mast is then stepped.
3. The foot of the mast is placed so that the distance between the center of the forestay pin to the front edge of the mast is 2,42 m.
4. Control that the distance from the top of the gooseneck mark to the deck measured along the side of the mast is 54,8 cm any possible difference should be adjusted when setting the forestay in the next step.
5. The mast rake is set so that the distance from the mark on the forestay to deck measured along the forestay is 1,37 m.
6. Now that the correct mast rake has been set, control that the mast rest on the full surface. If this is not the case, the pressure on the rig will become uneven and the forestay unsteady.
7. The marks on the top shrouds (from step 2) are now used to control if the mast is placed in the middle of the boat. This is done best by measuring the distance from the mark to the deck. This should be the same on both sides.
8. Rig tension is somewhat difficult to define, because not everybody has the same meter to measure. We have used a Loos Gauge type PT-1 M. See the On the Water Tuning Guide.
9. The lower shrouds are tensioned, so that the mast is completely straight in the boat up to 20-22 knots. From here on tighten them till the mast drops 5-10 cm off to leeward at the forestay fixture – the exact measure depending on crew weight.
Mainsail
1. The mainsheet is the most important factor when trimming the main. Even minor adjustments can have a big effect on speed and pointing. If the sail is sheeted hard the leech will close more and increase rudder pressure, but the pointing ability will be improved. This can be used in middle air and flat water as long as the boat can be hiked flat. In light wind the mainsheet is eased so that the tell-tale by the top-batten flies straight aft. In heavy winds the mainsheet is pulled very tight and the H-boat Tuning guide backstay is pulled until the boat becomes light on the rudder again. As the waves increase more twist is needed to facilitate steering. At the same time it improves speed and hereby pointing. As a thumb rule trim the aft part of the top-batten parallel to the boom in all wind strengths.
2. The outhaul is also an important factor when trimming as it controls the draft in the bottom of the mainsail. In light winds (0-4 knots) the sail should be 3 cm from the mark. In a little more wind (4-10 knots) about 1,5 cm from the mark and in more wind than this pull the sail all the way to the mark.
3. Avoid using the Cunningham in light winds. In middle winds pull only so much so that the wrinkles disappear. In winds above 14 knots pull the Cunningham hard to open the leech and the draft forward.
4. Adjustment of the traveller affects rudder pressure and depends on the crew weight. The traveller is adjusted so that the boom – as long as possible- is kept parallel to the centerline. This is to keep maximum distance between the main and the jib. As the wind increases and the backstay is pulled let the traveller to leeward until the boat is balanced and light on the rudder.
5. The backstay has two functions: To control mainsail depth and to control forestay sag. This means that a tighter backstay flattens and opens the mainsail, gives less forestay sag and hereby a flatter jib. We have put marks on our backstay every 5 cm, so we can return to good trim after mark rounding etc.
6. The kicking strap is used upwind in heavy winds to bend the mast and hereby opening the sail in the bottom part. It also keeps the leech from opening too much when easing the mainsheet in the gusts. Never use the kicking strap upwind in less than 16 knots. Remember always to ease the kicker before going downwind to prevent the boom from breaking. When reaching, set the kickingstrap so that the aft part of
the top batten is kept parallel to the boom.
Jib
1. JIB LEAD
As a general rule set the jib lead at a distance of 2,88 m from the forestay pin to the center of the block. The jib shall luff evenly along the luff of the sail. This means that the telltales should break evenly. If the waves are big in more than 6 knots move the lead 1-2 “holes” forward and if the wind is less than 6 knots up to 5 “holes” forward.
2. SHEET TENSION
To trim the jib, use the marks set on the spreaders. In wind strengths that are less than 6 knots use the mark at 54 cm from the mast in more wind use the inner mark
(44cm).
3. HALYARD TENSION
Never over tighten the halyard, as this will move the draft to far forward. Pull as much as to remove the creases, but not more. In light winds leave some creases at the
luff, as this will cause the draft to move aft, thereby increasing depth.As a general rule set the jib lead at a distance of 2,88 m from the forestay pin to the center of the block. The jib shall luff evenly along the luff of the sail. This means that the telltales should break evenly. If the waves are big in more than 6 knots move the lead 1-2 “holes” forward and if the wind is less than 6 knots up to 5 “holes” forward.SpinnakerThe height of the spinnaker pole on the mast should be 1,50 m over the cabin top roof. The pole is kept horizontal in most conditions. This makes it possible to take full advantage of the whole pole length, keeping the spinnaker as far away from the other sails as possible. Our GRADIENT spinnaker is designed for this.
In light winds the pole height is adjusted to keep the clews at the same height to get the best angle of attack on the windward leech and keeping the leeward leech open.
In heavy winds on a tight reach, the spinnaker pole should at no time be closer to the forestay than 60 cm to prevent the boat from coming out of control.
If you have any questions regarding trim or H-Boat sailing in general, please contact Theis Palm.
Good luck on the water!
READ MORE
READ MORE

MIRROR TUNING GUIDE
Mast rake
Is measured from the top of the mast/gaff to the centre top of the transom.
Wooden Hulls – 4950mm – 5000mm (These measurements work for both Gaff and Bermudanrigs).
Goodwin hulls – 4975 – 4850mm
Winder Hulls – 5000mm – 5100mm
Rig Tension
12 to 16 on the shrouds using a Loos tension gauge for older boats. New boats both wood and frp will take 18-22.This isn’t as critical as it would be if the mast had spreaders, however it still controls the amountof jib luff sag and mast rake so care should be taken to keep a record of your setting so it is thesame every time.
Outhaul
Upwind, set the outhaul so that the foot just touches the leeward side of the boom. If the conditions are choppy and you are not overpowered ease the outhaul so that there are 2cm between the leeward side of the boom and the foot. In strong winds pull the outhaul tight. Downwind, you can ease the outhaul 5cm if you want more power.
Fairleads and Jib Height
The fairleads should be positioned as far back as possible on the thwart and as high as possible.You are allowed to fix the fairlead on a block 25mm high. The distance between the bearing surfaces of the fairleads should be roughly 750mm.
Start with the tack corner of the jib 30mm above the deck.
Raise it to 50mm above deck for light and moderate wind and waves.
Lower the tack corner to level with the deck for strong winds.
Pull it down 10 – 20mm below deck level for very strong winds.
Kicker and Twist
I think twist is the key to making a Mirror fast. A closed mainsail leech will make you point but if you overdo it the sail stalls, the boats slows, and you go sideways, giving the same effect as notpointing. Keep leeches open enough to stop the telltales stalling. This isn’t so much of a problemonce you are both hiking because there is pressure on the mainsail leech to keep it open, but it isstill possible to oversheet the jib. If the boat slows down compared to the boats around you or theboat feels as though its bouncing up and down on the spot, ease the jib sheet 1cm and see ifthings improve.
Marks on the jib sheets are very helpful here and even calibration marks on the kicker will helpyou re-produce your fast settings.
Spinnaker Pole Setting
Good luck on the water!
READ MORE
READ MORE
ALBACORE TUNING GUIDE
Introduction
The settings in this guide will help you get the most out of your Albacore North Sails. As always experimentation and documenting will enhance your specific boat. The weight of the crew, the balance of the boat, the stiffness of the mast and local wind and sea conditions will impact your tuning. This guide was developed with the Superspar M2 mast and B2 boom.
Boat Set-Up: Foils
The basic hull and foil set up is similar for most Albacore builders and sails. Typically the centerboard is moved as far aft in the boat as the rule allows. The minimum allowable distance from the transom to the leading edge of the centerboard when lowered 90° to the hull is 2600 mm measured along the curve of the hull. It is normal to have the board within 1 5mm of this measurement.
It is increasingly common to rake the centerboard forward in flat water and in winds less than approximately 1 2 knots. Ensure the board can do this and that the 90° position is clearly marked and visible inside the boat. The trend is also to have flexible centerboards that have good gust response and give a slight gibing effect when raked forwards in light to moderate winds.
Make sure that the centerboard and rudder are aligned. With the mast off and the boat upside down, stand behind the boat and sight along the foils. I f they are not aligned, normally the rudder has to be moved to bring the foils into alignment.
Mast Butt Position and Rake
The maximum forward position of the mast butt is 3350 mm measured from the aft face of the transom to the fore side of the mast at the foot. 3335 mm is the recommended starting point for North sails. This will provide sufficient pre-bend without compromising the ability to ram the mast far enough aft to allow the boom to pivot around the leeward shroud while sailing downwind. The most robust measurement for rake is to mark the mast at the hull sheer line. Put a straight edge across the partners aft of your mast and measure down the shear line on both sides of the boat. Use the hull skin to deck intersection. Calculate the average of those two. Place a mark on your mast that same average distance down from the top deck. Disconnect the bottom of the headstay and swing it to the mark you just made on your mast. Mark the headstay at that point. (extend with line if necessary). Replace the headstay back to the bow. Hoist the jib and tighten the halyard just enough to take the slack out of the shrouds. The mark on your headstay measured to the top surface of the deck at the bow should be about 6”. I f it is not you may need to move your shrouds up or down to achieve the 6″. This is your max forward light air setting. In winds above 1 5 knots it is common to pin the shrouds down one pin from this position. Above 20 knots two pins is common.
North Sails
North Albacore Sails are cut to be powerful. Both main and jib have a fair amount of depth which is needed for superior downwind performance. In order to achieve superior upwind performance proper mast bend is required. The objective is to add just enough bend to keep the leech tell- tales flickering while in full power mode, and then as much bend as is required to flatten the sails in stronger winds. Bend is achieved primarily with boom vang, but pulling the mast forward at the partners, easing the jib halyard, and lots of main sheet all contribute to mast bend.
Pre-bend
A system to increase the bend of the mast at the partners is very important. A strut is the preferred method because it it raises the fulcrum where the bend occurs, but a simple tackle system at the partners will suffice. In most wind conditions upwind the mast must be pulled forward or “pre-bent” so that it resides about 1 ” -2” from front of the partners. In very light winds the mast will have to be bent all the way to the front of the partner to open the leech. In strong winds the mast should be allowed to bend to within 0.5” of the partner (any more than that and you risk over-bending and damaging the mast when you ease the head-stay). In light winds the mast will be fully pre-bent while reaching. The amount of pre- bend is gradually reducing as the wind increases. The correct time to reduce the pre-bend can be hard to judge, however if the mast is not pre-bent enough, the luff of the main is too full and the leech ticklers are difficult to fly all at the same times as the ticklers 1 /3 back from the luff. When this is correct, all ticklers can be flown.
Spreaders
A good way to check the spreaders is to set the mast at the max forward, light air position. There should be zero shroud deflection in any plane (I.E. totally straight shrouds with no deflection at the spreader tips). Put your eye close to the chainplate and sight up the shrouds. This should produce a spreader length of about 1 5-1 5.5” and a sweep of approx. 7” (Standard spreaders have to be shortened to achieve this). This position is a good starting point for crew weights of up to 360 lb. Above this consider increasing the length of the spreaders by 0.5-1 ”.
Jib Sheeting Position
A good way to start is to fold the jib head to the jib tack and mark the mid- point of the luff. Then draw a line on the clew patch from this point to the clew of the jib. By eye extend this line down to the jib track. Experience has shown that the best light/moderate jib lead position is about 4-6” aft of this point. Further forward of this and the lower third of the jib can get too full. As the wind increases the jib car needs to be moved aft. In very strong winds this sheeting position can be as much as 1 0” aft of the starting position. This will flatten the foot of the jib and open the leech. It is important not to over-sheet the jib so that the main is backwinded, or, the jib leech tell tail is stalled. The jib height must be adjusted so that the foot of the jib is in full contact with the foredeck upwind. The jib height can be adjusted through the lashing of the sail to the wire at the head. It is a good idea to raise the jib in light air to get extra sail area, and lower it in heavy air to keep the foot touching the deck when the jib car is moved aft.
Main/Jib Cunningham
The function of the cunningham is to move the point of max depth forward, or aft in the sail. Tightening the luff pulls the max depth forward. Maintain the max depth of the main just forward of half way. The more the mast bends the more Cunningham will be required. The jib max depth should be further forward about 1 /3 of the way back from the luff. (like an airplane wing) It is important that the jib and main cunningham are released off wind.
Outhaul
The North main is powerful at the foot so it is important that this is restrained upwind. In very light winds the outhaul is pulled so that the foot is taught. Above 1 5 knots it is pulled very tight. When reaching the outhaul needs to be eased. Maximum power is approximately 2-3” of release on the outhaul. This will be sufficient to open the foot of the main.
Jib Halyard Tension
In light winds upwind, the jib halyard is often set to allow for about 2” of sag at the mid luff. This should provide great speed and a wide groove. Tightened a little to improve pointing or slackened a bit to increase speed. Limiting Jib wire sag to about 2″upwind is important until the wind becomes overpowering. Above this, the sag is less important because the jib halyard is let off to increase mast bend and rake. It is a good idea to mark your halyard adjuster to know where your rake is. Check the section above “Mast Butt Position and Rake”. Mark your halyard adjuster on the mast at a point where you achieved 6” of rake. Then make a scale on it in 1 ” increments. 8-1 0″ of rake is common at the upper wind ranges. The halyard is loosened, the vang is tightened and the shrouds are pinned down. While reaching the jib halyard is eased to achieve 2-4” of jib wire sag. Many of the top boats have a system to tension the fore-stay while reaching in light to moderate conditions. With this applied, the halyard can be loosened to give jib luff sag and a powerful jib without affecting the mast bend control.
Vang
The vang is completely loose in light winds. As the wind increases a little use the vang to keep the top batten parallel with the boom. More and more vang is used as the wind builds. Once you are both hiking a harder vang will bend the mast and depower the sails. It is a sensitive control and too much vang can lead to a sail with too tight a leech, or too flat a main. Too little vang can lead to too deep a main, or too much twist. Correct vang adjustment and appropriate jib halyard are critical to maintaining good balance and the right amount of power. When reaching the vang is used to keep the top of the main from getting too loose. Good reaching speed is obtained with constant adjustment of vang and deck level mast bend in response to the changing conditions. Try to keep all of the main ticklers flying.
Wing on Wing
When wing on wing, it is important to get the boom out as close to 90° as possible, and the jib foot snug. With this in mind, the jib halyard is loosened off by at least 6” and the mast rammed all the way to the back of the partners. It is common to let the jib halyard off to give 8”+ of jib wire sag. Above 6-8 knots get the jib out and away from the mainsail. Normally the centerboard is fully in the case and the boat is heeled to windward. Vang should be set to give just a small amount of leech twist as can be seen from the photo.
George Carter
2015 International Champion
READ MORE
READ MORE

1720 TUNING GUIDE
Tuning Set-up
BEFORE YOU STEP THE MAST
Before stepping your mast there are a number of things to do that will make your boat easier to sail and the sails easier to trim.
MARKING THE SPREADERS
Before stepping the mast put a mark on the underside of each spreader (first spreader up) 100mm in from the spreader tip. Use either coloured tape or a felt tip pen. We’ll use this mark later as a guide to trimming the large jib.
JIB TRACKS
With a high aspect ratio jib like the 1720’s, the lead position is crucial to good speed. The stock hole spacing on the tracks is simply too far apart to get the lead right in all conditions. We suggest drilling one extra hole between stock holes on the track. Also drill out the heads of the screws to increase your adjustment possibilities. It is only necessary to do this at the back half of the track, as the front half is never used.
MAINSAIL
The 1720 main has one full-length batten at the head and three long battens at the base. The batten pockets on your North mainsail are a little different to accommodate these long battens. These pockets use Velcro closures rather that the traditional elastic to keep the batten in. The amount of pressure on the pocket is important especially on the upper batten. Be sure your battens are tight enough to remove any vertical wrinkles coming off the pocket, but not so tight as to induce curve in the batten. If the sails are new just put a bit more tension for the first outing just to allow for give in the batten pocket. Be sure to check your batten pocket tension when sailing.
TUNING THE RIG
These steps will get you set up to sail the boat in moderate conditions and give you all-purpose tune. In the following section we will describe adjustments to make the boat perform at it’s best in the full range of wind and sea conditions.With the rig in the boat and the forestay in place tighten the caps and lowers by hand until firm and you cannot tighten them any more. At this point adjust the gooseneck shrouds to centre the mast at boom height. To do this use a tape measure and check the exact length of each shroud to ensure accuracy. Again at this point the gooseneck shrouds only need to be hand tight. The next step is to measure from the masthead down to the chainplates on both sides. Tighten or loosen the upper shrouds until the mast is centred from side to side. Once you have achieved your AP setting you should mark the shrouds before de-rigging to make setting up the rig faster next time. Unfortunately at present the class rules outlaw the use of calibrated bottle screws, which in our opinion is a backward step as they make setting up the rig a piece of cake! Using a Loo’s model (PT-2) Tension gauge, tighten the uppers evenly, until the uppers measure 28 on the gauge. Then tension the lowers to 23 on the gauge and this will give you approximately 55mm of pre-bend at the spreaders. The gooseneck shrouds need to be set at around 5 on the gauge, and then you will be almost ready to sail! The final step is to tension the topmast shrouds. Now we are all using the double spreader rig these can be set a little looser than before, and we recommend that with only a 1/6th of the backstay travel applied the top shrouds should be hand tight. This is a little hard to describe in words but take a little time to determine the travel of the backstay, if in doubt put on slightly more rather than less!! Hook up the backstay, install the boom and you are ready to go sailing in moderate conditions. We have found these settings, to be good starting point for most people. Note: The rig tension measurement is taken without the backstay hooked up or the boom hanging off the main halyard. The weight of the halyard or tension in the backstay can effect shroud tensions. So to be consistent, we always leave these items loose when tuning the rig.
ADVANCED RIG TUNING
Adjusting the tension of the upper and lower shrouds changes the amount that the headstay can sag and the amount of pre-bend in the mast, which directly effects the fullness of the jib. Shroud tension also effects the mast and mainsail shape by controlling fore, aft and sideways bend of the rig. In general you will want the pre-bend reduced in lighter conditions and increased in a breeze. The aim of this is to increase and decrease the amount of power available from the up-wind sail plan. From our starting set up described above we will increase and decrease the tension on the lower shrouds to change the amount of bend in the rig. All the settings below start from the base settings which we have stated above:0-5 Knots – Take 2 turns off the caps and -1 turn on the lowers5-10 Knots – Take 2 turns off the caps
10-15 Knots – Leave as base
15-20 Knots – Add 2 turns on caps
20-25 Knots – Add 2 turns to caps and add 1 turn to the lowers
25-30 Knots – Add 3 turns to caps and add 2 turns to the lowers
The above settings are a good guide for changing gears but do not take into account the sea state. You will therefore find you can go tighter than those suggested in flat water, but will probably want to go looser in really choppy water down the wind range.
Sail Trim
MAINSAIL
Mainsheet
Upwind use the mainsheet functions to control the overall amount of twist in the leech of the mainsail. Once the traveller is set, we trim the mainsail until the back end of the top batten is parallel with the boom. We then fine tune the mainsheet tension depending on what gear we want to go in. If we want the boat to point we can trim the mainsail harder, reducing twist and the helm will load up a little allowing us to point higher. Eventually, as we point higher, we will slowly lose speed and need to foot off again. In order to foot we need to ease the mainsail slightly to twist open the leech and ease the load on the helm, we can then drop the bow down slightly to foot and build speed without heeling the boat over and inducing helm. The mainsheet can also bend the mast and flatten the sail (especially near the top).
Traveller
The traveller controls the athwartship’s position of the boom when sailing upwind. We’ve found that it never pays to have the traveller car more than 6″ above the centreline of the boat. In general the traveller will be on or very slightly above the centreline in light air, and below, or well below in moderate to heavy air. Once you are overpowered constantly, or sailing in waves, it is generally faster to keep the traveller fully down and drive the boat a little faster through the water. The 1720, like many other one designs needs to be sailed flat upwind. In puffy conditions it is often faster to play the mainsheet when a puff hits, than to ease the traveller or feather the boat. The goal when playing the mainsheet upwind is to keep the boat flat and on an even angle of heel through all changes in wind velocity. Start judging the angle of the jib against the horizon and work to keep it constant.
Outhaul
The Outhaul controls the depth of the lower third of the mainsail. Upwind, except in very light air and choppy water, the outhaul should be tight or out to the black band. Downwind, reaching or running, let the outhaul off so that the middle of the foot is 5″ away from the centre of the boom. In heavy air you may want to keep the outhaul tight to de-power on the reaches and project more sail area. We like to keep the outhaul tight upwind to reduce the amount of drag the lower part of the sail produces. The sheeting angle of the jib is very tight on the 1720 and easing the outhaul too much upwind will reduce the size of the slot and result in poor flow between the mainsail and the jib.
Boom Vang
In moderate conditions upwind we trim the mainsheet to where we want it and then take the slack out of the boom vang. This way when we ease the mainsheet for a puff and the boom does not rise up and twist open the mainsail leech. As the wind velocity increases the vang starts to become redundant up-wind and all of the loads are taken on the mainsheet only. The real benefit of this is that when you ease the mainsheet in a strong gust the sting is taken out straight away and the boat does not heal excessively.
Cunningham
The cunningham is used to control the draft position in the main. Our mainsail is made from very low stretch Mylar that does not change shape much as the wind increases. Because of this we find we do not need to use the cunningham much except in very heavy air. Upto about 16 knots, tension the cunningham enough only to leave slight wrinkles coming horizontally off the mast. After that if you feel that the draft has moved aft slightly, use only enough tension to pull it back forward to it’s designed position.
Backstay
The backstay is probably the least used mainsail control on the 1720. Upwind we do not use the backstay until about 18-22 knots of wind. At that point after dropping the traveller, the boat will still be slightly overpowered. Tighten the backstay very lightly to bend the top of the mast and de-power the sail. After tightening the backstay, the top of the main will twist open requiring you to trim the mainsheet slightly. Conversely, if you ease the backstay the main leech will tighten slightly forcing you to ease the mainsheet. If you find the mainsail starts to flog in an uncontrolled manner at this point remove backstay tension, as this is a sign of too much backstay. If in any doubt let it off and sail with the smallest amount on. Downwind in heavy air you will want to keep some tension on the backstay to keep the mast from moving too far forward. The swept back spreaders of the 1720 rig keep the mast from moving forward and you can keep the backstay loose downwind in light to moderate airs. As good practice get a crew member to sight up the mast to check for reverse bend. If the mast is bending forwards apply backstay until it comes straight.
Genoa Trim
We start by finding the correct lead position in the moderate air. Remember if the inside top tell tail breaks first, move the lead forward until all tell tails break together. In light to medium airs we usually sheet the genoa with 2 of the standard hole spacing showing. As the wind increases we quickly recommend moving the leads to the back of the track and twisting the sail but keeping the foot tight along the deck. In flat water and as long as the mainsail is not back winding, sheet the genoa onto the mark on the spreaders. As you get progressively over powered and waves are an issue, sheet the sail on or close to the spreader tip when sighting down to leeward in the cockpit. When you reach the top end of genoa conditions, sheet at the back of the track and ease the sheet as much as is required to stop the mainsail flogging. Anything that can be done at this point to keep the leech of the mainsail working will result in better speed upwind. At the other extreme be sure to keep the sheet well eased in light air to twist open the top of the jib and keep the slot open. You will probably be sheeting 85-100mm outside the mark in less than 6 knots. The halyard tension on this sail should not be over tensioned, small wrinkles should always be showing from the hanks, in all conditions. Take care when using the winch on the halyard as it is very easy to over tighten the luff and damage the sail. Extreme care must also be taken when raising and lowering this sail and always ensure that the sheets are not cleated when hoisting and lowering otherwise the sail will tear behind the hanks.
The Asymmetric System
The first thing you need to decide before rigging the spinnaker is whether you are going to gibe the spinnaker clew between the spinnaker luff and the jib or out around the spinnaker luff. We recommend that all gibes are done inside the spinnaker luff in all conditions. Gibing inside is faster, although it can get pretty exciting when the breeze is up. Gibing outside is usually safer in heavy air. But due to the long spinnaker pole on the 1720 we think it is safer to gibe inside all round.
Setting the Spinnaker
We always set the spinnaker to leeward underneath the boom. The first step is to set the pole (bowsprit). Next we hoist the sail up to the hounds before any attempt is made to pull on the tack line. One crew member usually helps to feed out the sail from the bin. As the boat heads downwind and before the boom is all the way out, we quickly pull the tack line while the mainsheet man trims the sheet. The idea is not to pull the tack of the sail out of the boat as you approach the weather mark, but to wait until the head of the spinnaker reaches the hounds. Keeping the tack back slightly helps to reduce the chance of the sail filling too early, and sliding under the boat! This is not fast!
Gibing the Spinnaker
Gibing the 1720 spinnaker is probably the most athletic job on the boat because there is a lot of sheet to pull in. We find that it is not how fast the old sheet is eased that is important, but how fast the new one is pulled in (at least on inside gibes).Start your turn slowly, easing the spinnaker sheet as the bow comes down. As the boat starts to lose speed, roll the boat to weather to turn the boat without using the tiller. As the boom comes over, quickly trim in the new sheet. Be careful not to trim the sheet too much, as it is easy to oversheet and slow the boat further. The outside gibe is much the same, except that easing the old sheet quickly is much more important to get the spinnaker clew out in front of the boat early.
Dropping the Spinnaker
We always try to take the spinnaker down on the port side, normally the weather side, so that we are already set up with the spinnaker on the correct side for the next set. The best way to do the weather take down is by coming into the leeward mark a little high. You can then run down right at the mark, making it easier to pull the clew around to the windward side of the boat. Drop the asymmetrical as you would a regular spinnaker by gathering the clew first, easing the tack line fully, and then finally the halyard checking the progress to ensure that the sail does not touch the water!
Trimming the Spinnaker
Trimming the 1720 spinnaker is very easy. Basically, you trim an asymmetric the same way you would a jib or genoa. Pull the sail in enough to keep 6-8″ curl in the luff. As with any other spinnaker, be careful not to over trim. Always keep the sheet moving in and out. This apparent wind moves around very fast on the 1720, so rapid trimming and easing of the sheet is important. When reaching it is important to keep the tack of the sail within 500mm of the end of the pole. This makes the luff straighter, opens the leech and increases the forward force of the spinnaker. When running or sailing deep, let the tack line off about 1.5 – 2 metres to allow the luff of the spinnaker to roll around to windward, this will allow you to sail a little lower. In certain conditions it will pay to have the tack line on the winch and trim it on and off to keep the sail working 100%.
General notes on sailing the boat
Always sail the boat as flat as possible.Be sure not to point or pinch too much. The foils on the 1720 are quite thin and stall easily at low speeds.Keep the crew weight forward upwind and downwind, when not on the plane.Move crew weight aft downwind in heavy air. We mean a long way back. Usually one of the crew moves behind the helmsman to the pushpit. This keeps the bow out of the water and keeps the boats planing.Keep the helm as neutral as possible upwind and downwind. The boat is meant to be sailed with a neutral helm. If you have a weather or lee helm, something is wrong with your trim or set up.
Caring for your sails
Your sails from North Sails One Design are constructed from the best materials on the market today. Before we made your sails, we tested many different fabrics from the best suppliers in the world.
MAINSAIL
It is not necessary to remove the battens from the main when storing it. Be sure to roll the sail up parallel to the battens to avoid putting a permanent twist in the battens. Watch the mainsail for signs of wear on the batten pockets where they cross the shrouds. Be sure to wash the sail off with fresh water when it becomes salty and make sure the sail is thoroughly dried before storage.
GENOA
Like the main, always roll the sail after sailing and do not remove the battens. Occasionally wash the sail off with fresh water. If you have been using a lot of leach line on the sail remove this before storing.
SPINNAKER
The best thing to prolong the life of your spinnaker is to always store the sail clean and dry. Although this is not always possible! When the sail gets wet in salt water (and it will) wash it off with fresh water and dry it thoroughly if leaving for a long period of time. Fold your spinnaker to store it if possible.
Good luck on the water!
READ MORE
READ MORE
505 TUNING GUIDE
This tuning guide has been put together by Ethan Bixby from North Sails in North America, who is the designer of our newest 505 sails.
The calibration scheme below does not reuse existing numbering schemes. We have tried to develop a calibration scheme that supports the following:
Standards
Uses reference points common to all builder’s 505s, forward tack and aft tack 505s, etc.Uses zero as the neutral, or basis datum setting.Uses negative numbers for LESS of a control and uses positive numbers for MORE of a control. If that is not clear, the light air settings are on the negative side of the datum and the positive numbers are heavier air settings, finally forward is negative, aft is positive.
Mast Step
Measure from the back of the mast along the top of the CB cap, aft, over transom, to the aft most point of the hull (it may be slightly aft of the transom). Ignore the rudder fittings. The mast should be stepped as close to 10′ 0″ as you can get it and still get the right low bend at max. rake and not hit the partners. Don’t worry if the step extrusion in the boat keeps you about 1/2″ or an inch forward of this point.Note: The aft end of the hull is where the class rule measurements are taken, not the actual face of the transom. This value is more reproducable across different hulls.
Rake
With no jib hoisted, connect a tape measure to the end of the jib halyard. Hoist and cleat the halyard to the point where the “O” on the tape measure starts at the top of the the “gooseneck band” on the mast, with reasonable tension applied. On a boat with an integral wire in the luff of the jib, you can use the topping lift as long as it is very close to the jib halyard/headstay intersection with the mast.
Take the jib halyard (or topping lift) forward and measure from the end of the halyard (at the same tension) to the top of the rail at the bow. This is the top forward part of the boat, regardless of where the headstay is.
Adjust the forestay/jib halyard and shrouds until a measurement of 3 ‘4″ is obtained. The shrouds should not be excessively tight, but snug. Mark that setting on the forestay tackle in the boat, where you can see it. This is the datum rake number, mark it in the boat as “0”. Measuring aft this should be 25’8″.
For future reference record the distance from the eye to the fork pin to some reproduceable point on the boat. On a Waterat I use the bearing point of the jib tack fitting to the headstay fork/eye junction, and on my boat the distance is 5.5″ as an example. Mark that setting as “0”.
All of your rake settings can be simply marked on the luff of the jib adjacent to the fork/eye junction. This is the best repeater and easy to see! Mark one inch increments at additonal inches, i.e. 1,2,3,4,5,6,7.
Note: that the forward rake measurement is much less sensitive to mast bend, shroud tension, hull rocker, and height of transom.
Mast Ram (Bend)
Set rake to 0 (3 ‘4″ forward) or 25’8″ (aft) with mast dead straight and the rig just snug.
Jib Leads (Fore & Aft)
In light or no wind, with the mast rake set to “0” as above, and the ram set to “0” as above, sheet jib in hard. Sight down lead lines on the jib clew. Move jib cars fore or aft until the jib sheet is lined up with the more vertical line. That is the standard power setting. Mark that hole on the jib track as “0”. Number holes with negative numbers forward from there, and positive numbers aft of that hole. The angled aft (slightly closer to the horizontal line) is for heavy air depowering when raked. In practice, you may not need to actually move the jib car for heavy air, as rake changes the lead angle for you. You may need to move the jib lead aft for light air, flat water.
Jib Lead Tension
With the jib still sheeted as above. Mark a spot on the jib sheet that is clear of the cleat and turning blocks. You will be calibrating the jib lead tension based on that mark, so mark the corresponding point on the seat tank as well.
Note: that we use the “normal” trim line on the jib as this allows us to reproduce fore-aft or up-down jib lead measurements across any jib sheeting system, long and short luff jibs, and forward tack and aft tack boats.
Centreboard
Roll the boat over on it’s side. Pull board out and put it in the down position. Set the leading edge of the CB perpendicular to the bottom of boat at the centreboard trunk. Mark the head of the board (perhaps aft end of the head) level with the top of the CB cap. Mark this as “0”. Mark increasing numbers in 1″intervals up the back end of the head. Mark “1,2,3,4,5,6,7,8”. Also mark a position with the board as far down (raked forward) as possible.Also measure from the top of the centreboard to the aft end of the hull on the centreline. With an HA board this number should be roughly (depends on rake and board depth) 122″.
Note: we’re open to suggestions on this. This measurement will result in different effects with different CB planforms. I think what we are really trying to measure is where the centre of area or pressure is fore and aft and below the hull.
Spreaders
Set the spreaders to 16.5″ length (measured from the side of the mast to the shroud), and for 6.5″ poke. For lighter teams, and in very light or very heavy air, increase sweep to 7″. Lighter teams can also shorten spreaders to 16″.
Note: that this measurement is from the shrould to the closest part of the mast, along the spreader. This measurement assumes that your spreaders are 124 inches above deck level (old US specs) AND assumes your shroud chainplates and mast step locations are the same as other boats. If any of spreader bracket height, mast step position and shroud chainplate location are different on your boat, these measurements will not result in the same effects we get.
We have a comprehensive measurement system to relate spreader height, hounds height, spreader details, and triangulation of the chainplates. Please contact us for this as it is a much better tool to obtain the actual deflections and angles.
READ MORE
READ MORE

FARR 30 TUNING GUIDE
Download the Farr 30 Tuning Guide Download the Farr 30 Quick Tune Guide.
READ MORE
READ MORE


SWAN 42 TUNING GUIDE
Download a PDF: Swan 42 Tuning Guide Swan 42 Crossover Chart
READ MORE
READ MORE

J/111 TUNING GUIDE
See also: J/111 European Tuning Guide
NORTH SAILS J/111 QUICK TUNING CHART
Wind Strength
Jib
Asym
Mast Butt
Headstay
Verticals/Uppers
D1s/Lowers
D2s/Intermediates
Sheet Angle/In-haul
Traveller Car
Vang
0-6 Knots
LM
1.5A
-6
-2
Handrail
All Up
Off
6-8 Knots
LM
1.5A
-4
-1
1.5" - 2" inside handrail
18" Up
Off
BASE 9-11 Knots
LM
1.5A
44.3 cm
2.22M Arc 15.3M "pin-pin"
62 Units RT-10 Loos gauge
28 Units RT-10 Loos gauge
27 Units PT-2 Loos gauge
Handrail
4" Up
Off
12-15 Knots
MH
2A
5
1.5
Handrail
Centerline
Off
16-20 Knots
MH
2A
9
3
1/2 way handrail track
Centerline
On Hard
20+ Knots
HWJ
2A
14
5
1/2 way handrail track. "Twisty" sheet load
Centerline
On Hard
24+ Knots
Track, no in-hauler
READ MORE
READ MORE

J/105 TUNING GUIDE
Download the North Sails J/105 Tuning Chart
Part 1: Rigging Preparation
The following recommendations are small changes that should be made to the stock J/105 to allow you to get the most from your North Sails and make the boat easier to sail and set up.
Head swivel shackle
The North Sails jibs come with a webbing loop at the head. It is critical to have a 90-degree “twist” shackle to attach the sail to the swivel. A standard shackle will cause a hard spot at the top of the jib as the sail is torqued.
Remove backstay toggle
Many J/105s come with a toggle that rotates the hydraulic cylinder 90-degrees so that the handle faces forward. While it is nice to have the handle forward, this toggle reduces the throw of the backstay adjuster too much so that you are not able to get enough tension in heavy air. Some of the older boats actually need to have the backstay rod shortened to get enough backstay throw.
Change to 4:1 or 6:1 Cunningham
The standard Cunningham is 2:1 and led aft to a cabin house halyard stopper.This system should be replaced with the lower purchase with integral cleating shackled to the ring on the top of the Quik Vang. This allows for easier and more precise Cunningham control by a forward crewmember. Many boats then rig the asymmetrical tack line through the free stopper.
Mark the tack line at the cleat
Put marks on the tack line at the proper range of settings. As you approach the windward mark you can then pre-set the tack line so that when you extend the pole and set the spinnaker the tack will be set properly. The tack line is much easier to work with in this placement than on the side of the cabin house.
Move mainsheet swivel base forward of the traveler
This allows for easier trim of the gross tune by the main trimmer, especially when tacking.
Tapered Spectra spinnaker sheets
These sheets have a light uncovered portion that attaches to the sail, with a covered portion that goes on the winch. The sheets should be 3/8” Spectra cored line with the cover removed at the sail end of the sheet. These lightweight sheets are used in all conditions and help downwind performance in light air. Heavy sheets pull down on the leech of the spinnaker in light air, closing the leech too much.
Bypass the jib sheet turning block
The standard set-up for the jib sheet is to run the sheet from the clew of the jib, through the lead block, through the turning block near the rail, and then to the winch. This set-up makes the lead block lean over to leeward, increasing sheeting angle. In light and moderate air, the jib will sheet tighter to the centerline if you lead the sheet straight to the winch from the jib lead block. In heavy air, it can be faster to use the turning block to sheet the jib outboard slightly.
Part 2: Rig Set-Up and Preparation
Tools and items required: Loos RT 10M Rod Tension Gauge, 2 crescent wrenches, spray lubricant, bosun’s chair and 50’ metric tape measure.
Part of the success of growth of the J/105 Class is the tight class rules and limited sail inventory. With the J/105s limited sail inventory of only one headsail, aggressive rig tuning is essential for performance throughout the full range of wind conditions. By definition, the North Sails “AP” inventory is optimized for 9 to 12 knots. This is actually the easiest condition to sail in, so the racing tends to be at its tightest. Having really fast sails in this condition is key to gain a slight speed edge and the AP inventory is designed to give you just that. The heavy air “HA” inventory is optimized for 13-20 knots. In the extreme conditions of light and heavy air the rig must be manipulated to enhance the sail shapes for those conditions. The result of proper rig tuning is the correct relationship between mast bend and headstay tension to get fast shapes. The North inventory has been designed to make these transitions easily with the correct tuning to be fast in all conditions.
Step One: Check Mast Butt Position
The measurement from the front of the forward bulkhead to the aft face of the mast should be 24.46cm (9 5/8”). This is very close to the center of the step. For the HA sails, the mast butt should be 26.00cm (10 1/4”) from the bulkhead.
Step Two: Check J Measurement
The J measurement is the distance from the headstay intersection to the deck to the forward face of the mast. This should be a minimum of 4.11m (13’6”). Use mast chocks or SparTite to achieve this position.lean over to leeward, increasing sheeting angle. In light and moderate air, the jib will sheet tighter to the centerline if you lead the sheet straight to the winch from the jib lead block. In heavy air, it can be faster to use the turning block to sheet the jib outboard slightly.
Step Three: Set Mast Rake
Rake is controlled by headstay length. The headstay should be set at the class legal maximum rake, 13.035m (42’ 9.125”). Hoist a crewmember up the mast and have them hold the butt of the tape measure at the center of the pin that secures the forestay to the mast. Measure to the to of the furler drum (measurement A), then measure from the top of the furler drum to the bottom of the furler drum (measurement B), then from the underside of the furler drum to the intersection of the stem and sheer line of the boat (measurement C). The overall headstay measurement is then the sum of A+B+C.
Step Four: Centering the Spar
Put a mark on the rail of the boat on one side even with the chainplates. Measure this distance from the headstay attachment on the bow. Put a corresponding mark on the other side, the same distance from the headstay. At this point the Upper Shrouds (Caps) should be hand tight and the Intermediates (D2s) and the Lowers (D1s) should be loose. Hoist the tape measure to the top on the centerline jib halyard. Measure to the marks on either side and adjust the Caps until they are equal.
Step Five: Tensioning the Shrouds
Tighten the D2s and D1s to hand tight. Add 8 full turns to the Caps. Then tighten the D2s 6 turns. This should be done incrementally (2-3 turns at a time per side) sighting the mast to be sure that the mast is in column. Add turns to one side and remove turns from the other to bring the mast in column. This added tension that you have applied has probably made the D1s slack, so double check to make sure that they are hand tight.
Step Six: Check Shroud Tensions with Loos Gauge
Put marks on the shrouds 2m (6’ 6 3/4”) up from the deck. Put the top post of the gauge on this mark when measuring tension. Be sure to have the backstay released when measuring tension with the Loos Gauge. For the base setting for 10-14 knots TWS the shrouds should read the following:
All Purpose Sails Caps: 35D2s: 10D1s: 0 (10 cm play)
Heavy Air SailsCaps: 55D2s: 25D1s:10 (hand tight)
You should double check to be sure that the mast is still in column at the dock when the rig is at full tension. At the base setting, the mast should sit with virtually no pre-bend up to the hounds.
You are now at the “base” setting and ready to go racing. From here follow the Quick Tuning Guide to optimize your J/105’s performance for various wind conditions.
Advanced Tuning – Beyond the Numbers
The North Sails J/105 Tuning Guide is very refined, and has been used to the letter to win many events. However, understanding the fundamental concepts of how tuning affects the rig and sails is important to be able to check that the settings are right for your boat, as well as customizing your own tuning numbers for your sailing style. Keeping good records is the key. Keep a Wet Notes pad on your boat and record your rig settings, wind speed, sea state, and your speed and pointing relative to other boats. This will help you to see what is working best for you and fine tune your own numbers.
Changes to shroud tension affect the rig in two ways: 1) headstay tension & 2) mast bend. Tighter Cap shrouds generate more headstay tension by pulling back against the headstay. A good guide for Cap (upper) shroud tension is that the leeward Cap shroud should just go slack in all but the heaviest of wind conditions. Tighter D1 (lower) and D2 (intermediate) shrouds generate more headstay tension by reducing mast bend and compression. The important factor of the D1 anD2 adjustment is the relationship to the amount of backstay used in each wind condition, which affects mainsail shape. Tight D1s and D2s will make the mast too straight (main too full and draft forward) when no backstay is used, and conversely loose D1s and D2s will allow the mast to bend too much (main too flat or even inverted) when a lot of backstay is used. The final D1 and D2 rig tension will be dictated by mainsail shape.
The light air performance of the J/105 can be dramatically improved with leeward mast sag in under 12 knots. This is side-to-side sag from the partners to the hounds. This can only be seen under sail and will not happen at the dock. The settings from the Quick Tuning Guide should generate this sag, but all masts are a little different, so you may need to adjust your intermediates and lowers to achieve it. Loosen the intermediates and lowers so that there is 2.5cm (1”) of leeward sag halfway to the hounds in under 9 knots and Zero in 9-12 knots. In general the intermediates will need to be eased twice as many turns as the lowers to achieve even sag.
Part 3: Mainsail Trim
The J/105 relies on much of it’s power from the mainsail with the class inventory. The mainsail is very easily adjusted because there are many shape controls including mainsheet, traveler, backstay, cunningham, vang and outhaul. Proper mainsail trim is achieved by balancing the speed and pointing with its twist, angle of attack and overall power. Proper communication with the helmsman for the feel of the boat and performance vs. the boats around you are the key to establishing the correct balance of those three elements.
Mainsail Angle of Attack — The Traveler
The traveler controls the boom angle to the centerline of the boat, which is described as angle of attack to the wind. Much like the sheet, a narrow angle of attack (traveler high) is used for pointing and powering up the boat and a wide angle of attack (low traveler) is used for acceleration and depowering the boat. Carry the traveler as high as possible without making the boat heel too much.
In light to moderate conditions the boom should be on centerline or slightly above. In very light air, when the main is twisted, setting the boom actually above centerline will put the lower third of the main parallel to the centerline of the boat. A good gauge for this is to look where the bottom batten is pointing. The bottom batten should point at the backstay in very light air. If it is pointing to windward of the backstay, the traveler is too high.
As the breeze builds, the traveler should be played aggressively to control heel and keep the boat on its feet. If the boat heels too much, the boat will get too much helm and the helmsman will have to use much rudder angle to keep the boat going straight. The optimum rudder angle to create the most lift is around 4 degrees. There are times when more angle than that is unavoidable, but 5 degrees of rudder angle should be the most that you try to use. Rudder angle can be monitored by putting a tape mark on the top of the wheel when it is perfectly straight. The main trimmer can notice when the helmsman is using too much helm (or not enough) and adjust the traveler appropriately.
Mainsheet vs. Traveler for Various Sea States
One of the more difficult things to determine is how to depower the main in moderate to heavy conditions. As we have learned, you can depower the main by either twisting the main by easing the sheet or letting the traveler down. The technique used should be determined by sea state, which will affect how the helmsman has to steer the boat. In flat water, the helmsman should be able to use very subtle steering changes. Hours of on-the-water testing has shown us that depowering by lowering the traveler and keeping a tight, untwisted leech produces the best VMG. You can point reasonably high in flat water without slowing down and the tight leech will help with pointing. We have found that twisting the main in flat water in moderate air only makes you lose height. With this style the traveler is played to maintain the proper angle of heel.However in waves and chop, the opposite has proven to be faster. In waves and chop the helmsman has to be more aggressive with the helm. With the wider range of steering keeping the traveler higher (with the car near centerline) with a more twisted main allows the helmsman to steer through wider angles and accelerate as needed in the waves. With this style the mainsheet fine tune is played to maintain the correct trim and angle of heel as the helmsman steers through the waves.
Overall Power – The Backstay
The backstay is the most important sail control for setting the overall power of the sail plan. The backstay is the universal control to modify the shape of the main primarily, but also the jib. The North Class Inventory has been carefully designed so that backstay adjustment changes the shape of the main and jib in unison. As backstay is applied the mast bends, flattening the main. It also pulls aft against the headstay, reducing headstay sag, which flattens the jib. By flattening the sails the boat’s power is reduced as the boat becomes overpowered and heels too much. Flatter sails can be trimmed harder than full sails so when it is windy it is better to set the sails up flatter and sail with less twist. This will allow you to point higher.
As stated in the tuning section of this guide, having the rig set up properly for the wind conditions will allow you to get the most benefit of adjusting the main and jib together with the backstay, but itis also the control that allows you to set up the sails as best you can when the wind changes and you are no longer tuned correctly.
With a loose rig the main will flatten out faster than the jib. This is because the loose D1s and D2s will allow the mast to bend, which will flatten the main. However, since the mast is bending, the main will get to a point where it over bends before you can bottom out the backstay. By not being able to bottom out the backstay, the jib will still be a bit fuller than is ideal at this point since 1) you can’t pull on the full range of backstay and 2) the mast will compress more so the backstay tension will not transfer as well to the headstay.
Conversely, with a tight rig, the main will stay fuller when the backstay is eased, while the overall rig tension will keep the headstay tighter and thus keep the jib a bit flatter. It is important to understand this relationship between how the backstay and rig tuning affects sail shape when you may not be tuned correctly. If your rig is too loose, use more backstay to set the main up flatter, knowing that your jib will be fuller than ideal. If your rig is too tight, use less backstay to set the main up fuller, knowing that your jib will be flatter than ideal. In general, it is better to be set up with a flat main and a full jib so it is better to err on the loose side of the rig tuning matrix if you expect the wind to change. It’s much easier to depower the J/105 than it is to power it up so always tune for the lulls!
As the mast bends it has an immediate effect on the luff and leech tension, so other controls must be adjusted in conjunction with the backstay. When you pull the backstay on, the mainsail will twist more so more sheet will have to pulled on to reset the twist. More backstay will also loosen the luff, so more cunningham will be needed. Don’t forget to ease the sheet and the cunningham after you ease the backstay.
Other Mainsail Controls
Cunninghamhe cunningham controls the luff tension of the mainsail. Luff tension controls the draft position of the mainsail. As backstay tension is applied, the mast compresses and the main appears to fall down a little and the draft will move aft. Pull on the cunningham to move the draft forward to the desired position. As well as moving the draft, luff tension will also make the main somewhat flatter. In light air, you should see slight wrinkles coming from the sail slides. In moderate air the luff should be smooth. In heavy air, the luff should be tensioned past being smooth to set the draft position and flatten the sail.
VangWith the non-overlapping jib, in order for the mainsail to generate enough power in light air, a certain amount of depth has been designed into the lower portion. In over 12 knots begin to pull on the vang to induce low mast bend to flatten the lower third of the main. When it is really windy pull on the vang quite hard to help bend the mast. be sure to ease the vang at the weather mark! Before you ease the main, ease the vang to allow the main to twist as you bear off. If the vang stays on too hard, you may not be able to bear away, or worse you could break the boom.
OuthaulThe outhaul also controls the sail shape in the lower third of the mainsail. Easing the outhall makes the lower third of the mainsail fuller and tightening flattens the lower third. In light air the outhaul should be slightly eased and pull it progressively harder as the wind increases, to the point where you should pull it as hard as you can in over 15 knots.
Part 4: Jib Trim
The J/105 Class Jib has a very tough job. It has to be fast in all wind conditions, where other 35’ offshore one-designs allow three headsails! The single jib inventory presents a tough challenge for sail designers to create a sail that is versatile enough to cover the entire wind range, while being constructed so that it can be light enough to perform well in light air, yet being strong enough to handle heavy air. The 3DL jib is the ultimate solution to handle this daunting task. The latest design has been refined to be responsive to the few controls that can change the shape. The 3DL process is the only way to create a sail that is minimum weight, yet is strong enough for heavy air.
While the North 3DL jib is refined to a level that makes it very easy to enhance the light shape in light air and a heavy shape in heavy air, it is important for the trimmer to be able to manipulate the sail appropriately. The primary controls that we have to affect the sail shape are the halyard, sheet, jib lead placement and headstay tension.
Jib Halyard
The halyard is the most important sail control for shaping the jib and it has a much greater affect on sail shape than the cunningham on the main. However, just like the cunningham on the mainsail, the halyard controls the entry angle, draft position, and overall depth in the sail. A tighter halyard will produce a more draft forward, rounded entry shape, with less overall depth. A loose halyard will produce a more draft aft, finer entry shape with more overall depth. As a general rule, the halyard should be tensioned to just barely remove the wrinkles in the luff. In lighter air wrinkles can just be visible, in moderate air the luff should be smooth, and in heavy air the halyard should be pulled 2.54-7.62cm (1-3”) past removing the wrinkles.
In flat water, a looser halyard can improve pointing with a finer entry angle. In waves and chop, a tighter halyard will produce a more rounded entry and more open leech, which will have a wider steering groove and be better for acceleration. If you try the loose halyard and your helmsman seems to be struggling to find the groove, try a slightly tighter halyard.
As sails age, the entry tends to get finer and the draft starts to move aft. An older sail will require more halyard tension to achieve the same shape as a brand new sail with a looser halyard.
Jib Sheet
The sheet is the most important control for adjusting the jib once the draft is set. The general rule is to trim the jib as hard as possible without slowing the boat down too much. The jib needs to be played in conjunction with the main and the helmsman’s steering. The sheet tension will change with each change in the wind speed. When a puff hits, the leech will become more open. Be careful not to trim the jib too soon. Allow the leech to stay open to take advantage of the puff to accelerate the boat and them trim in once you have accelerated to increase pointing.
The Class mainsails are fitted with a spreader window so that you can see the jib leech on the lower spreader. Put tape marks on the spreader at 7.62cm (3”), 15.24cm (6”) and 22.860cm (9”) in from the spreader tip. In general you should trim the jib so that it is at the spreader tip in very light air, 7.62cm (3”) inside the tip in light air, 15.24cm (6”) to 22.860cm (9”) inside the tip in moderate air, then back out to 7.62cm (3”) in heavy air. These guidelines are subject to change based on sea state. The jib can be sheeted harder in flat water than in waves and chop. Be careful to only make small sheet adjustments. Due to the high aspect nature of the jib, small changes make abig difference.
Jib Lead
The jib lead should be used to control the top and bottom shape of the jib. The middle of the jib is not as affected by lead position as much as it is with sheet. Once the sail is trimmed to the appropriate spot on the lower spreader, adjust the lead to make the top and bottom look right. Moving the lead forward will make the upper leech more closed and the foot rounder. Moving the lead aft will make the upper leech more open and the foot flatter.
The median jib lead position is slightly aft of the middle of the jib track, which is about 9” aft of the chainplate. This position is also just forward of the window on the side of the cabin house.
Headstay Tension
Headstay tension has the most dramatic affect on the overall camber of the jib. Headstay tension affects headstay sag. This is a difficult thing to visualize, but it works much the same as mast bend affects mainsail shape. As the headstay sags, it pushes the luff towards the leech, which increases camber. Conversely as the headstay gets tight, it pulls the luff away from the leech, decreasing camber.
Clearly this is very important, but has been listed last here because it is very dependent upon rig tuning. Headstay tension is achieved by a combination of a tighter rig and a tight backstay. As we have learned in the rig tuning and main trim sections, rig tuning and backstay tension has a great affect on mainsail camber as well. The Class main and jib designs and the tuning guide shroud tensions have been carefully developed to have the backstay control main and jib camber in unison. If you are tuned properly, when the main sets up correctly, the headstay tension will be correct as well. Your headstay tension should be almost self-tending.
During a race, the only way to adjust your headstay tension is with the backstay. Because of this it is important to know how you are tuned and whether you are actually sailing in the right wind speed for your tuning. The backstay will be the key to get the most of the set up that you have when you are not tuned perfectly. Simply, if there is less wind than you are tuned for, use less backstay tension to power up the sails as best you can. If there is more wind than you are tuned for, use more backstay tension.
A good technique is to tape a batten with marks every 2.54cm (1”) on it to the backstay cylinder. This will help you to be able to record your settings and duplicate them later.
Part 5: Crew Weight Placement
With the new “float line” rule, this discussion has become much easier now that we know that all boats should float the same. The goals of weight placement are to 1) control helm and 2) reduce wetted surface in light air.
Light Air
In light air the crew should be well forward and to leeward both upwind and down. Two crewmembers should be forward of the shrouds to leeward. Remaining crew should be up near the shrouds. There should only be one person in the cockpit other than the helmsman. In really light air the main is not trimmed that often and the helmsman can make small adjustments. Being to leeward helps heel the boat increasing helm giving a better feel and allows for the best pointing and rudder lift. Being forward allows the bow to dig in which also helps pointing as well as reduces wetted surface by getting the transom out of the water.
Moderate Air
In moderate air the crew can begin to slide back as they begin to move to weather. Once anyone goes to weather they should be stacked just behind the shrouds. At this point if you have a dedicated main trimmer, he can slide back to his station upwind. Downwind as soon as there is constant adequate pressure on the sheet and you begin to try to sail low the crew should move to weather to help rotate the spinnaker to windward out from behind the main. This happens at about 10 knots. There is plenty more coming on downwind sailing in Part 6, starting on page 21.
Heavy Air
In heavy air the crew should continue to move aft, especially in waves. If you notice that your helmsman has to steer a lot to keep the boat going straight (dialing for dollars), move aft and as the bow lifts the boat will track straighter. Since crew weight is limited the guys who are on the rail need to hike hard. Remember, sailing is a sport and it’s a boat not a couch!
Part 6: Downwind Sailing
Sailing the J/105 downwind can be one of the more difficult things to do well. Paying small attention to the minor details can make a huge difference. The key to fast sailing downwind is good communication between the trimmer and the helmsman. The trimmer should constantly be telling the helmsman how much pressure he has in the sheet. This will allow the helmsman to know if he can bear off a little more, but more importantly when he needs to head up a little bit to build pressure.
The J/105 has an asymmetric spinnaker set on a centerline sprit. The goal in downwind sailing is to maximize downwind VMG. This is achieved by sailing a wind angle tight enough to keep speed, but sailing lower towards the mark whenever possible. The North Sails asymmetric has been designed as a running spinnaker for optimum downwind performance at the apparent wind angles that produce the best VMG for the J/105. The sail has been designed to rotate out to windward to project the maximum sail area out from behind the mainsail. Always hoist the sail all the way to the top. Due to the luff length restriction in the rules, the tack of the sail is never set all the way down to the pole. Raising the tack helps the sail to rotate to windward.
Light Air Sailing (0-9 knots TWS)
In light air, you must sail tighter angles for best VMG. The tack is set 0.3m-0.6m (1-2’) off the sprit. The crew should be forward and to leeward. Keep the crew weight as low as possible. Steer down in the puffs until the pressure sheet starts to get light and then head up slightly. Communication between the trimmer and the helmsman is key. Try to find the lowest angle you can sail before the speed drops. Don’t forget about the main! Proper mainsail trim is essential to good speed. The vang should be set so that the top batten is open by 5 degrees. A good trick to help acceleration out of the jibes is for the main trimmer to hold the sail in a bit after coming out of the jibe. When the asymmetric is jibed, it needs to
be overtrimmed to make it “pop” through. When the spinnaker is overtrimmed, it blows air back into the mainsail relieving pressure from it. By keeping the main in, it will keep the main pressurized as well as opening the slot between it and the spinnaker to get the air flowing over it faster. The main trimmer can easily feel if the main is pressurized by the pull on the sheet. Ease the main out slowly as the pressure on the sheet builds as the spinnaker is eased.
Moderate Air Sailing (9-12 knots TWS)
In moderate air, there is a wide range where you can sail. Lower is best as long as you can maintain your speed. The tack line is eased 0.6-0.9 (2-3’) off the sprit. The same principles apply to steering as in light air. Once the boat feels well pressured, the crew should move to the windward side to help rotate the spinnaker. In this range the crew should be very active moving to weather when you head down in the puffs and back to leeward when you head up in the lulls.
Heavy Air Sailing (12+ knots TWS)
In over 12 knots, the boat is well pressured up going downwind. At this point you want to sail as low as possible most of the time. There will almost always be good pressure on the sheet but when you sail too low, the sail will become blanketed behind the main and collapse. The sheet is well eased to get as much of the sail out from behind the main as possible. The crew should be to windward at all times. Heel the boat to windward by as much as 10 degrees. The vang should be set so the top batten is parallel to the boom.
DOWNWIND NOTESGood coordination between the trimmer and helmsman will result in very subtle changes in the sheet. A properly coordinated team will only adjust the sheet by a couple of feet. If you find yourself constantly trimming and easing more than 3 feet of sheet than your coordination should be improved. Be careful not to try to sail too low and collapse the spinnaker. A collapse will result in around a three-boat length loss!
Rev 0218
READ MORE
READ MORE

J/88 TUNING GUIDE
Below are Vince Brun’s suggestions for boat set-up and pre-race routine, based on his experience sailing the J/88 North American Championship. You can also download PDFs of the following:
US Tuning Guide
US Quick Tuning Guide
EU Tuning Guide
EU Quick Tuning Guide
BOAT PREPARATION
Bottom
Needless to say the bottom of the boat being clean and properly maintained is a key part of any fast boat or program. Going fast starts there and I can assure you that not one boat ever won a big event with a poorly maintained bottom. Don’t matter how well the crew perform, the rig is set, the sails trimmed, or the helmsman skills, a clean and smooth bottom, will have a huge impact on the overall boat performance. For this reason, I always make sure that my boat bottom is as good as I can possibly get it, this will give me confidence which helps me focus exclusively on the mast and sail setup.
SAILS, RIG SETUP & PERFORMANCE
Rig Setup
I found that the current North Sails J/88 tuning guide was extremely accurate on the gauge numbers.
Light Medium versus Heavy Jib
At the regatta Velocity performed better with the Light/Medium jib up to 18 knots TWS, and this was made clear when we had the heavy jib in winds between 14 to 18 knots. The J/88 likes to be slightly overpowered and the small jib didn’t help in that range. This was noticed not only in the lack of acceleration after a wave, but also in the poor pointing ability. I would tend to use the Light Medium, even if the breeze is hitting 19 knots in the puffs, when the wind drops, the J-88 gets underpowered quickly when using the heavier jib.
Backstay
The backstay is a key control on the J/88 in all conditions, not only helping with the flattening of the mainsail but also critical on controlling the forestay tension, and therefore forestay sag. Find a good way to calibrate your “fast settings” with good backstay marks, so that they can be duplicated again, and again.
Inhaulers and Jib Lead Position
For anyone trimming the jib, the inhauler and jib lead position are key controls in achieving a well set jib. If these controls are set in the wrong position, the trimmer won’t be able to have the jib properly trimmed. During a race you don’t normally have the luxury to stay on the leeward side to get the sail set up just right, so having these settings established well before the race is extremely important.
In my opinion, the key to success on any boat, is the confidence to be able to repeat “fast settings” that were learned in previous races or training and only work on fine tune changes from there. These numbers should be constantly added into your boat’s tuning matrix, so that these adjustments can be made automatically, which will help free everyone’s minds to better focus on what is happening on the race course and strategy.
Running rigging with proper length and good marks
As emphasized above, I’m a firm believer that good marks on the control lines, are a tremendous help to crews allowing them to perform their tasks faster and with more precision.
Example: If the spinnaker halyard is marked when the sail is fully up, the mast person will know precisely when that job is done and be able to move to his next task quicker, and without hesitation.
Mainsheet
I would suggest having the mainsheet fine tune separated from the mainsheet gross, to avoid the lines tangling at the leeward rounding or during pre-start maneuvers.
Spinnaker sheet turning block position
It might be a good idea to have the turning block for the spinnaker sheet moved forward, so that the spinnaker and jib sheets don’t cross. This allows the spinnaker sheet to stay ahead of the jib winch and in line with the spinnaker top deck winch.
Folding Propeller
As we learned on the first race on Sunday, it’s extremely important to have the propeller properly closed before the start to avoid the extra drag. The boat should be traveling at full speed before turning the engine off and putting it in reverse, this will ensure that the prop is properly set.
PRE-RACE ROUTINE
Pre-Race Warmup
I have seen many different approaches to this, but ultimately everyone has the same items crossed, before the start. Below is the pre-race routine I try to execute before every race day. It’s very simple:
Get to the starting area and start sailing on starboard (hopefully against another boat) for a good period of time to record the wind oscillation range, and have the lifts and headers numbers well defined.
During this time, I also fine tune my controls so that I’m comfortable with the boat speed (this being the reason for another boat being around). If there are speed issues, I make changes and continue testing.
After this is done, I hoist the spinnaker to make sure all the lines are led correctly and practice a few jibes to get the crew polished and ready for the day.
At the starting area, I normally check in and inspect the starting line, by going head to wind near the committee boat. Checking the wind direction and comparing it with the line setup.
Now with all the data needed, the crew can discuss and prepare the starting and first leg strategy.
Starting around other boats
Obviously it’s hard to predict what others will do when approaching the starting line with a minute (or less) to the start. Possibly more important than how close you are to the line, is what “upwind lane” you will have 30 to 60 seconds after the start. A boat close to leeward with their bow slightly forward, will be a serious issue immediately after the gun. There are a couple of ways to escape this situation but the key is to identify the problem earlier rather than later, particularly when there are boats closer to windward.
If someone is close to leeward with a minute or more to go, you have two possible options:
Two tacks – which involve doing two quick tacks and opening the gap to the leeward boat and closing on the windward boat. This normally requires a nice gap to windward and great crew work to make this maneuver possible. This technique will require a well trained crew that understands the boat and can execute the tacks with relatively minimum loss of speed.
The other more common option is to “push” the leeward boat by bearing off and taking their stern, establishing a hook to leeward. In most cases this attempt will force the leeward boat to do the same, but if they are late responding, which is not uncommon, you will be in a controlling position since you will have more speed and be able to hook. If you are unable to execute the hook, because the leeward boat has mimicked your move, you will be forced to go with plan A and do a double tack to protect your hole and future lane.
Again, identifying the situation early will give you more options to avoid a bad starting position.
READ MORE
READ MORE

J/109 TUNING GUIDE
Base Settings
Rake – Swing Arc – Use jib halyard pulled down to top of black band on mast – swing fwd to mark headstay.
Rake – Distance from mark on headstay to deck at stem: 2230 mm
Cap Shroud Tension: #60 on RT-10 Loos Gauge
D1 Tension: #40 on RT-10 Loos Gauge
D2 Tension: #25 on RT-10 Loos Gauge
J Dimension: Measured from stem to Fwd face of mast: 4050mm
Mast Base: Measured from Fwd face of mast to bulkhead: 460 mm
Pre-Bend: without mainsail hoisted: 20mm
Sail Models
Jibs
0-14 TWS: LM-2 Light-Medium Jib
12-25 TWS: MH-2 Medium-Heavy Jib
Spinnakers
0-20 TWS: A2-4 AP Spinnaker
18-25 TWS: 4A Heavy Spinnaker
Quick Adjustments
Turns from Base Settings
TRUE WIND SPEED
SAIL SELECTION
CAP SHROUDS
D1s
D2s
Very Light (0-8 TWS)
LM-2
-5 turns
-2 turns
-2 turns
Light (9-12 TWS)
LM-2
-2 turns
-1 turn
-1 turn
BASE – Medium (12-16 TWS)
LM-2 or MH-2
Loos 60
Loos 40
Loos 25
Heavy (17+ TWS)
MH-2
+5 turns
+2 turns
+1.5 turns
READ MORE
READ MORE
FARR 280 TUNING GUIDE
The Farr 280 is a relatively light boat which makes it very receptive to positive trimming. It is imperative to have thesail trim spot on but also the fore and aft weight trim correct and whichever team does this the best will be rewarded with the best boat speed. Up to 7 kts the Farr 280 is always looking for more power so keep the sails powered up, focus on building speed efficiently out of transitions (tacks, jibes, ducks and mark roundings) and don’t over trim or you can easily kill the speed.
Tools Needed
Take your rig tune seriously. Keep whoever adjusts the rig the same from the beginning to the end and you will be far more accurate all season long. It is one item on our list we can get right before we leave the dock.
Equipment Requirements
• Loos Gauge PT-2 (headstay, V1 and D1 shrouds)• Loos Gauge PT-1 (D2 shrouds)• 30 m (100’) tape measure (forestay pin-to-pin)• 5 m (16’) steel tape measure (mast heel)• Rig spanners (adjustments)• Setting Up the Mast
Step 1
Set the mast plate in the correct location.Before the mast is stepped, place the aftface of the mast step 455 mm (17.91”)forward of the forward keel bolt centerline. Measure from the white line to theforward keel bolt (Fig. 1).
Step 2
Step the mast and attach the headstaystrop to the lower headstay fitting
Step 3
Attach the cap shrouds only just past hand tight.
Step 4
Measure down from the uppermeasurement point (Fig. 3) and make amark on the headstay 11.92 m (39.11’) fromthe top point.
Step 5
Pump up the mast on the hydraulic jackso that it just lifts off the collar. Then pump the headstay down (shorter) so that your headstay mark of 11.92m (39.11’) becomes just even with the plate in the headstay well.
Step 6
Measure back from the headstay to the same location on both sides of the boat even with the partners. Make a mark on the partners halfway between these 2 points. This locates the centerline of the mast on the boat’s centerline.Using the supplied chocks center the mast on the centerline of the shrouds. This may entail sanding the supplied plates to fit the partner hole. Once centered, screw the plates to the chocks through the sidewall of the partners so that none of these fall out while sailing. Eventually the mast should be held in place with “Spartite.”
Step 7
Using the centerline halyard measure down to the mark from Step 6 on both sides of the boat aft of the headstay.Adjust the cap shrouds so that this number is the same on both sides. Now your “hounds” are centered.NOTE: It is extremely important that there is no “load” on the shrouds when you adjust the nuts (Fig. 6). If there is toomuch load you may either strip or cross thread the rod. To adjust the nuts you must “drop” the mast, adjust, then pump back up.
Step 8
Use an ARC measurement to get the correct 1.5° rake at the correctmast butt height. Take the centerline halyard, measure 1.00 m (39.37”) down from the boom band, swing the halyard to the headstay and mark headstay. Pump up the mast until this headstay mark is 684 mm (26.93”) above deck. Place a straight edge over the headstay well to get this measurement.Note: how high the bottom of the mast is relative to the mast plate. See Step 9.
Step 9
Obtaining the correct cap (vertical) shroud tension. With the mast pumped up so that the headstay ARC measures 684mm (26.93”), note the mast butt height. In the case here it is 78 mm (3.07”). With the headstay at 1.5° rake and the mastraised 78 mm (3.07”) (Fig. 8). You want the jack pressure to read 1925 psi or 133 bar on the cockpit dial with just the headstay and cap shrouds attached. You will need to raise and lower the rig a few times to make the necessary adjustments to the cap shrouds.
Step 10
Repeat Step 9 when attaching the D1s with the caps (verticals) and headstay. Use the PT-2 Loos Gauge to get 28 units on the gauge for the D1s.
Step 11
Repeat the Step 10 while attaching the D2s, D1s, caps and headstay. Use the PT-1 Loos Gauge to get 26 units for the D2s.
Step 12
With all standing rigging attached, check the finished tune with the Loos Gauges.You should have the Loos Gauge units listed below for the BASE settings. The mast butt height will be relative to your boat. Hull #1 was 78 mm (3.07”).
We set BASE settings for this boat at maximum load. From this point the tuning relates to lowering the mast buttheight combined with lengthening the headstay to soften the rig loads as the wind speeds diminish.
BASE Settings for 18+ kts TWSRake 1.5 °Mast Butt 78 mmHeadstay 39 PT-2 Loos GaugeCaps 43 PT-2 Loos GaugeD1s 28 PT-2 Loos Gauge
No diagonal or vertical shroud adjustments should be required with this rig. Primary adjustment is with the headstay and mast butt ram. Headstay and mast jack pressures can be referenced using the hydraulic pressure gauges on the control panel.
1° of rake change = 53 mm (2.09”) change to the headstay length. With the mastset at 1.5°, use a batten set down into the bottom of the headstay well to mark the batten at the centerline of the headstay pin shown in the photo below. Tighten and ease the headstay in 26 mm (1.02”) increments and mark the batten from 1.25° to 3°of rake. Use this batten for a quick reference when tuning.
Use the centerline of the headstay pin to measure rake while sailing the boat. The red line shows the centerline of the pin. D2s 26 PT-2 Loos Gauge For lighter winds we recommend a combination of dropping the mast down and lengthening the headstay. This promotes sailing with a softer rig laterally while sailing with more rake.
Three marks that help when sailing
1. On the under side of the spreaders make a mark to reference the headsail leech when sailing:
Lower Spreader: 635 mm (25.00”) from mast centerline
Upper Spreader: 476 mm (18.74”) from mast centerline
2. Mark the headstay to be visible from the cockpit/rail. The red marks below note 1.5° (upper) and 3° (lower) of rake when parallel to the deck height.
3. Mark the maximum down position on the aft face of the mast (shown below with white electrical tape. But this should be marked in a more permanent manner.
READ MORE
READ MORE

STARLING TUNING GUIDE
The object of the Starling class is for all sails and masts to be identical.
We pride ourselves on our ability to reproduce sails identically, so please feel free to contact us if you feel your sail isn’t the same as other sails. This is important as it allows us to improve our methods, and ensures all sails out on the water are the same. If for any reason your sail is outside the tolerances, then we will replace it.
The luff of the sail is 4040mm long.If you are fitting a fixed height gooseneck, then allow 4025mm from the top of the boom to the top of the sail.
The foot is 2115mm long.Allow for the outhaul to pull the sail out to a maximum 2125mm from the aft face of the mast.
The leech is 4370mm.
Sail Care
Always roll your sail and keep it in its bag when not in use. Ideally remove thebattens after use. If you don’t want to do this, then release the battens from the pocket elastic and roll the sail parallel to the pockets. If you are rolling onto a tube, tie the clew first and roll the sail a couple of turns before attaching the tack. This will allow you to roll the sail parallel to the batten pockets on the tube. Wash the salt from the sail every 3-6 weeks depending on how often it gets wet. Do this on a light day by hosing the sail while rigged, and leaving to dry.Setting up:The tack should be set on one of the holes on a standard gooseneck fitting (about 25mm from the mast) for. Choose the hole which makes the tack area of the sail setup smooth.There are no rules requiring black bands. To take maximum advantage of this, make sure your sail is as high as possible up the mast. Check that your mast is the maximum length allowed under the rules (4480 from base to tip.) If you have a fixed gooseneck, then you will want the sail to be at the top in heavy airs. You will need 2-3 talurits on the halyard strop so you can adjust the luff tension to make it looser for lighter winds.
Make sure that the boom is long enough so you can get maximum tension on the outhaul when the wind increases. Check that the sail doesn’t extend beyond the end of the track on the boom or it will damage the sail.
Battens
Your sail comes with a standard set of battens specially designed for the Starling.Smaller skippers will find a benefit from changing to a heavier #2 batten as the wind increases.
The basic shape of the sail features a very straight (or flat ) exit, so there shouldn’t be any need to change the lower battens from one condition to the next.
Remember – the stiff end of the batten is the back. Bendy end forward!!!
Outhaul
We suggest 4:1 purchase inside the boom, so you can make small repeatable adjustments. Make sure you have a system of marks so you can repeat your fast settings from upwind to downwind- or when the breeze changes. Use a shock cord system inside or outside the boom to help the system release.
Don’t ease the foot too much. If you are getting vertical wrinkles off the boom, then you have gone too far.
The Starling sail has the ability to be set up full, but then to flatten really well as the wind increases. Experiment with various settings so you know what is fast for your weight in each condition.
Rake
Following is a formula for working out the correct mast rake for your hull.Because there is a variation in the hulls, there is no correct rake to suit all boats. There is a correct rake for your individual boat and you should have a record of this and of the rakes you try. Another way to find a starting rake is to level your hull alongside a top boat. Then sightthe masts and set your mast up to the same angle. Measure this from a mark permanently etched on your mast to a mark on the stern. This is your rake.
The following system will give you a good all round rake. You should feel free to use this as a starting point and experiment slightly forward and aft of this point.
Measure up 3050mm from the deck and mark the back of the mast – this is the new rake measuring point.Measure from the 3050mm position to the intersection of the deck and transomA good starting mast rake is 3640mm.From this position, individual skippers will need to adjust the mast rake to suit their body weight and sailing style. If more speed is needed downwind, rake the mast forward, and if more pointing ability is required, rake the mast further aft
Sail Shape
It is a good idea to glance up at your sail occasionally especially when you are going fast- (or really slow) to see what your rig looks like and therefore be able to eventually memorise these shapes and settings.Look carefully at the top batten. Try and guage how open the top batten is and use this as a reference to compare withprevious settings. This tells you how much mainsheet and vang you should be using.
Rig Tension:Tight v’s loose. I prefer a firm rig. The tension should be so that by pulling forward on the mast you can just do up a shackle on the forestay. Any tighterthan this is unnecessary. My reasoning is purely practical.
There are pro’s and con’s for the 2 extremes. If you have a loose rig, it will give you more optimal fore and aft rake upwind and downwind, whereas a tight rig can’t move. However a loose rig also means it falls away sideways which isn’t desirable. I think that this is why the 2 styles ultimately perform equally. Of course what the top skipper is using will always appear fastest!!- but look carefully at what else he/she is doing.
My practical reasoning is simple. A loose rig is more susceptible to wear and therefore failure. The movement also makes it more prone to shackles etc working their way loose.
If you are a methodical type of person and check your gear often, then by all means go for a loose rig if you believe it to be the way to go.
If you have a rotating rig, you may need to have it a little looser to help it rotate more easily. Try a 1-2mm thick teflon washer under the mast.
Masts
All masts must be from the same F4 section from Fosters. There is a 150mm range between the maximum and minimum heights for the stays. We suggest having the forestay close to min (2800) and the sidestays close to max (2950).If you have a rotating mast, then we recommend an inner forestay at 900mm. This should be set very loose so that when the boom is right out there is still about 20mm slack in the stay.
Due to the nature of the mast construction, there will be variations in the stiffness of the masts. Beware of this as it can be the reason for consistently poor performance in certain conditions. Avoid masts which are too stiff.If you are over 60kg you will start needing a stiffener in you mast. If you are careful you can wait until you are over 65kg- however you run the risk of breaking rigs downwind.
Vang
Your vang is there to control leech tension once you run out of width on your traveller. If the breeze is light and you aren’t having to ease the main in gusts, then you don’t need any vang. In these conditions you should have it just eased, so that it isn’t taking any load.However, you don’t really want it too loose or else it will take too long to pull on should the breeze increase.
In the lighter breezes you are quite often sheeting quite loosely, so make sure there is no tension on the vang.
As soon as you find yourself easing the main in the gusts, you should have vang on. This should mean that as you ease the main in the gust, the boom moves outwards only- not upwards.
Remember vang bends the mast and flattens the sail a lot, so if you are hunting for power, make sure you don’t have too much vang on.
Be sure your rig and fittings are strong enough, so that you aren’t afraid to use a lot of vang when the wind increases.
Reaching is similar in trim to upwind. In the light you will have to be careful not to close the leech too much, however as the breeze increases, you will need to slowly increase the amount of vang to keep the leech under control and keep powered up. Again too much vang will bend the mast too much and lose power.
Downwind you will need less tension than you have had upwind or on the reach.Ease vang as you go around the mark.
If you can imagine looking up from the boom, the ‘twist’ or amount the leech opens, should be nearly the same on all points of sail, in all conditions.For this reason it is a good idea to get used to looking up at how open the top batten is and try to adjust the vang to keep it looking the same as the wind changes.
Cunningham
Cunningham does two things. It moves the shape forward in the sail, and then as you use more, it bends the the mast and opens the leech in the head.
Cunningham is the last control you should be using to depower. You will already have a good amount of vang and full outhaul before you use the cunningham. The more you get overpowered, the harder you pull on the cunningham.
Centreboard
Your centreboard is another very important control to how the boat sails. The rake and positioning of the centreboard changes the balance of theboat and makes it easier or harder to sail. Basically the further forward and further down the board is, the more poweryou will have. You may even try raking it forward a little in the light. As the breeze increases you will begin getting overpowered and the helm will start getting a little heavier. A heavy helmis slow, as you are holding the rudder against the water flow and creating drag just like a big brake. Therefore as it starts getting heavier, it is time to start moving the board. Firstly do this by raking the board. Leave the top at the front of the case, and let the bottom move as far aft as possible. You will probably find it faster if you begin doing this a little earlier in choppy conditions.
If you are still overpowered, you can now start lifting the board. Don’t be afraid to sail around with up to 150mm of board up if it is windy.
This will allow the boat to sail flatter, especially through the gusts, and to move faster through the water. Be aware to begin putting it down again if it lightens, or else you will find yourself not pointing.
Rudder
The rudder is very important. You sail the boat by feel. The position and rake of the rudder will effect this feel. As arough rule the rudder should be set up so the leading edge is square to the water.However it is even better to fine tune it from here by trying it a little back orforward from this position. Changing the tip postion by 10mm increments is about right. Once you are happy, then fix it in place with some sort of system which won’t allow it to move around.
The rudder ‘feel’ should be light in all conditions.
Make sure there is no slop in the rudder system. There is potential for wear especially in the gudgeons. If this is the case then replace them with a good positive system.
Calibration
Even the best skippers need calibration marks. These enable you to keep the best speed from week to week, and to keep learning how small changes effect your performances.
Highest priority is the Outhaul, the cunningham and the vang. I would also recommend some marks on themainsheet. Marks on ropes can be done with markers, or better still, by sewing contrasting thread into the lines.
Good luck, and please feel free to make comments and contributions to this guide.
READ MORE
READ MORE

DRAGON TUNING GUIDE
The purpose of this tuning guide is to give our clients in the Dragon class some guidelines on how to get the most out of their North sails. The tuning-guide was compiled by Jørgen Schönherr, Poul Richard Høj Jensen and Theis Palm.
Always experiment and try finding your own trim using these guidelines. The weight of the crew, the balance of the boat and the stiffness of the mast, together with specific local wind and sea conditions all have influence on the fastest and final trim.
MAST TRIM
Before stepping the mast in the boat, some very important measurements have to be checked to follow this tuning guide correctly:
1. Lead the upper shrouds and forestay along the mast, the uppers have to be outside of the spreader tips. Pull them as hard as you can and put a mark on all three wires at the top at the black band on the mast (it is 80 cm above deck level). These three marks are now used to check if the mast is straight from side to side in the boat, and to check the mast rake.
2. All measurements for the mast position is made from station 4, (you find station 4 between the forestay and the mast) which is marked on both port and starboard side of the hull with a dot. Draw a line in between the points. From the middle of this line to the front end of the mast (without spinnaker pole track) See the distance in the ‘on the water’ tuning guide below.
3. The mast rake is set by first fixing the forestay on the deck 1,86 cm from the front side of the mast. (This is the max. distance allowed in the class – rules). Then measure the distance from the black mark on the forestay to the deck (along the forestay). See the distance in the on teh water tuning guide below.
4. The upper shrouds proper position is located by measuring perpendicularly from the line on station 4 to where the shroud enters the deck. See the distance in the on the water tuning guide below. For light crews (220-240 kg) we recommend to leave the shrouds one hole forward.
5. The lower shrouds are placed in the hole just behind the top shrouds (approx. 3 cm), so that they don’t hold the mast back when going downwind.
6. The marks on the top shrouds (from step 1) are now used to control if the mast is placed in the middle of the boat. This is done best by measuring the distance from the mark to the deck. This should be the same on both sides. It is very important, that the mast is straight from side to side and not being distorted at deck level.
7. Setting up forestay tension, put the mast in strong wind position (tension 20 on the uppers and 8 on lowers). Next, put the tension gauge on the forestay around the black mark. Pull runners until the gauge reads 30. Make tape on runner exit above deck. Do the same on the other side. Now both runners have the same tension on the mark set-up. When you ease the runners until the forestay is just tight, the tape mark will be 15 cm above the deck as the uppers are both the same length.
8. The jumpers are adjusted by pulling the permanent backstay. Look up along the sail track and check that the jumpers are equally tight on both sides. If this is not the case, they should be adjusted till the mast is completely straight.
9. For all rig tension measurements we have used a Loose Gauge PT-2M. To get a more precise reading, cut the plastic of the upper shroud about 1.2 m above deck. You find all setting in the chart below.
10. The lower shrouds are tensioned, so that the mast is completely straight in the boat up to 20-22 knots. From here on, tighten them till the mast drops 5-10 cm off to leeward where the forestay meets the mast – the exact measurement is dependent on crew weight.
ON THE WATER TUNING GUIDE
Wind
Light – 0-5 knots
Medium – 6-16 knots
Heavy – 17+ knots
Comments
SailInventory
Mainsail A-7+ for Std. Petti & BBMainsail LM-2 for stiff Petti mastGenoa MG-15 / MJ-8Spinnaker CD-5 or R-5
Mainsail A-7+ for Std. Petti & BBMainsail LM-2 for stiff Petti mastGenoa MG-15 / MJ-8Spinnaker CD-5 or R-5
Mainsail A-7+ for Std. Petti & BBMainsail A-10 for stiff Petti mastGenoa HG-15 / MJ-8HSpinnaker CD-5 or R-5
The sea conditions and waves can change the wind range in the sail inventory
Mast Rake
123,5 cm (Petticrow)120,0 cm (BB)
122,5 cm (Petticrow)120,0 cm (BB)
122,5 cm (Petticrow)120,0 cm (BB)
Measure 80cm up from deck, transfer mark at mast to the forestay. Measure along the forestay to deck level
Mast Ram
Mast 1,5 cm forward at deck level
Mast neutral
Mast 2,5 cm forward at deck level
If you struggle with pointing, pull the mast back
Mast Position
83,0 cm (Petticrow)81,5 cm (BB)
83,0 cm (Petticrow)81,5 cm (BB)
83,0 cm (Petticrow)81,5 cm (BB)
Mast position at deck level is taken from station 4
Jumpers (adjustable)Jumpers (fixed)
Loose
Loos gauge tension 6
Mast straight
Loos gauge tension 6
Mast straight
Loos gauge tension 6
Make sure the mast is straight from side to side
Upper Shrouds
Loose gauge tension 14 for Std.Petti & BB and 12 for stiff Petti mastminus 1 turn
Loose gauge tension 14 for Std.Petti & BB and 12 for stiff Petti mastplus 1-2 turns
Loose gauge tension 14 for Std.Petti & BB and 12 for stiff Petti mastplus 3 turns
Tension is taken without plastic. Shroud position from station 4. is 83 cm all time, for light crew 80 cm
LowerShrouds
Let the mast bend 1 cm toleeward at spreader level
Mast straight
Mast straight plus 1-1½ turn so themast bends to windward
When you set the mast straight, look up at the sailgroove
Backstay
Little tension in the very light
Just tight to prevent the mast top from moving in waves
Just tight to prevent the mast top from moving in waves
Little tension in the very light to pre-bend the mast
Runners
Slack to 15 -16 cm above deckMark # 4
From 15 – 5 cm above deckMark # 3 – # 2
From 5 – 0 cm this is maximumMark # 1
Mark # 1 (tape) runners at through deck level such thatthe forestay reads 30 on the Loos gauge.This is the maximum runner setting
Mainsail
Light sheeting; upper teltalesflying straight back
Sheet until the top batten isparallel with the boom; uppertelltales 20% on leeward side
Sheet until the main is flying nicely, the top batten is 2 degrees twisted to leeward, telltales are flying straight back
If you struggle with pointing, you must pull the sheetharder, but check the mast ram first
MainTraveller
To windward; boom on middle
To windward; boom on middle
On the middle and up to 10 cm to leeward
The boat has to be light on the helm
Outhaul
2,0cm from black band
1cm from black band
All the way out to black band
The sail has to be flat along the boom in heavy wind
Cunningham
Loose
Loose – just remove wrinklesalong luff
Just remove wrinkles along the luff
In very heavy winds, you can pull hard to move draft forward
Boomvang
LooseMake sure it is cleated for the run
LooseMake sure it is cleated for the run
LooseMake sure it is cleated for the run
On the reach and run pull so the top batten is parallel to the boom
Genoa Sheet
Pull so the foot just touchesthe shroud at deck level
Pull until the foot is touching10 cm up at shrouds
Pull until the foot is touching25 cm up at shrouds
Genoa Barberhaul
Mark #4 / 15 cm out of cuddy15-18 cm from the spreader
Mark #2 / 9 – 10 cm out of cuddy5 cm from the spreader
Mark #3 / 10 – 12 cm out of cuddy8 cm from the spreader
GenoaHalyard
Small wrinkles along the luff
Just remove wrinkles alongthe luff
Just remove wrinkles alongthe luff
Make sure that the luff is NOT overstretched
READ MORE
READ MORE

YNGLING TUNING GUIDE
Congratulations on your purchase of North Yngling sails. Thank you for choosing us as your personal sailmaker. We have been working hard to design and build the fastest, easiest and most durable Yngling sails available.
Please use this guide as a reference and starting point. While we have found these numbers to be accurate and beneficial for most sailors, others may find different settings to be even more comfortable. We urge you to experiment.
While we cannot guarantee immediate victory by following this guide, we can assure you will be taking a major step in the right direction!
Please call on any of your North One Design Yngling experts if you have any questions. Good luck and good sailing!
Prior to stepping your mast
Check the length and cant of your spreaders, as they are important in shaping the mainsail. When set properly the spreaders help maintain control of the mast bend and indirectly, the tension/sag of the forestay.
The length of the spreader is measured from the side of the mast to where the shroud passes through the spreader tip. The length of the spreader should be very close to 60Cm (23 9/16”). The cant of the spreaders is measured by checking the distance of a taut line (bungee cord hooked at the tips works well) from the back of the mast. We have found this distance should range between 21.5-22.0 Cm ( 8 ½- 8 ¾”). The greater this distance, the bendier the mast. For the Abbot Boats/ Proctor Spar combination set up closer to 21.6-21.8. For the DeWolf Boats/Hall Spars combination set up the spreaders closer to 21.5 cm.
The butt of the mast is set so that the distance between the center of the forestay pin to the front edge of the mast is 1.925 m (6’ 3 ¾”).
Note: it is important to check that your mast does not sit squarely on the step (or casting). Ideally there should be a gap of nearly ¼ “ between the front of the mast extrusionand the casting or step. This gap will allow the mast to “rock” fore and aft easier and therefore bend easier, making for smoother gear shifting from light to heavy winds.
Hoist a tape measure on your main halyard and lock in your standard full hoist position. The mast rake is set so that the distance from the top of the mast ( main halyard in its locked position)to the top of the deck at the transom is 26’ 3”- 26’ 5”.
Using the tape on your main halyard, check that the mast is centered in the boat side to side.
Start with a tension gauge to measure your rig-tension. We suggest the Loos Model PT-1 gauge as it appears to be most consistent. These are good rough tune starting points for the upper shrouds at the dock: Light winds (below 6 mph) your gauge should read close to 6. In medium winds, and for your “base” setting your guge should be close to 9 and in heavy breeze the guage should be at 18. HOWEVER……
Note: As a final check in all conditions for your upper shroud tension, ideally the leeward upper shroud will just barely start to go slack…not sloppy.
The lower shrouds are best adjusted and fine tuned while under sail. They are tensioned so that the mast has a slight (3/8”) sag to leeward at the spreaders in light to medium winds. Only in heavier winds or when overpowered, will the lowers be tightened to straighten the mast laterally in the boat.
MAINSAIL TRIM
Trim the mainsheet hard enough to make the top batten parallel to the boom. You can check this by sighting from underneath the boom on a vertical plane. Once you have accelerated and you want to point higher, trim harder to cock the top batten slightly to windward. Generally, we recommend sailing with the top leech telltale stalling 70% of the time. In flat water, you can trim harder, but in light air and choppy water, you will need to ease to twist off the top of the main.
In light to moderate air, trim the traveller car to windward no more than 4-5” above centerline so the boom is on centerline. When you have the traveler to weather be sure to ease the mainsheet to maintain the upper batten parallel to the boom position. In light, sloppy conditions , or when trying to accelerate, ease the sheet so the upper batten is angled outbord from parallel 15-20 degrees.
As the breeze increases, gradually drop the traveler back to centerline to reduce helm, while at the same time trim the mainsheet. In very windy conditions, the traveler car may be dropped up to 2-3” below centerline. In these conditions the vang is tensioned hard to control leech tension and help bend the lower sections of the mast.
OUTHAUL
The outhaul controls the draft in the bottom of the mainsail. In nearly all conditions the outhaul is pulled tight enough to close the shelf foot so that the shelf seam is along the side of the boom. In heavier winds, the outhaul is pulled very tight, and to the band, so that the bottom of the main is very flat. Actually, the difference between standard “all around” trim and heavy wind trim on the outhaul is very slight. The outhaul, again, is pulled quite hard in most conitions.
CUNNINGHAM
The cunningham is used to position the draft of the sail. Your goal should be to keep the maximum draft point 50% back in the sail (sighting from luff to leech). We use no cunningham up to 10 knots, just enough to remove many of the wrinkles in 11-12 knots, and progressively tighter in higher winds to remove most of the wrinkles and position the draft forward in the top of the sail.
BACKSTAY
The backstay affects several different areas of sail trim and should never be overlooked as a power control. Pulling on the backstay does two things to the sail plan. First, it bends the mast by pulling on the tip, which opens the main leech and flattens the upper two-thirds of the sail. Secondly, it makes the headstay tighter, which flattens the upper entry of the jib and eases its leech; thus increasing pointing ability and reducing heel. Since pulling on the backstay has a large effect on main leech tension, whenever you adjust the backstay, you should check your mainsheet trim and vang tension.
JIB
JIB LEAD
As a basic starting point, set the jib lead at a distance of 2 m from the forestay pin to the center of the block. The jib should luff nearly even along the luff of the sail. In heavy winds move the lead aft a hole (no more than one inch). Note: Many sailors are raising the tack of their jib off the deck nearly 2-3” ( the skirt is still lying on the deck) to help make the bottom of the jib more powerful.
HALYARD TENSION
Be careful to avoid over tightening the halyard, as this will move the draft too far forward. Pull just barely enough to barely leave a hint of wrinkle off of each snap, but not more in all conditions. In heavy winds pull the halyard a slight bit tighter so as to make the luff smooth and position the draft properly.
SPINNAKER
The general rule of trim is to allow 8-10” of curl in the luff of the sail.
The outboard end of the pole should be even with the free floating clew and the pole should remain perpendicular to the apparent wind.
Pole height is important and has a big effect on the spinnaker. The luff break should appear approximately one-third of the way down from the head. If the break is lower, the pole is too high and it should be lowered, higher than this, the pole is too low and should be raised. Another effective guide is to position your pole so that the centerseam of the spinnaker (the vertical seam running from the head to the middle of the foot) is parallel to the mast.
Light Air
The most important area in light air is to concentrate on good communication between helmsman and spinnaker trimmer. The goal is to sail as low as possible while still maintaining good pressure on the spinnaker. An easy way to measure this is knowing the tension on the sheet. The important thing is not to sail too high with translates into longer distances, consequently do not sail too low thus sacrificing boat speed.If the spinnaker sheet starts to drag in the water, head up slightly!
Be careful not to pull the pole too far aft, which over flattens the spinnaker.
Heavy Air Reaching
Never allow the pole to rest on the headstay. Always maintain at least 2-3” of distance between the pole and headstay. When big puffs hit and the spinnaker is full, ease the sheet 2-3’ to help the boat accelerate. Trim as the puff subsides. Have the foredeck person keep a hand on the vang at all times and be ready to release if the boat begins to spin out. As soon as the rudder starts to have weather helm, the vang should be out of the cleat and eased until the boat is under control again. Hike hard on the reaches.
Mainsail
Ease the sheet until a luff appears then trim slightly to create more apparent wind. Dead downwind the boom will be out to the shrouds. Set the vang in light to moderate air so the top batten is eased out past parallel to the boom ( since the shrouds are set aft on the Yngling more twist in the main dead downwind is necessary to help the boat sail low enough.) The Cunningham, backstay and outhaul should all be eased for maximum downwind power.
Twings
It is critical to utilize the twings properly sailing both on the reaches and dead downwind. The windward twing should always be all the way down. It is critical to make sure the leeward twing is off during the set. If it is not, the spinnaker will fill prematurely, causing the boat to create weather helm and round up.
When sailing downwind in light air, the leeward twing is completely released. In very heavy air, pull the leeward twing as well, on about halfway or 2’ away from the deck to help keep the spinnaker under control.
READ MORE
READ MORE

Y-FLYER TUNING GUIDE
Congratulations on your purchase of North Y-Flyer sails. We are confident you will find superior speed over all conditions. Your sails are designed to be fast, as well as easy to trim and handle.
The following measurements are those we have found the fastest for your new North sails. After experimenting, you may find a slightly different setting may mean even better boats speed for you. We are anxious to help you go faster and win races!
Onshore Adjustments
Mast Placement – The mast step should be positioned so that the mast is near maximum aft position. In this position the back edge of the mast should be 16” to 16½” forward of the centerboard pin.
Mast Rake – the best method for measuring the mast rake on the Y-Flyer is by hoisting a 50’ tape to the top of the mast and measuring the distance from the top of the mast to the intersection of the transom and the back deck. Just hook the tape on your main halyard shackle and don’t worry about adding or subtracting any difference for the shackle. With the rig tensioned properly (discussed later) this measurement should be 24’1” to 23’10½”.
If you are trying to correspond this measurement to the older method of the bubble level on the top of the centerboard trunk, the measurement should be approximately 30”-31”.
While the tape measure is hoisted to the top of your mast it is important to check that your mast is set up straight in your boat laterally. To check this, take the tape and measure the distance from side to side at the bottom of the chainplates. Try to adjust your shrouds so there is no more than ¼” to ½” difference from side to side.
Rig Tension – We have found that the Y-Flyer performs best in medium winds with the rig set up fairly tight. It is best to use a powerful jib halyard adjustment system (a lever, magic box, block and tackle, drum, etc…) so that the leeward shroud just begins to go slack when it is blowing 10-12 mph.
To verify the proper rig tension we strongly suggest using the Loos Tension gauge. When using the Loos gauge, and checking the tension on your 1/8” upper shrouds, the number should read approximately 34-36 (not lbs.).
In light winds without changing the shroud position, it is advantageous to ease off the jib halyard slightly so the tension is reduced in the rig. This will allow the jib luff to sag slightly, making the jib slightly fuller. Using the Loos gauge to check the tension on the shrouds, you should find a number of approximately 28-30. If you still have your tape hoisted on your main halyard, you can check the rake number and see that it will become less (indicating more rake) by 1-2”. In heavy winds, when the boat is overpowered, it is fastest to rake the rig farther aft. If you set your mast up at 24’1” for medium winds, we suggest that you allow it to drop back nearly as far as 23’9” to 23’10”. Ideally, it is best to also drop the shrouds in their channel adjusters so that the rig, when raked farther aft, would still be close to the proper 34-36 Loos gauge number on the shrouds. However, if the breeze comes up during a race and since it is impossible (and Illegal!) to change the shroud tension it is still best to compromise and sail with a looser rig with the mast raked farther aft.
Loos Tension Gauge – This gauge is a very helpful guide in tuning your Y-Flyer.
Mast Bend – when the rig is properly tensioned with the proper rake and spreader settings, your mast should develop positive prebend, where the middle of the mast will move forward at the spreader and the top of the mast will come aft. In medium winds with the rig tensioned at 34-36 on the shrouds the mast should develop nearly 1” to 1½ of prebend. You can check this by pulling the main halyard down tight and holding it at the gooseneck so it will develop a straight line as a reference from the top of the mast to the gooseneck.
In light winds with less tension in the rig, there will be less prebend of approximately ¾”.
Listed below are suggested spreader positions for the various popular masts used the Y-Flyer Class. It should be noted that masts of a particular section may have slightly different bend characteristics depending on spreader height and rigging placement and differences in the extrusions themselves. Because of this, the following measurements should be used as starting points only with appropriate adjustments being make on the actual bend and tested while sailing.
Spreaders for the stiffer mast (W2, H2) – We have found that the spreaders that are 19¼” long and are free swinging forward but lock up when pushed aft at a point where they are 35” to 36” tip to tip will give the proper desired bend. this tip to tip measurement can be found by pulling the spreader together with a tape from one spreader to the other at the tips. Also, check and make sure that the spreaders are angled evenly on each side. These measurements are for masts with spreaders that are 9’1” to 9’2” from the deck. Spreader that are higher on the mast will need to be somewhat shorter.
Spreader for the bendy mast (DP1, C1) – These masts require spreader which are 18 ½” long and 38” measured tip to tip. These measurements are taken of masts when the spreader are approximately 10’ above the deck. To make adjustments to the bend, the “cant” in the spreader should be adjusted (forward for less bend-aft for more bend: or closer tip to tip measurement for more bend, greater tip to tip measurement for less bend).
The Mainsail Look When the Mast is Properly Bent: Basically on all masts we are looking for very slight overbend wrinkles (diagonal wrinkles that will appear from the spreaders to the clew) showing that the mast is beginning to reach maximum mast bend. In light to medium wind these wrinkles should barely appear while in winds above 15-18 mph, these wrinkles will be quite noticeable and in above 20-25 mph winds, will be quite severe. If these wrinkles are not developing, your mast is not bending enough.
Lower Shroud Tension – Your lower shrouds should be adjusted so that the mast is straight sideways when sailing upwind. Check this by sighting up the back of the mast, up the tunnel, and determine if the mast is sagging to leeward or bowing to windward at the spreaders. If sagging to leeward, tighten the windward lower shroud; if bowing to windward, loosen the windward lower shroud. Check both sides independently and when adjusted correctly the lower shrouds will be much looser that the upper shrouds with the jib up and the rig tension as described before.
If you find that it is necessary to sail with your lower shrouds quite tight to keep the mast straight sideways, it could be a good indication that your spreaders are too long. Lower shrouds that are tight can severely impair the mast’s ability to bend properly and therefore harm the boat’s performance. Shorten your spreaders in increments of 1/4” to 3/8” and readjust the lower shrouds to match. Again, your goal is that the leeward lower shroud will be much looser than the leeward upper when sailing upwind in medium winds. The lower shroud should be considered just as a “tweeker” to help control lateral mast bend, but definitely not to be the primary control. The spreaders are most important.
Jib Lead Placement – On your new North Y-Flyer jib you will notice a pencil line drawn from the clew grommet out towards the center of the sail. Use this “trimline” to position your jib lead by making your sheet a direct extension of this line.
In heavy winds, move your jib leads 1” to 2” aft of your medium/light air extension of the trimline position to help depower the jib and open up the slot.
Your leads should be positioned 13½” to 14” off centerline (27” to 28” lead to lead).
Centerboard Angle – It is important that your board is lowered to the maximum, with as little of the board as possible showing above the trunk when sailing upwind.
Sailing Adjustments
Main and Jib Cunningham – For both the main and the jib, never pull tighter than to just leave a hint of wrinkle along the luff of both sails. On your main, these wrinkles will appear in the lower 1/3 to 1/4 of the luff, and on your jib, will appear as small wrinkles approximately 2” long, perpendicular to the luff.
Note: do not attempt to pull out your overbend wrinkles by tensioning your main cunningham. Again, remember that the overbend wrinkles are a necessary guide in showing that the mast is vending properly and pulling the cunningham tight enough to pull these wrinkles out will pull the draft too far forward in your main, robbing your boat of necessary power.
Outhaul – The outhaul adjusts the depth in the lower part of your mainsail. as the outhaul is eased, the shelf on the bottom of the sail opens and the seam that attaches it to the sail moves away from the boom. To gauge outhaul tension, judge the distance from the seam to the side of the boom at roughly the center of the mainsail foot.
The outhaul will be pulled tight enough so that there is just a ½” to 1” gap between the side of the boom and the shelf foot seam in the middle of the foot. In breezes above 10-12 mph when the boat becomes overpowered the outhaul will be pulled tighter until the seam is snug against the side of the boom (max outhaul).
When reaching, ease the outhaul until vertical wrinkles appear across the seam perpendicular to the foot into the body of the sail. Tighten your outhaul until the wrinkles are just removed. When overpowered on a reach, with the spinnaker, leave the outhaul set as you had it upwind. For downwind sailing, leave your outhaul in the tensioned position for maximum projected area.
Jib Sheet Trim – Unfortunately, there is not an easy guide for jib trim. We are looking for a parallel slot between the exit of the jib and the entry of the main. A guide that has been used with some success is imagining a middle batten on the jib at mid leech. Set this “batten” parallel to the centerline of the boat, making the upper batten of the jib twist outboard slightly and the lower batten twist inboard slightly. In extremely flat water and winds of 8 to 12 mph, it is possible to trim the jib in slightly tighter so that the top batten is nearly straight back parallel with the centerline. This trim can be used for short periods of time when the boat is traveling at near maximum speed.
In light winds, or when acceleration is needed, ease the sheet out slightly so that the top batten is angled outboard approximately 15 degrees from parallel with the centerline of the boat. The imaginary middle batten will be angled outboard just slightly from parallel to centerline, and the jib will be fuller and less apt to stall.
Mainsheet Trim – The mainsheet on your Y should be pulled so that the upper batten is parallel to the boom. This is sighted underneath the boom looking up the sail, lining the batten and the boom parallel on a horizontal plane. In very light winds, it is usually impossible to keep the upper batten from hooking slightly to weather because of the weight of the boom hanging on the leech. In these conditions, ease the sheet out so that the top batten is parallel with the centerline of the boat.
In choppy conditions in winds above 2 to 3 mph, ease your mainsheet approximately 6 to 8 inches to slightly open the upper batten out from parallel to the boom. This will make your mainsail fuller, more powerful, and like the jib, less apt to stall.
In medium winds and flat water (ideal boat speed conditions) sometimes it is possible to slightly overtrim your main so that the top batten is looked to windward of parallel to the boom approximately 2 to 5 degrees for short periods of time.
Picture the mainsheet as your accelerator. As your boat picks up speed, pull the main tighter and tighter until the upper batten is parallel or slightly looked to the boom, and in lights winds or when the boat is hit with a wave and needs to accelerate, ease the mainsheet so that the upper batten will angle outboard slightly, inducing “twist” into the sail.
Boomvang – Upwind in medium to heavy winds the boomvang should be kept hard enough to keep the upper batten parallel to the boom. This may require a good deal of boomvang tension, but this will also help to bend the mast and flatten the sail. In light winds, never use any boomvang tension upwind. Downwind the vang should be tensioned only tight enough to maintain the upper batten parallel to the boom position. There may be a tendency to overvang downwind in light winds and undervang downwind in heavy winds. Basically, look for the main to set downwind as it does upwind. The traveler is used to help balance the helm of your Y and keep the boat upright. Upwind when the boat becomes overpowered, the traveler should be eased to leeward, with the boat slowly feathering up into the wind to help keep the boat level and the helm neutral. In the lulls, be sure to quickly pull the traveler back up to centerline, but be ready to ease back down to leeward in the puffs.
Downwind – When sailing your Y downwind with the whisker pole up, it is best to ease off your jib halyard as much as 10” to allow the luff of the jib to sag greatly. A loose luff, when sailing with a pole, will allow the jib to basically “turn around” with the leech becoming the luff and the luff becoming the leech. We need to remember that we are trying to create airflow across the jib with the wind entering the jib from the actual leech of the sail. Not attaching your jib to the forestay with the snaps or Velcro’s will make this procedure much easier. Instead, you can set the forestay so that it is loose enough to just allow the rig to lean back to your heavy air setting of approximately 23’9”. There will be slop in the rig, but that is necessary for top performance downwind. A shockcord retainer can help minimize the slop in the headstay when sailing upwind.
In addition, it is also suggested to sail with a longer whisker pole, which will help with better performance on beam and broad reaches. You will find that the pole will just barely fit in the cockpit of your boat!
Once again, a powerful jib halyard adjuster is helpful to make it easy to adjust the halyard tension properly and easily before rounding the leeward mark when the pole is dropped.
When sailing on a close reach, without the pole, be sure to use your barberhaulers and move your jib lead outboard. The proper position of your barberhauler lead, forward and aft, is determined by the trimline on the clew of the jib. This time, position the barberhauler lead so that the sheet is angled slightly forward of parallel to the trimline. This will make the jib slightly more powerful and help to support the upper leech.
We wish you good luck and fast sailing! Do not hesitate to give us a call if you have any questions or problems. Please consider us your personal sailmaker.
READ MORE
READ MORE

WINDMILL TUNING GUIDE
The following tuning guide is meant to be a good starting point in setting up your boat. Depending on your crew weight, strength, sailing style and local conditions, you may have to alter your rig slightly. As you read this, write down any questions you may have, and we will be happy to discuss them with you in more detail. We are trying to achieve a rig set-up that is fast in all conditions; upwind, reaching and running, and is very easy to adjust or change gears. Your new North Sails are designed around this all-purpose philosophy.
INITIAL SETTINGS
- The first item that should be checked is the mast step. It should be place at about 59-60” from station 0. Make sure that your mast is tight in the step and will not twist in the step.
MAST RIGGING
- The standard height for spreaders is between 104 to 106” above the theoretical top of keel. In checking the fleet, I have found some as high as 117”. While this is quite high, it seems to balance the mast bend nicely, and allow the jib to be sheeted inside the shrouds if you’d like and not foul on the spreaders. The length and angle the spreaders are set to determine the deflection that the shroud is moved away from a straight line between the mast and the chainplates. These factors control the stiffness of the mast. The spreader length should be set to deflect the shrouds about 2.5” to 3” outboard to restrict side bend and pinned to deflect the shroud about 1.5" to 2" forward which restricts fore and aft bend. These are checked at the light air rake settings. When measured from a straight line between the shrouds, the distance to the aft edge of the mast should be about 5" for a Kenyon “A” section, and 6.5” for a Proctor Lambda or Alpha Minus. Spreader length of about 15.5" from the surface of the mast works well with the spreaders at 106” and the chainplates inboard. With the spreader bracket at 117” above the keel, a length of 15.5” works well with the chainplates close to the gunwhale. These numbers will vary depending upon the location of the chainplates and height of the spreader brackets, but the overall deflection is the key. When sailing upwind in 8 to 10 knots, with the boom close to centerline the mast should be straight up to the forestay. If the spreader area goes to leeward, you need to either loosen the rig if it’s tight, or shorten the spreaders. It is also a good idea to have nicropress stops under the spreaders so the spreaders don't drop in angle.
CENTERING THE MAST
- Before calibrating your mast rake, check that the mast is even in the boat athwartships. You can do this by hoisting a jib and tensioning the rig until the shrouds are tensioned. Attach a tape measure to the end of the main halyard and raise it to full hoist. Check the distance to each chine directly below the chainplates, and adjust the shrouds until the mast is in the center of the boat. Next sight up the back edge of the mast to ensure that it's straight athwartships. If the measurement to the gunwales is even, and the mast isn't straight side to side, then either the spreaders are uneven in length or the mast partners at deck level are uneven and pushing the mast to one side. It is important that the mast is straight in the boat and nominally tight in the partners. Any side to side play in the partners depowers the rig too early.
MAST RAKE
- Mast rake and rig tension are the two very important tuning variables. We use a “boom band radius system” to measure and calibrate your rake, which uses your forestay. Hoist your jib without attaching the hanks to the forestay. Detach the forestay from the headstay fitting at the bow. Swing the headstay back to the mast, and mark the stay with tape where the wire is even with the top edge of the sail black band at the boom. This is your “zero point.” If your spar has two bands, use the upper band. If you are not confident that the band is in the right place, check the class rules and re- measure it. Now swing the wire back forward, attach a tape to the “zero point”, and measure down to the upper forward intersection of the deck and the bow. In light air and full power, this number should be about 34.5” An average light air setting would be 36”. For lighter crews or increasing breeze, rake back to about 37”. In heavy air rake back to about 38” To set the shroud tension, at your light air rake setting the shrouds should have about 150 lbs of tension, as measured on a Loos Gauge. If you don’t have a Loos Gauge, this is moderately tight where the shroud can be wiggled in a small circle without too much trouble. Heavier crews can use more tension to restrict mast bend, and lighter crews can sail with looser shrouds to allow more mast bend. As the breeze builds and you get more overpowered, just ease the jib halyard off to increase aft rake. This depowers the main through more athwartship and fore and aft bend. As a guideline, if you are pointing too much and going too slow, increase rake and loosen the helm up. If you are fast but not pointing, decrease your aft rake. With the mast in the 3’0” rake setting and the jib up, block the mast to have about 1/2” to 1” of pre-bend, that is where the middle of the mast bends forward.
DAGGERBOARD
- In my limited experience, it appears that the board should be as stiff as possible. It is also important that the board fit tightly in the trunk. The trunk can be shimmed within the WCA class rules with carpet, which will protect the daggerboard and keep it snug in the trunk. In conditions up to a full hiking breeze, keep the board all the way down and even forward in light air. As weather helm increases with the windspeed, you can balance the helm by either raising the board and/or angling the board aft.
MAINSHEET TENSION AND BOOM VANG
- Generally, the vang should just go slack when the mainsheet is at maximum tension. In light to medium conditions, trim your mainsheet so the top batten is about parallel to the boom. If you are sailing in very smooth water, trim hard enough to hook the top batten 5 degrees to windward. The boom vang is a powerful tool in that it will increase the mast bend and flatten the main. When sailing upwind, if you have speed with no pointing, try reducing aft rake, getting the traveller closer to the centerline, or vanging harder to tighten the leech and flatten the main. If you have pointing with not enough speed through the water, try increasing your aft rake, easing the traveller, bending more, or checking to see that you are not vanged too hard. Or just hike harder and sail the boat flatter!
MAIN CUNNINGHAM
- The main cunningham should be slack up to 10 knots. Above 10 knots, tighten enough to remove wrinkles along the luff. Always be aware that the cunningham pulls the draft forward and depowers the leech, which is not always good.
OUTHAUL
- Our sails are designed with a shelf foot, which makes the sail sensitive to outhaul control. Ease the outhaul 2-3” for power in a chop, and for offwind legs. Tighten in heavy air or overpowered conditions.
JIB LEAD POSITION
- As a starting point, your jib leads should be positioned so that the bearing point on the blocks is about 83” aft of the jib tack pin. Another guide is to set your leads so that the jib sheet lines up with the trim line on the clew of the jib. In choppy conditions it may be faster to move the lead forward from this point, and sheet just a little looser. If your sail does not have a trim line, you can install a line on the clew, defined by the center of the clew and intersecting the luff midway between the tack and the head. This is a good starting point. Move the jib lead aft as the wind increases, and/or more rake, to accomplish the same end result of twisting off the top of the sail. If you have speed with no pointing, try moving the leads forward. If you have pointing with not enough speed through the water, try moving the leads aft. Experiment with different lead positions, especially in stronger breezes, as changes are readily felt. The leads should be about 16” to 17” from the centerline. This can be adjusted by changing the length of the shackles which hold the ratchet blocks to the track slider. Generally, 16” is best for light air, and 18” or so best for heavy air.
READ MORE
READ MORE