MAST FURLING INSTALLATION GUIDE
MAST FURLING INSTALLATION GUIDE
Key Elements of Usage and Installation

This guide is intended to help better understand the key construction elements, usage and installation of your sail. If you have any questions after reading this document and before installing your sail, please contact your North Sails representative. It is best to have two people installing the sail which can be accomplished in less than one hour. Your boat needs facing directly into the wind and ideally the wind speed should be less than 8 knots.
Step 1: Unpack your Sail
Begin by removing your North Sails Purchasers Pack including your Quality Control and Warranty information. Reserve for future reference. Locate and identify the battens (if any) and reserve for installation later.
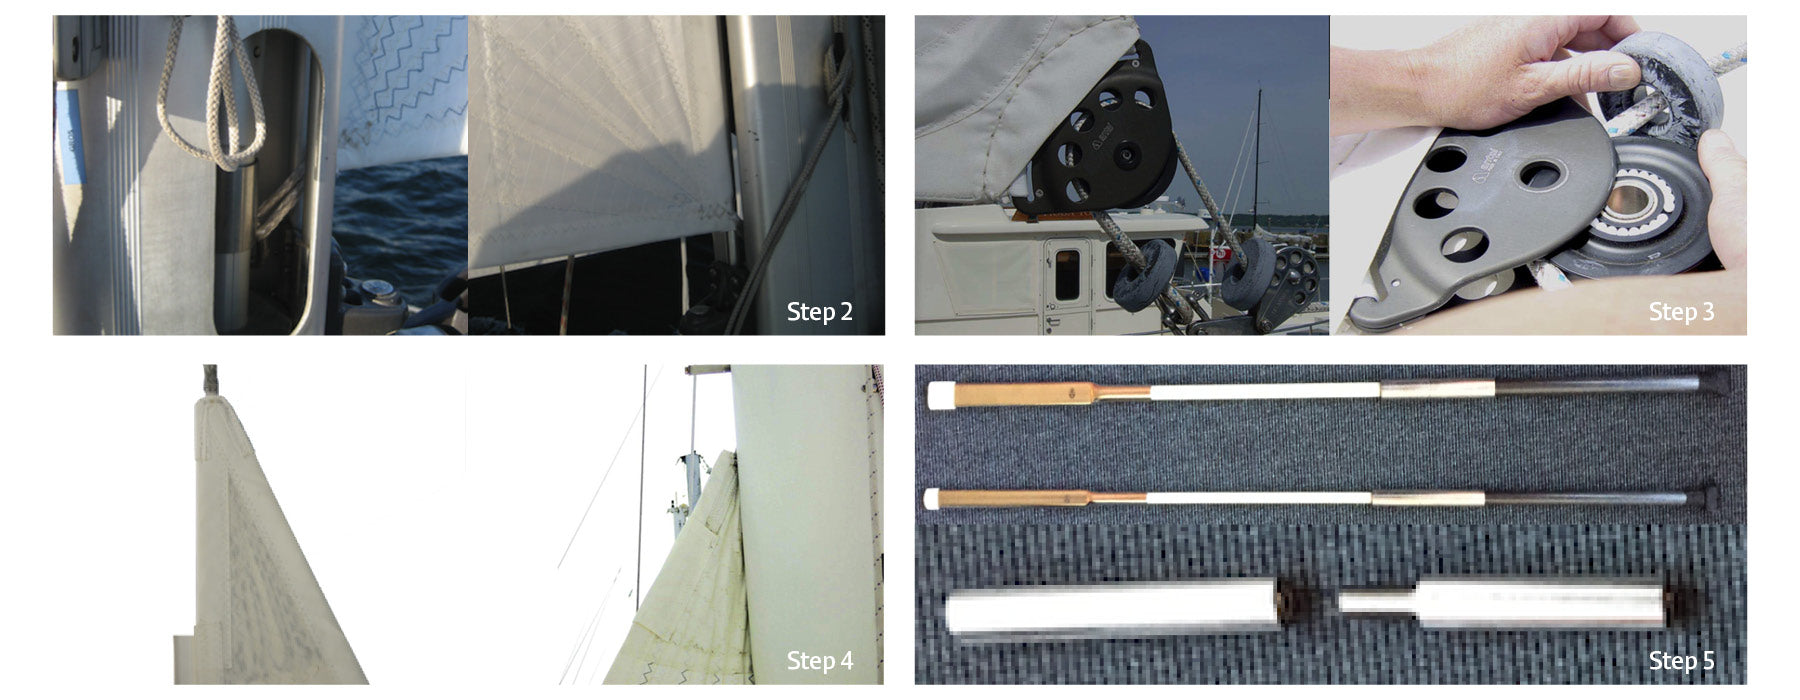
Step 2: Attach the Mainsail Tack
Begin by unrolling your mainsail on the side deck from luff to leech. Lift the mainsail tack area and attach to your tack fitting. Your new Mast Furling mainsail incorporates a North Sails exclusive Rope Tack. This feature is designed to provide a soft and easily furled corner attachment. The sail has less patching the normal corner, but has the Spectra/Dyneema rope splayed and sewn into the sail to proved strength. Please ensure the tack rope is connected to a smooth hook or shackle to ensure durability and that no chafing occurs.
NOTE: If your mainsail has a Crab Claw Cutaway and two webbing attachment points – Please read the Stowaway Mast Furling Mainsail installation guide.
Step 3: Attach the Mainsail Clew
Lift the mainsail clew to the end of the boom and run the outhaul line through the clew block. Depending upon the type of block and the rigging of the outhaul, you may need to remove the block sheave or the outhaul line stoppers to pass the outhaul through the clew block.
Step 4: Attach the Mainsail Head
Lift the mainsail head to the mast and attach to the head of the sail to furling head swivel. The mainsail head has the same rope corner as the tack for ease of furling.
Step 5: Hoist the sail and insert Battens (if applicable)
If your mainsail has no battens, you can now hoist the mainsail all the way and furl into the mast. If your mainsail has leech battens, you will insert each batten as you hoist the sail. If your mainsail has full length battens, you will assemble the battens before hoisting the mainsail and then insert the battens after hoisting following the leech batten procedure.
Leech Batten Installation
Most Mast Furling Mainsails with Leech Battens will include Round Carbon Rod Battens. These un-tapered battens are stiff to support the leech and also able to slightly twist around the luff extrusion for easy and compact furling. The leech battens should be located on the inside of your furled sail so they do not impact the mast gap edge hen furling and unfurling. Only sails with the smallest gaps will include flat battens. Your battens will be secure into the sail with a standard Velcro leech closure. The leech (upper) end of the batten has a small plastic cap taped on to fit compactly into the closed leech batten pocket end. The bottom (lower) end of the batten has a custom metal fitting changing the shape of the batten from round to flat to best secure the batten in the sail.
NOTE: Please follow the Velcro Stuff Batten Installation Guide when inserting the Vertical Leech Battens as hoisting your sail
Full length Batten Installation
If you have ordered a Mast Furling Mainsail with Full Length Battens, you will have received your battens in segments, which need to be assembled. Simply identify the segments from the batten labels and screw together using the just joiner. Furl the sail When the sail is new, it will be stiffer than your old sail. Please keep some tension on the outhaul when you are first furling the sail, to train the patches to accept the furl. Take note to see if there are any excessive wear points and that the battens are entering the mast evenly and smoothly.
Leech Line
Your new Mast Furling Mainsail includes and Around the Clew Leech Line. The leech line is not a sail shape control but an essential tool to prevent leech flutter. The leech line will have a purchase system and Velcro closure above the clew and a cleat with in front of the clew. Your sail will either have micro-blocks or a tunnel to direct the leech line around the clew. Use the leech line to prevent leech flutter in higher wind speeds and when reefed. Excessive leech flutters can cause serious sail damage.
Sail Shape Control
You can control the depth and position of draft in your new mainsail by adjusting the halyard tension. A tighter halyard will move the draft position further forward and result in a flatter sail. When your sail is new, pull the halyard up just enough to remove any horizontal creases along the luff. In stronger breeze you will need more halyard tension.
