T-10 TUNING GUIDE
The North Sails T-10 team has been working hard to make sure you are getting the most updated info and getting the most performance out of your new North Sails. Collectively we have all combined our notes, tips, and tricks for making the T-10 go fast and we are excited to share all this info with you. If you have any questions about the information in this Tuning Guide or would like to learn more about Tuning, Sail Trim, or Sailing Techniques please do not hesitate to contact any of our T-10 experts.
Sail Care
Properly caring for your North Sails will prolong the life of the sails. When storing your sails, keep them clean, dry, out of direct sunlight and away from areas of extreme heat. Rolling the mainsail and jib when they are not being used and folding your spinnaker (instead of stuffing it in a bag) will help all your sails remain wrinkle free and last much longer. In addition, releasing the tension on the full-length battens in the mainsail and headsail, for storage, will increase the life of the sails.
Tuning Tools

Some basic tools are required to accurately setup and tune your T-10 mast. These include: Steel Measuring Tape, Model B Loos Tension Gauge, Calipers, Permanent Marker, Bucket and Electrical Tape. Each of these tools will be mentioned in this tuning guide and will aid in the proper tuning of your mast. Tuning tools needed to accurately setup and tune your T-10. Another important setup tool is the use of reference marks. MARK EVERYTHING! While this sounds basic, marking settings can make it much easier to repeat your setup and tuning on the water. Mark your shrouds to be consistent in which side is which (port vs. starboard) as this will make it easier the next time you tune your mast. Mark your sheets, halyards, and control lines as well to make settings repeatable and more accurate.

Mast Set Up and Tuning
Initial Rig Set Up - Mast Down
-
Spreader Trim Marks
- Before stepping the mast, mark the spreaders with tape stripes to use as a reference when trimming the jib. These marks will indicate the location of the leech of the jib when it is trimmed for upwind sailing. Measuring from the side of the mast, along the aft edge of the spreader, put tape stripes at 30”, 31 1/2” and 33” with the measured edge of the stripe closest to the mast. -
Headstay Length
- Make sure your headstay is at the class max for allowable length. Forestay measured from the center of the eye to the forestay attachment point (lower edge of the T-ball fitting where it rests on the forestay attachment point), to the bearing point of the hole which connects to the link plates. Refer to the measurement table in the class rules to ensure your forestay is at class max length. -
Mast Butt Position
- The “J” dimension (measured from the pin at the bottom of your headstay link plates to the front face of the mast at deck level) should be 12’ which is the class minimum specification. Mast butt position and headstay length will affect your mast rake. With the headstay at max length and the “J” at minimum you will be sailing with maximum mast rake. -
Measurement Marks to Center the Mast
- With the boat out of the water, you must place marks on each side of the hull equal distance aft from the headstay pin and equal distance up from the keel. This will ensure that your mast is inline and centered with the keel, not just the deck. Refer to image below.

Measure aft from the headstay pin connection and place a mark on the hull near the toe rail. Next measure up from the center of the front edge of the keel to your mark measured aft from the forestay and place another mark making a cross hare. This mark will be used to center the mast with the keel.
Tuning
Before the mast is stepped, with the mast down and supported, track side facing up, sight from end to end to ensure the mast is straight. If any S or bend is evident this will come into play later when we tension the lower shrouds.
-
-
Center the Mast Side to Side
- With the lower shrouds disconnected, backstay disconnected, and boom off, hand tighten your upper shrouds as evenly as possible. Using the Jib Halyard, attach to your bucket (halfway filled with water, this will create even weight to measure the mast side to side). Place the bucket over the side of the boat and lower it down past your markings on the side of the hull.To measure the rig side to side you can place a tape mark 2-3’ above the deck on the halyard. Now measure down from this mark to your markings on each side of the hull. Adjust each upper shroud accordingly to get the mast centered and inline with the keel.

-
Get Your Mast in Column
- With your lower shrouds attached now, we need to get the middle of the mast in column with the hounds (we centered the hounds to the keel), the tip of the mast may fall off one side or the other if the middle of the mast is bowed to one side or the other.Sighting up the mast track, adjust each lower shroud to get the middle of the mast in column with the hounds. Remember if the mast had any S or bend to it prior to stepping, if so, you may not be able to get the mast perfectly straight, and that is not uncommon with T-10 masts, we will talk about tuning on the water and getting the mast to set up evenly tack to tack later in the tuning guide.
-
Getting Tensioned to BASE Tune
- Set the base shroud tension. The base tension for the upper shrouds is 40 and the lower shrouds is 22 using Model B Loos tension gauge. While adding tension to get to the base setting, occasionally sight up the sail track on the aft side of the mast to ensure the length of the spar is straight. If the mast track has any side bend or curve, adjust the shrouds to bring the mast into column.A helpful tip if you are struggling to get the upper shrouds tight enough to read 40 on the Loos Tension Gauge is the tension the backstay extremely hard. Tensioning the backstay will lower the tension on the upper shrouds, making it easier to adjust using the turnbuckles. Be sure to release the backstay completely before taking a new tension reading.
-
Check Mast Pre-bend
- After setting the shroud tensions at 40-22, check that the mast has the proper pre-bend (aft bend) by pulling the main halyard down taught to the bottom of the mast track near the gooseneck (see pic). The pre-bend distance between the back of the mast track and the front of the main halyard (at the spreaders) should be between 1.5” to 2”.

-
Use Calipers to Record BASE Settings
- Use calipers to check your base settings. After setting the base rig tensions and checking the side-to-side center position of the mast, it is a good idea to use calipers to measure the distance between the studs on the Upper and Lower Shrouds. This measurement can help you get the rig back to base setting more easily, especially if unsure of the turns or tensions while on the water.
-
Rig Tuning While Sailing
The T-10 class is one of a few classes that allow for rig adjustments while sailing during a race. It is critical that you pay close attention to your shroud tension, the headstay sag, as well as how your sails are setting up tack to tack. In various wind speeds and sea states it is important to properly set the shroud tension to optimize the sails shape. We have produced a Quick Tune Guide that has recommended adjustments for certain conditions, but every rig can set up different. It is important to pay close attention to how your mast is setting up, and how it is affecting your sails shape. Remember when making tuning adjustments to always trend on the looser side.
Light Air | Under 8 knots
A looser rig is required to increase sail depth for power. There is a difference however between sailing in light air flat water vs. light air and chop.
Light Air and Flat Water
Decreasing upper shroud tension and lower shroud tension will create a deeper and more powerful sail plan. However, in flat water we do not want the rig tension to be too loose. In flat water conditions it is not ideal to have a sail plan that is too full as you can lose your ability to trim the sails tight enough to have an advantage in pointing ability. Adjust your upper shrouds so that the leeward upper is snug, not tight, and not lose, you want to have some tension on the leeward upper shroud. This will ensure that you are still able to create pre-bend in the mast. Having pre-bend in the mast will help to flatten the mainsail enough so you can trim harder with out stalling the leech of the mainsail. The upper shroud tension also has a direct affect on the headstay tension (headstay sag). Setting your upper shroud tension this way will generate a little more headstay sag vs. having the uppers too tight, but not too much headstay sag making the headsail too deep. If the headsail gets too deep you lose the ability to trim the sail tight enough to gain a pointing advantage. Adjust your lower shrouds so that when sighting up the mast (place your eye next to the gooseneck and sight vertically up the mast slot to the top of the mast) you want to see the middle of the mast (at the spreaders) sag to leeward 1”. This tension for the lower shrouds allows the mast to bend more, creating more pre-bend.
Light Air and Chop
When sailing in lighter air conditions and a choppy sea state, generating power in the sail plan is more important than generating the ability to point. Adjust your upper shrouds so the leeward upper is starting to go completely loose. You do not want to see the leeward upper shroud so lose that it is doing 2” circles, rather you want to see and feel the leeward shroud at the point it is under no load. Adjust your lower shrouds to achieve 2” of leeward mast sag (when sighting up the mast slot). This will help create more sail depth in the middle of the mainsail. By setting the rig tension up this way you are creating a deep and powerful sail plan. The mast will have little to no pre-bend as the upper shrouds will be loose. The headstay will have more sag creating a deeper headsail shape. Pay attention to the headstay though, if the headstay is moving around (bouncing) you may need to snug the backstay slightly but be careful not to apply tension to the backstay. If you need to apply tension to the backstay to control the headstay bounce, that means your shrouds are too loose. The difference in turns from light air and flat water to light air and chop should only be one full turn difference.
Medium Air | 8-15 Knots
Tuning your T-10 mast for medium air is similar to tuning for light air. We still need to consider the sea state, are we sailing in flat water conditions, or choppy conditions.
Medium Air and Flat Water
Still paying close attention to the leeward upper shroud, we want to feel some tension on it, you do not want it to be lose nor do you want a lot of tension on it. Adjust the uppers accordingly to achieve the “snug” feel of tension. What you are looking for when making adjustments in lower shroud tension involves sighting up the mast slot as we do in the light air tuning. Set your lower shroud tension so the mast has a slight amount of leeward sag at the spreaders. You are looking for close ½” of leeward sag. This lower shroud tension will help create pre-bend in the mast, so the main is not setting up too full for the flat water conditions, however the lowers are now tight enough that when we apply backstay in puffs, the main sail does not over flatten (overbend wrinkles).
Medium Air and Chop
Setting up your rig tension for medium air and chop is like light air and chop. We tend to keep the rig tension a little looser when sailing in chop. One full turn looser is usually a good setting or starting point for medium air and chop vs. medium air and flat water. Start by setting your upper shroud tension for the leeward upper is just starting to go loose. When tuning for medium air and flat-water conditions however you do not want to see any leeward mast sag. What you want to see is a straight mast. By having the lowers slightly tighter you now can use backstay in puffs to control the mainsail shape as well as headstay tension with out over flattening the mainsail (overbend wrinkles). If the lowers are too loose, as you apply backstay, the main sail will get too flat too quickly, resulting in the loss of power to help get you through the choppy conditions. Also, having the lowers slightly tighter you have more control over the headstay, keeping the headstay stable in choppy conditions is critical.
Heavy Air | 15 + Knots
As the wind speed increases, creating more rig tension is required to control our sails shape, our sail trim controls will have more effect on sail shape with the rig tuned properly for the conditions. Unlike sailing in light air and medium air, the heavy air rig setting focuses more on Headstay tension and main sail shape. To properly set your shroud tension, start by setting your upper shrouds so the leeward upper is still under some tension. If the uppers are too loose, we will lose some control of the mast’s pre-bend as well as the headstay tension. Your lower shroud tension becomes more critical in heavy air conditions. The lowers control the middle of the mast as well as the ability to use backstay to control headstay tension. In heavy air conditions getting your headstay tight enough is critical to your boat’s performance. The lowers need to be tight enough so we can apply backstay without generating over bend wrinkles in the mainsail. In flatter water the headstay needs to be very straight, little to no headstay sag. This means we need to be able to tension the backstay awfully hard, pay close attention to the main sail and tension your lowers so the main is flat but not inverting. In a choppy sea state, your shroud tension needs to be tight enough so you can control headstay tension without the use of too much backstay. To set your rig tension in heavy air and chop, set your lowers the same way you would for flat water, but take one full turn off the upper shrouds.
Sail Trim Settings
Mainsail Trim
Mainsail trim on the T-10 is an important factor in getting the boat up to speed. Check each of these for proper mainsail setup:
- Make sure the mainsail hoist (luff tension) is appropriate for the conditions. In lighter air set the main sail halyard tension so small wrinkles appear along the mast. In medium to heavier air conditions, the halyard should be set so no wrinkles appear. It is also good to lower the main slightly when sailing downwind but be sure to get the main back to a proper upwind setting prior to rounding the leeward mark. Having marks on the main halyard will allow you to have repeatable settings.This setting should be checked regularly as the halyard could stretch out during the day.
- Correct batten tension is important to achieve proper mainsail shape.Each batten should be tensioned so that all the wrinkles are removed from the batten pocket and the batten can pop from side-to-side easily. If a batten is too loose, winkles will appear along the batten pocket and if a batten is too tight, it will be difficult to pop the batten from side-to-side.
- Tack pin location. On the T-10 you may have several options to pin the tack of your main sail, make sure you are using the tack pin location that creates a smooth sail in the tack area, if you have wrinkles appearing in the tack area, try using a different tack pin location.Trimming the mainsail on the T-10 is a balance between power and stalling. If the sail is trimmed properly, you will get the maximum amount of power out of the sail and if not trimmed properly, the sail could stall, and your boat speed will suffer. The controls that most directly affect the trim of the mainsail are the mainsheet, the main traveler, the boomvang, the outhaul and the backstay. Here is what to check for each control when trimming the mainsail:
Mainsheet Tension
Mainsheet tension is the place to start for proper trim. In most conditions, the T-10 mainsheet should be trimmed so that at max trim the leech telltale at the top batten of the main is stalling 20% of the time. In light wind or when building speed the upper leech telltale should be flowing 80- 100% of the time. As the wind speed increases, it is critical that you input enough twist into the mainsail by easing the main sheet more, but you do not want to ease too much, ease the main to the point where the top tell tale just starts to fly at 100%.
Boom Height
Boom height relative to the boat’s centerline, is another important factor in mainsail trim and the mainsheet traveler is the way to set the boom height properly. Until the boat becomes overpowered, the traveler should be set so that the boom is near the centerline of the boat while sailing upwind. It can be set slightly above center to help in pointing, but there is risk of stalling the sail. If the boat loses speed when the boom is raised above centerline, the traveler or the mainsheet should be eased to help return the boom to centerline and build speed. In heavier air conditions, you may lower the traveler below center line to help de-power the boat. Remember that easing the main sheet too much is bad, so lowering the traveler is a good way to depower the boat.
Boomvang
When the wind gets stronger the boomvang is used to help depower the lower part of the mainsail. Adding tension to the boomvang flattens the lower main sail and allows the trimmer to ease the mainsheet in the puffs and still maintain some leech tension on the sail. It is important to remember to ease the boomvang when the wind speed drops to add shape and power back into the mainsail.
Outhaul
The shape of the foot, and lower section of the mainsail can also be changed using the outhaul. The outhaul should be set looser when the boat needs more power and tighter as the power increases. A good indicator of proper outhaul tension is the lowest batten. When the mainsheet is trimmed properly, the lowest batten will hook slightly to windward of the boom. If the lowest batten hooks too much, the outhaul might be too loose and if it is parallel with the boom, the outhaul could be too tight.
Backstay
Like the boomvang and outhaul, the backstay is used to change the power in the mainsail. When the wind gets stronger, more backstay tension will help to depower the upper part of the mainsail and take sag out of the headstay. Increasing backstay tension bends the top of the mast and flattens the upper part of the main and tensions the headstay flattening the jib. Also, like the boom vang and outhaul, the backstay should be eased off if the wind drops so the mainsail and jib will gain depth and power. In medium wind speeds, when main sheet adjustments are more frequent, it is important that you take the slack out of the backstay so you can ease the mainsheet and not loose headstay tension.
Headsail Trim
Trimming the headsail in a T-10 requires constant attention. The boat responds well to headsail trim adjustments, but before we get into those adjustments it is important to properly set your headsail up for the conditions.
Jib Lead Position
Measured from the headstay pin to the center line of the jib car sheave you should read 14’1”. This is your BASE jib lead setting, and you should place a mark on the deck in this location. From this BASE setting, the jib lead will only move forward in wind speeds less than 5 knots and moved aft 1 hole from BASE in wind speeds greater than 15 knots.
Jib Halyard Tension
Depending what jib you are using will determine how to set your jib halyard tension. Below is a chart for recommended jib halyard settings for the different wind speeds and sea states for paneled headsail as well as the 3Di headsail. The wrinkles refer to the distance the wrinkles (crows’ feet) move aft in the sail.
|
Sail |
Light/Flat 5-8 knots |
Light/Chop 5-8 knots |
Med/Flat 8-15 knots |
Med/Chop 8-15 knots |
Heavy/Flat 15+ knots |
Heavy/Chop 15+ knots |
| Paneled AP | 2" wrinkle | 6" wrinkle | 2" wrinkle | 1" wrinkle | Tight | Smooth |
| 3Di AP | Smooth | 1" wrinkle | Smooth | Smooth | Tight | Tight |
| 3Di Light/Wave | Smooth | 1" wrinkle | Smooth | Smooth | Tight | Tight |
Jib Sheet Tension
The T-10 responds well to an active jib sheet, meaning in the changing conditions (puffs, lulls, waves) the jib sheet should be adjusted. To make these adjustments properly and effectively it is recommended that you incorporate a system to be able to trim the active jib sheet from the windward winch (windward cross sheeting). In 10 knots of breeze trim your jib sheet so the middle batten of the jib is parallel to the centerline of the boat. This trim setting will position the leech of the sail at the 30” mark on your spreader. In lighter conditions, overpowering conditions, or wavey conditions, the jib sheet should be trimmed outside of the 30” mark, depending on the conditions. It is not uncommon in windy conditions, or extreme choppy conditions to trim the jib sheet so the leech of the sail is even with the spreader tip.
Sailing Tips
- When making tuning adjustments before each race, always trend on being looser vs. tighter
- Loosening the rig tension in light air OK, but pay close attention to your headstay, if it starts to bounce around too much the rig to too loose
- As soon as your team is starting to hike, your rig tune should be set so the mast is straight when sighting up the mast slot. No leeward sag in the middle of the mast is necessary.
- When the boat is becoming overpowered, continue to tension the uppers so the leeward upper maintains tension and adjust your lowers to keep the main sail from inverting (overbend wrinkles)
- Jib sheet adjustments are critical in maintaining good boat speed. Ease the jib before large puffs or bad waves, trim the jib in during flat spots
- Proper Jib Halyard tension is critical. Make sure you have a marking system on your halyard to create repeatable settings
- When sailing downwind, it is beneficial to Fraculate the rig forward. By attaching the jib halyard to the tack fitting or having a snap shackle on a line extending from the tack fitting attached to the jib halyard, pull the rig forward to help increase downwind performance.
T-10 Quick Tuning Charts
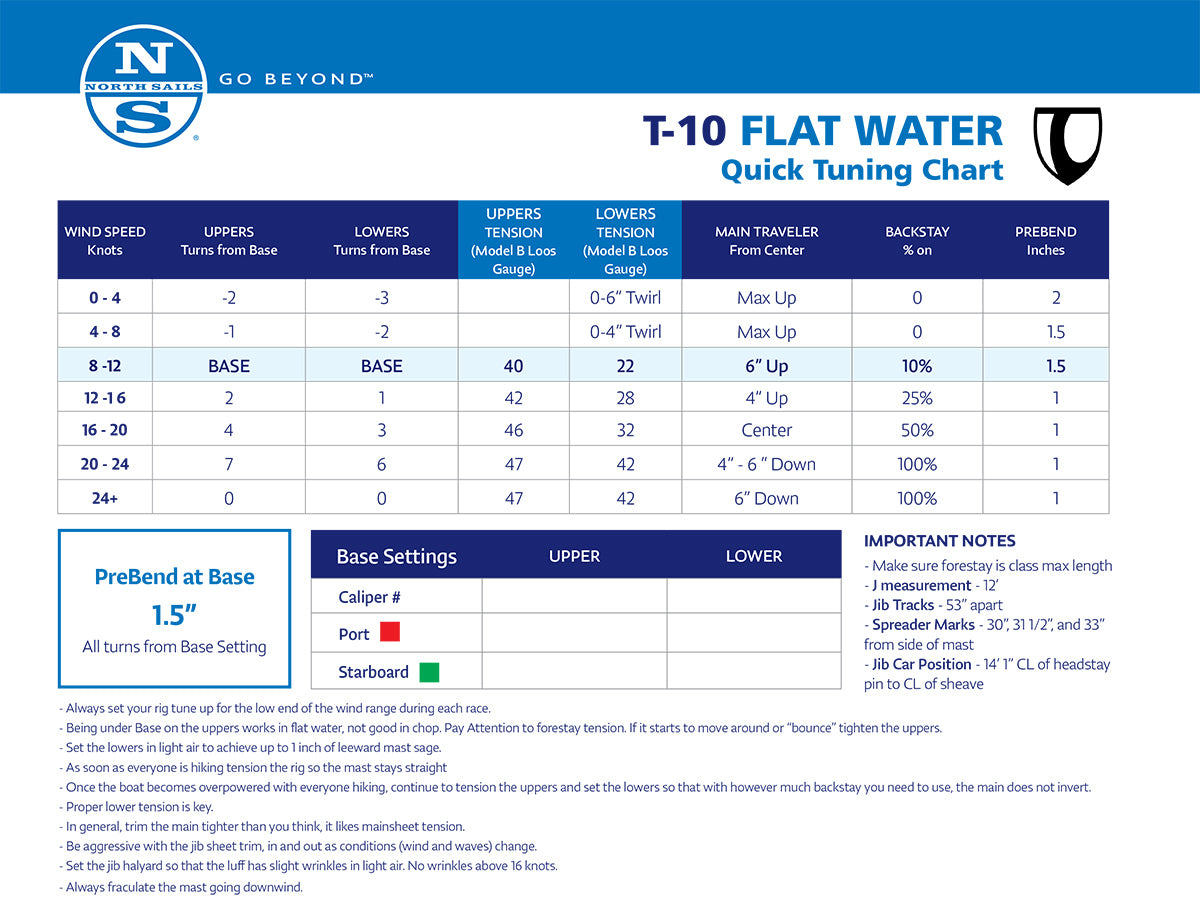 |
 |
