VIPER 640 TUNING GUIDE
MAST TUNING - CARBON MASTS
SET SPREADER DEFLECTION
Check spreader deflection measurement by placing a straightedge or string between the shroud tips at the spreaders. Measure from the side of the straightedge or string closest to the mast, to the back of the sail track. We prefer to have this between 290mm and 300mm. Ideally, set it at 295 mm (11 3/8”). If you have to choose between a deflection measurement slightly under 295 vs slightly over 295, we suggest choosing the larger deflection measurement. Ideally set the overall spreader length set to 683mm (26 ⅞”). This is measured from the mast to the tip of the spreader when the spreader is attached to the mast. You can slide the end fitting in or out on your spreader tip to achieve this measurement. Having to set your spreader length to 27” in order to achieve the proper deflection measurement is not uncommon, and therefore you shouldn’t be worried if you need to do this. 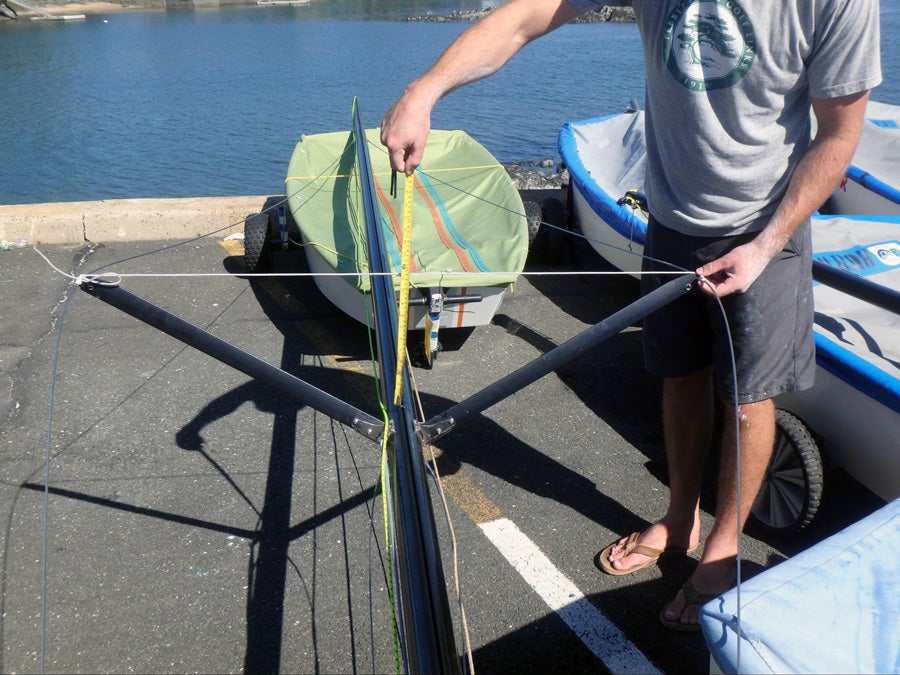
MEASURE YOUR HEADSTAY
From the lower side of the “T” fitting at the top of your headstay to the center of the pin at the bottom, this measurement is 7576 mm. We recommend taking this measurement with the headstay wire laying on the ground as straight as possible - detached from the mast.
MAST STEP POSITION
Check which hole in the step to place the aft pin by measuring from the front edge of the keel slot at the cockpit floor to the aft pin in the mast butt track. This measurement should be about 552mm (1’9 ¾” ). This often leaves 2 holes showing behind the mast on the mast butt track.
MAST PARTNERS
In order to best tune your Viper, it is necessary to restrict the forward mast movement in the partners. You can do this with the line and cleat that comes with the boat. We recommend using mast blocks in front of the mast in order to solidly control mast bend. Adding blocks provides greater headstay tension to keep the jib flat and twisted as the breeze increases. It also helps control the depth in the lower part of your mainsail. The aft block which fits against the front of the mast needs to be filed away to accommodate the angle from the rake and curve of the mast. This will help keep the blocks from climbing up. We recommend a “base” tune of ⅛” of fore-and-aft play (“wiggle”) in the blocks between the front of the mast and the front of the partners. If you are sailing in less than 6 knots, you may want to remove ¼” - ½” of blocks from “base” to induce pre-bend in the mast and slack in the headstay. Once the crew is fulling hiking, you will want to add ¼” of blocks to your “base” to keep the pre-bend and headstay targets. When you are fully de-powered and using heavy vang, you will want to add another ¼” of blocks (having +1/2” total). Your boat may require a different amount of blocking. See the tuning chart below. 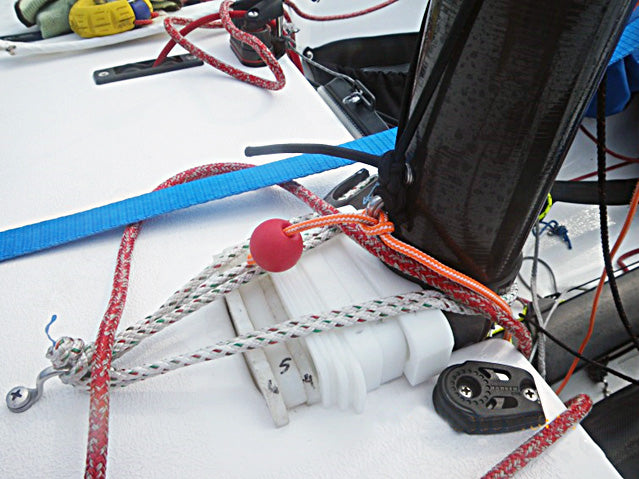 Use a line to hold the mast forward against the blocks and to keep the blocks from climbing up. This line is absolutely necessary to prevent the mast from inverting when sailing downwind in heavy air. Also remember that as you increase blocks, it may be important to increase the amount of vang tension you carry downwind to avoid mast inversion. The forward most crew has the best vantage point while sailing to look up at the mast and see how much bend is in the mast downwind. We suggest keeping the vang on snug enough to achieve about 1 inch of aft bend in the mast at a minimum while sailing in planing conditions downwind.
UPPER SHROUD TENSION
Put sufficient tension on the upper shrouds with the lowers completely slack to register 15-20 on the PT1 gauge. Sight up the track of the mast and get the track as straight as possible. Then, center the mast by hanging a decent amount of weight (like a tool kit, or a bucket full of water) on the spinnaker halyard and measuring to the shroud base on each side of the boat. The bucket should meet the rail at the same height on both sides of the boat when the mast is centered. Once the mast is centered, tighten the upper shrouds in equal turns on each side to a tension of 26. Once you have your mast straight and centered, insert enough mast blocks in front of the mast (leaving about ⅛” of play between the mast and the blocks). Your headstay tension should read about 15 on the PT1 gauge. Check pre bend by pulling the main halyard down to the goose neck against the back of the mast. Judge distance between the halyard and the back of the sail track at the max distance. This is usually just above the spreaders. You can use a pre-bend checker pulled up on the spinnaker halyard. Picture example shows how it works. The yellow line is the main halyard pulled straight to the gooseneck. 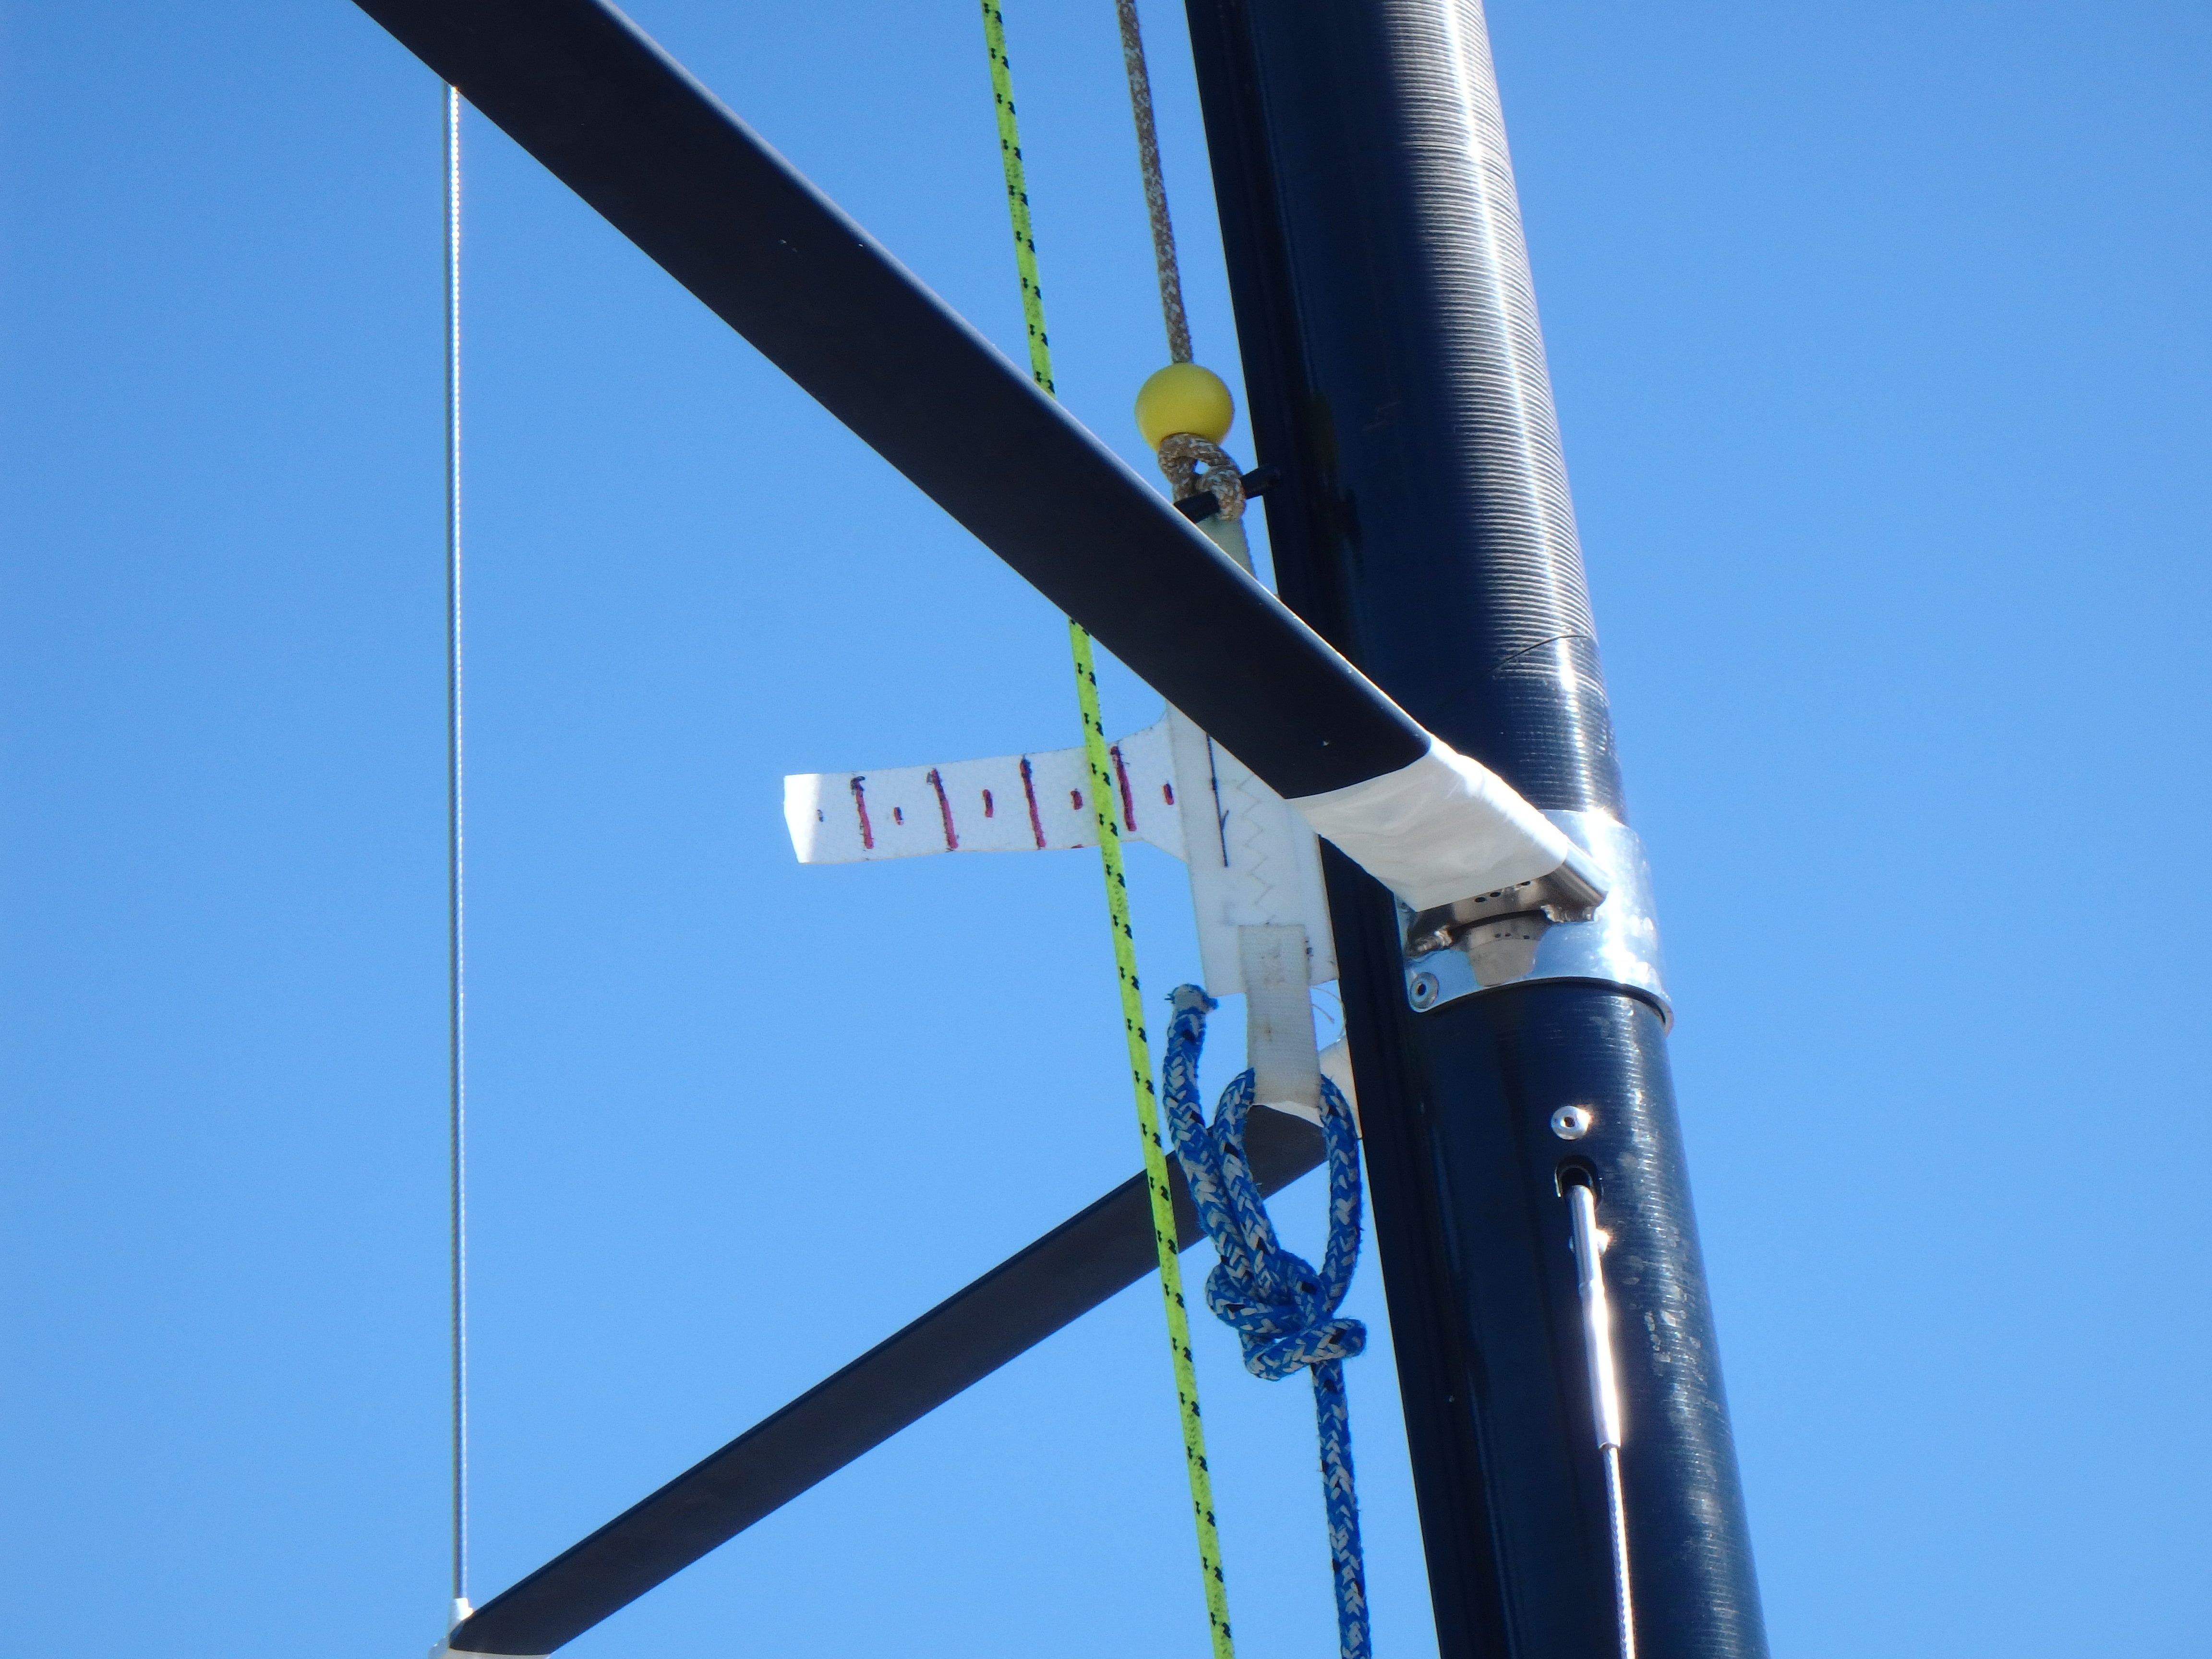 For a base setting you would like to attain 2 ¼” of pre bend with headstay 15 and uppers 26 on the PT1 Loos gauge. This is a good base setting for 7 to 10 knots. How much and how soon you need to increase rig tension to de-power and control headstay sag is dependent largely on crew weight and to some degree on sailing style and wave conditions. The chart below represents a guide for roughly 575 lbs of crew weight and the spreader sweep as outlined above. The number of turns will likely vary from boat to boat:
|
Wind (TWS) |
Inches of Blocks |
Turns from Base Uppers |
Turns from Base Lowers |
Shroud Tension |
Headstay Tension |
| 0-4 | - 1/4” | - 2 | - 1.5 | 20 | 10 |
| 5-7 | - 1/8” | - 1 | - 1 | 23 | 12 |
| 7-10 |
BASE (1/8” wiggle) |
BASE |
-
BASE |
26 | 15 |
| 10-13 | + 1/8” | + 2 | + 1 | 31 | 19 |
| 12-14 | + 1/4” | + 4 | + 2 | 34.5 | 24 |
| 14-16 | + 1/4” | + 6 | + 3 | 37 | 27 |
| 15-18 | + 1/2” | + 8 | + 4 | 39 | 30.5 |
| 18-20 | + 1/2” | + 10 | + 5 | 40 | 32.5 |
| 20+ | + 1/2” | + 12 | + 6 | 41.5 | 33.5 |
LOWER SHROUDS TENSION
To find “base” for your lowers, put a mark on each lower shroud and each upper shroud that measures 4ft up from the deck on each shroud. Now pull the lower shroud towards the upper shroud just barely finger tight and measure the distance between the two marks. This measurement should be about 5 ½”. This technique gets you in the ballpark, but the tension on the lowers need to be adjusted precisely under load while sailing. For this reason we recommend putting turnbuckles on the lowers. In under 8 knots, your lowers should be set such that when you sight up the mast while sailing, you notice about ¼” of leeward “sag” at the spreaders. Once your crew is on the rail, you want to tension your lowers until the mast looks very straight with little to no leeward sag in the middle of the mast when sighting up from the bottom. As you go through the rig tune as the breeze comes up, adjust the lowers to maintain a straight mast. If you are over-powered and trying to execute a “bow down” mode in big breeze, you might tension the lowers enough to see about ¼” of mast “poke” (poking to windward) at the spreaders. Note: It is critical to not over tension the lower shrouds in heavy air. If the lower shrouds are too tight, it could contribute to inverting the mast while sailing downwind and causing breakage. The more tension you carry on the lowers, the more vang tension you should carry downwind.
SAIL TRIM
JIB LEAD POSITION
*** For a jib tack shackle height of 2 ¾” *** The standard shackle on a Viper is 2 inches. We suggest adding a ¾ inch twist shackle to the 2 inch shackle provided with the boat to achieve the optimum 2 ¾” jib tack height. Generally the jib lead should be set more forward in light air to allow the foot to have 6” of round in it. This will have 7 or 8 holes showing behind the jib lead. As soon as the breeze is strong enough to justify hiking, the lead should come aft as much as needed to flatten the foot nearly to a straight line when the leech is properly trimmed. This setting typically has 5 holes showing behind the jib lead.
JIB SHEET TENSION
Your North jib has a leech telltale ¾ of the way up he leech. This telltale can be observed by the jib trimmer from the leeward side in light air. In any hiking breeze it can be observed through the luff window in the main. This is to use in judging sheet tension. In most conditions trim the jib in until this telltale no longer streams aft, then ease it out until it just streams aft. Generally the middle batten in the jib will point straight aft when it is properly trimmed. The top jib batten is full length. In under 6 knots, use the soft batten provided. As soon as the breeze is over 6 knots it is important to change to the stiffer top batten. This helps keep the leech open as the wind increases. Once you are fully de- powered, go to the stiffest batten you have, and you might consider putting the light air batten AND the heavy air batten in at the same time!
WEATHER SHEETING
Many teams have found that weather sheeting can be quite effective sailing upwind in winds from 5-15 knots, or until your team is fully overpowered. A general base setting while weather sheeting puts the clew of the jib directly over the top of the inboard fiberglass combing that the jib track is recessed into. This is about 2 inches of clew movement to weather, and about 4 inches of weather jib sheet pulled through the cleat (because the jib sheets are a 2:1 purchase). The further aft you move the jib car, the more effective weather sheeting becomes. 
JIB SHEET TENSION
Your North jib has a leech telltale ¾ of the way up the leech, and another one off the leech at the top batten. This telltale can be observed by the jib trimmer from the leeward side in light air. In any hiking breeze it can be observed through the luff window in the main, or leaning forward and looking in front of the mast from the rail. This is used to judge sheet tension. In most conditions, trim the jib in until this no longer streams aft, then ease it out until it just streams aft. Generally the middle batten in the jib will point straight aft when it is properly trimmed.
TOP JIB BATTEN
The top jib batten is full length. In under 6 knots, use the soft batten provided. As soon as the breeze is over 6 knots it is important to change to the stiffer, standard top batten. This helps keep the leech open as the wind increases. Once you are fully de-powered, go to the stiffest batten you have, and you might consider putting the light air batten AND the heavy air batten in at the same time!
MAINSAIL OUTHAUL
Easing the outhaul in light air powers up the main. Judge the outhaul tension at the mid-point of the boom. Look at the distance between the side of the boom and the foot of the sail. In rough water light air conditions easing the outhaul to open the foot as much as 3-5” can be fast. In smoother water generally keep it tighter. As soon as there is enough wind to hike, tighten so the sail lays against the side of the boom.
MAINSHEET TENSION
In light and moderate conditions when heeling can be controlled with hiking, the aft end of the upper battens (on either side of the Viper insignia) should be parallel to the boom. This may require quite a lot of sheet tension. In stronger breeze, applying vang tension and a couple of inches of sheet ease will allow you to keep the jib pressed, and the bow down with the boat moving forward. The goal here is to find the angle of heel that allows the boat to sail with as little helm as possible. Use vang adjustments, mainsheet adjustments, and feathering to keep that angle of heel as consistent as possible. Remember that the mainsheet is the biggest controller of your head stay tension. If you need to ease your main sheet to keep the boat flat, be sure you have adequate mast blocks and lower shroud tension. If the head stay still looks too “saggy,” ease the jib sheet an inch or two to de-power the jib and straighten the head stay.
GNAV (Reckik in Britain, or Vang)
Under 10 knots make sure the gnav isn’t applying any downward pressure on the boom. This applies for both upwind and downwind. As the wind becomes stronger, apply progressively more tension to keep the boom down as the mainsheet is eased in the puffs. Not only does the Gnav help keep leech tension when easing the main, it bends the middle and bottom of the mast which flattens the main and de-powers it. It is only necessary to pull max vang tension on if it is choppy enough that you need to use the “bow down” mode to power through the chop. It is essential to have the appropriate amount of blocks in front of the mast to ensure the headstay stays tight.
GNAV & CUNNINGHAM RELATIONSHIP
As you will notice, when you progressively apply more vang tension, the mast will bend progressively more, therefore the luff of the mainsail will develop progressively more wrinkles. As you pull on the vang to depower, ideally you will pull the cunningham on as well to help smooth out the luff of the sail. If you ease the vang (i.e. you sail into a lull), make sure to ease the cunningham too. The two controls (vang and cunningham) should be adjusted together appropriately.


